Ticket Actions
Ticket actions allow different interactions with a ticket. in doing so, it is, for example, possible to send an e-mail directly from a ticket or to modify information contained in the ticket subsequently.
For ticket actions, a distinction is to be made between direct and indirect actions. Direct actions are displayed below the Actions tab in the ticket. In case of an indirect action, it will be displayed at different places within the ticket,
In order to have a ticket action performed by a user, different conditions need to be met:
- The user has to have the required rights on the ticket schema of the respective ticket.
- The ticket has to have a certain status configured in the ticket action.
- The executing user needs to be configured in the action either in the appropriate group or for this status on himself.
In the following, the common configuration of a ticket action will be explained. The special configuration of individual actions is dealt with in the Actions description.
Note: General behavior when assigning tickets to owner groups
When setting a new owner user of a ticket (applies to Actions and plug-ins), the owner group is set by priorities in the following order:
- If the new owner user is a direct member of the current owner group, the owner group is not changed.
- If the new owner user is not a direct member, there is a check, whether the user's main group is part of the current owner groups hierarchy. If so, the owner group is set to the user's main group.
- If 1. and 2. don't apply, the new owner user's closest sub group membership to the current owner group's hierarchy is determined and set as new owner group.
- If 3. doesn't return any sub group, the new owner group is set to the new owner user's main group.
Additionally, if there is a restriction to the ticket action Assign ticket, like e.g. Assign to this group and its sub groups, only this group and it's sub groups are taken into account. The ticket cannot be assigned to users, who are not part of this specific group's hierarchy.
Chapters:
On the Ticket statuses tab can be defined for every single action, in which ticket statuses it is to be visible and usable. The action will then be usable in the ticket during which this ticket has the respective ticket status.
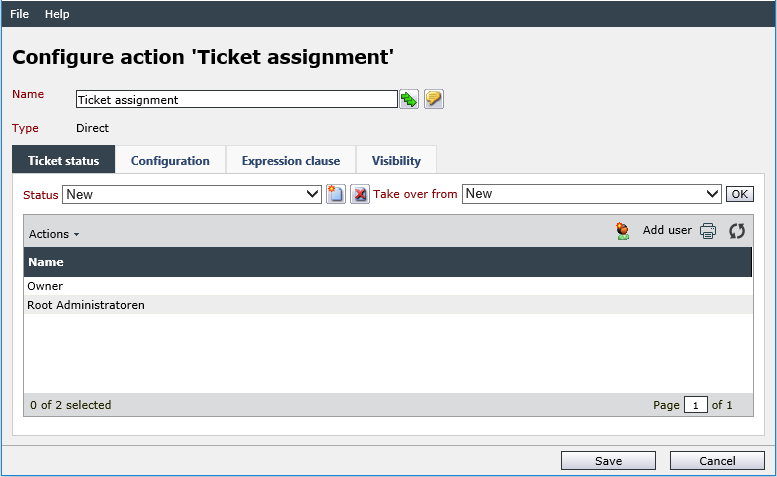
It is possible to select the designated status, in which the action is to be available, under Status. Users and/or groups who are supposed to perform the action later on can be stored in the table below. If an action is to be available for the same users in other statuses as well, a new status can simply be selected and the previously configured status can be set in the next field Take over from. By clicking on OK afterwards, the configuration will be adopted for the new status.
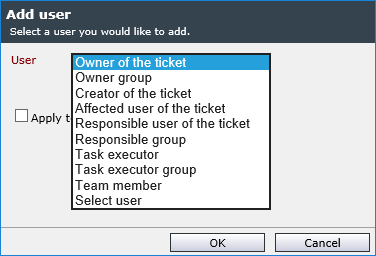
As users, the following ticket roles can be used for an action:
Owner of the ticket: Only the current owner of the ticket can use this action. Unless a ticket has been accepted, the user will not be the owner. The action is available for the Owner group if Owner of the ticket is selected as an option. In this case, the specific ticket has no owner, but an owner group.
Owner group: The owner’s entire group (e.g. a support group) can access the action.
Creator of the ticket: Only the user that created the ticket can access the action.
Affected user of the ticket: Only the affected user of the ticket can use this action.
Affected group: All members of the affected user’s group can use the action.
Responsible user of the ticket: The action can be performed by a user listed in the ticket as responsible.
Responsible group: All members of the group of the user listed as responsible in the ticket can execute the action.
Task executor: A user handling a task created from the ticket can execute the action.
Task executor group: All members of a group which the task executor belongs to can execute the respective action.
Team member: Only members of the team can use the action.
Select user: Allows selecting a user or a group via a user browser, which can always see and execute the action, using the search function.
If a user role is to be added to all previously configured statuses, the option "Apply to all statuses" can be used. This option, however, will only affect already configured statuses. When another status will be edited later on, the user or group will not be added there automatically.
To remove a user role from the list, select it in the table and choose the "Delete" option from the Actions menu. If you want to remove the selected user role from every configured status, select "Delete from all statuses".
Under Configuration, several configuration options can be found depending on the actions, which will be explained in the following sections.
It is possible to enter an additional expression which can restrict the visibility and usability of an action. The third possibility of displaying a ticket action under certain circumstances only, is, next to ticket status and added users, the Expression clause.
The expression may return nothing but True or False (Boolean). If the expression is True, the ticket action will be displayed for the configured user/users as soon as the ticket has reached a certain status.
In several ticket actions, an additional tab Visibility can be found. On this tab can be determined the visibility of the objects to be created. The default configurations for the visibility are set in the ticket schema dialog. Via the settings in the ticket actions, they can be overwritten.
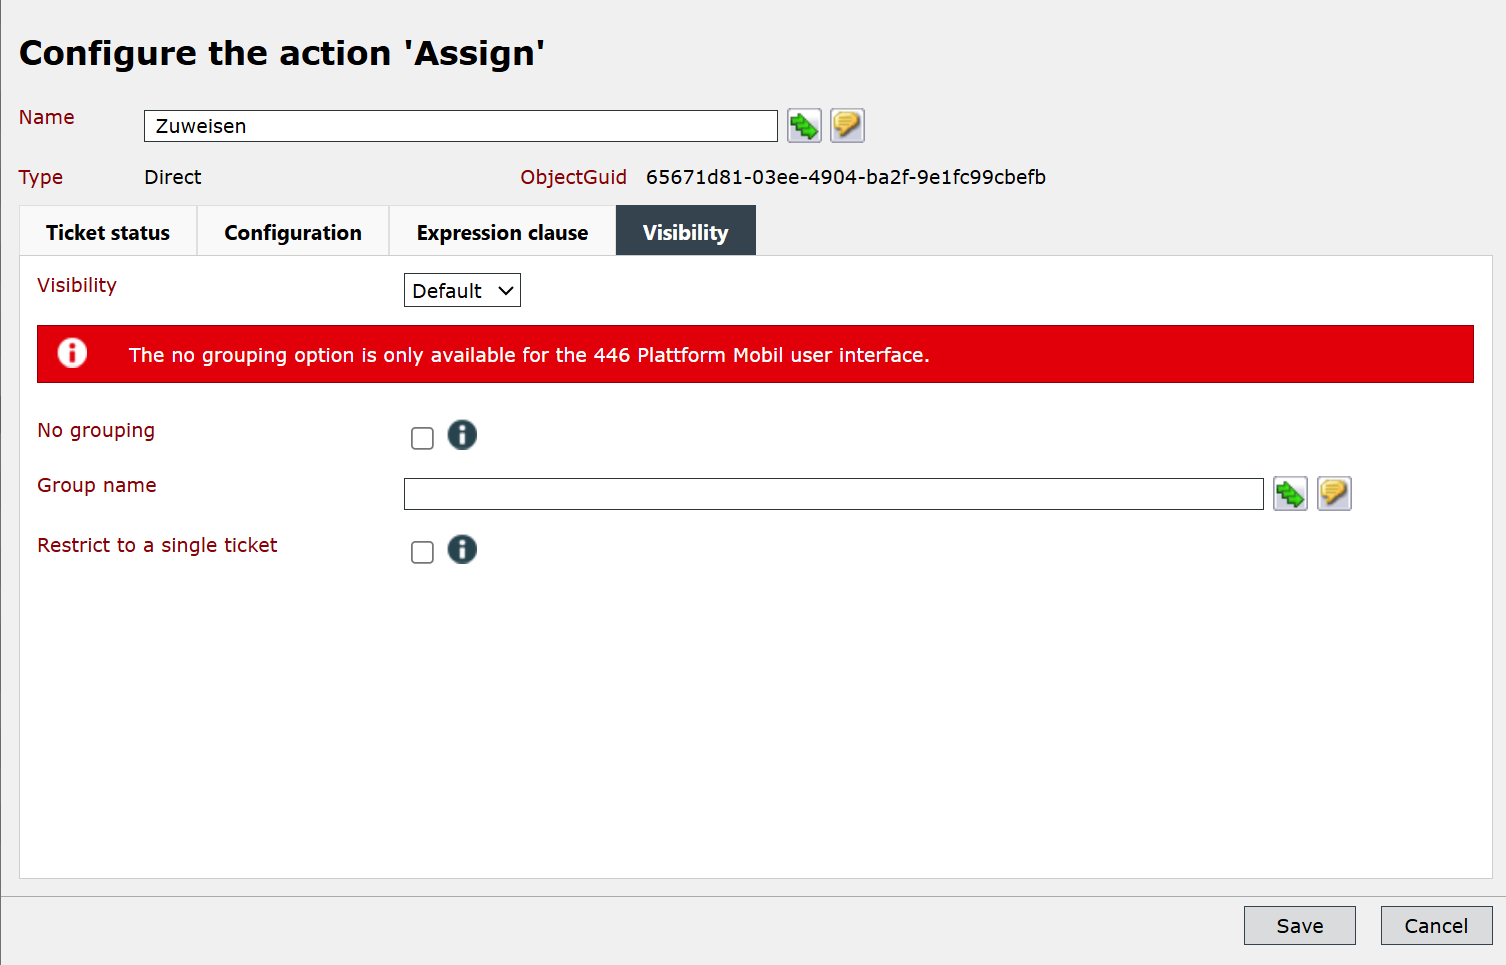
A grouping function can be used in the Visibility tab for the following ticket actions. This grouping allows different ticket actions of the same action type to be combined in the Actions menu of the ticket:
Action marked as Direct:
- External link
- Extract ticket from container
- Reactivate ticket
- Send e-mail
- Show form
- Start workflow
Action marked as Indirect:
- Change additional affected users
- Change affected user
- Change geographical position
- Create KB article from ticket
- Convert ticket
- Duplicate ticket
- Forward mail
- Link ticket with KB article
- Take over ticket
Configuration:
No grouping: If activated, the action will be shown on the first layer inside the action menu in the top menu of the ticket.
Grouping: A name can be put in, which will be used to group related ticket actions of the same type.
Example:
There are three actions of the action type Start workflow configured for a ticket.
- Workflow A
- Workflow B
- Workflow C
Workflow A and Workflow B have the same grouping name Workflow group.
Workflow C has no specific grouping settings.
- On the first layer of the top ticket action menu a group Start workflow get's created.
- On the second layer there is the ungrouped action Workflow C, as well as the configured group Workflow group.
- On the third layer, inside the Workflow group, actions Workflow A and Workflow B will be displayed.
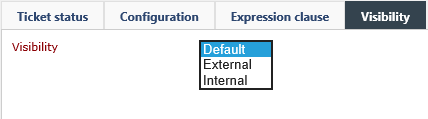
Further ticket actions with visibility settings can be marked internally or externally. For example, an additional ticket action Internal Comment can be added, for which the visibility will be set to Internal. Consequently, all comments created via this action will be marked as Internal, irrespective of the default settings configured in the ticket schema.
Note:
In various actions, you can find the option Covered statuses on the Configuration tab. Due to these actions causing a status or workflow change, you can determine via this option, which statuses are to be marked as Achieved by the SLM nevertheless.
This action allows for adding comments to a ticket.
Configuration
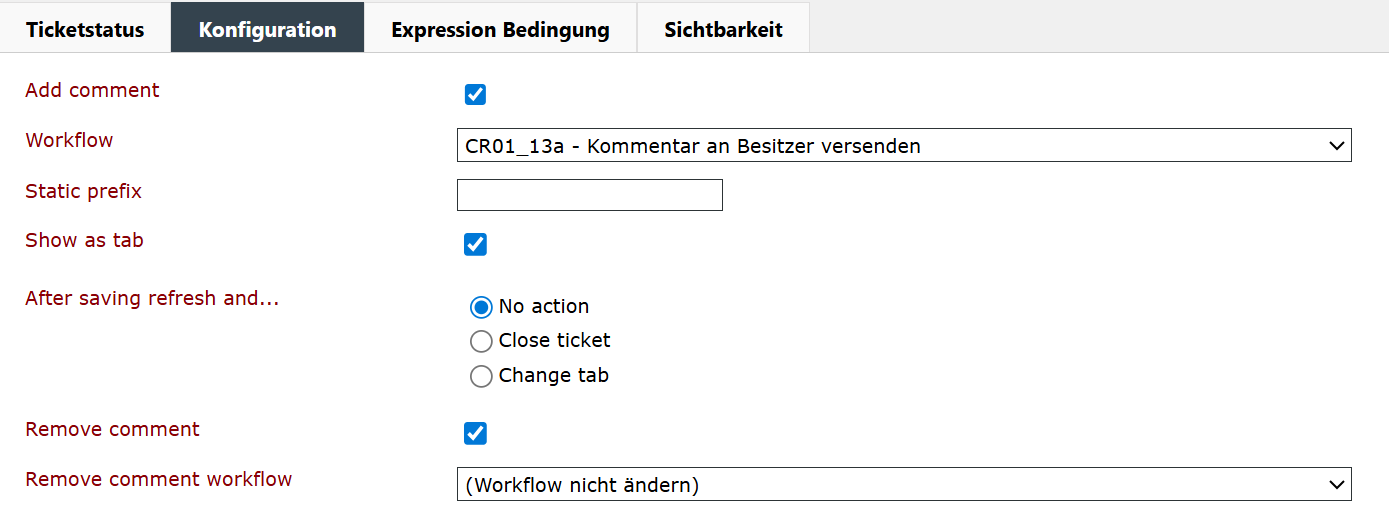
Add comment: This option enables the addition of comments.
Workflow: If a workflow has been defined here, it will be triggered for a ticket, as soon as a comment has been added.
Static prefix: Inserts a prefix right in front of the comment automatically.
Show as tab: This option can either be configured as a tab or as an action on the Comments tab.
After saving refresh and ...: This option specifies, which action will be executed after the ticket action. The available options are:
- No action: Die ticket action is executed.
- Close ticket: After executing the action, the ticket will switch to the status for Closed.
- Change tab: The tab specified here will be opened in the side bar of the ticket.
Remove comment: This option enables the removal of comments.
Remove comment workflow: The workflow selected here is triggered when a comment is deleted.
Executing the Action
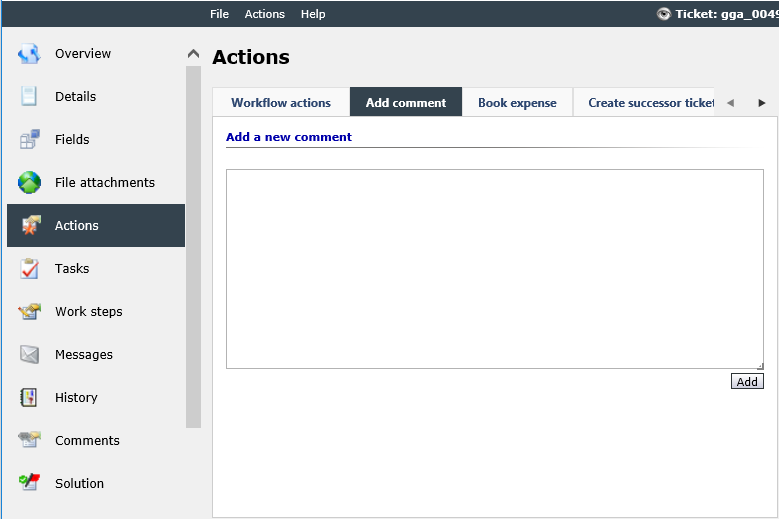
The action can be executed via Add comment on the Actions tab of a ticket, if the option Show as tab has been activated.
If this option has not been activated, the action can be executed on the Comments tab.
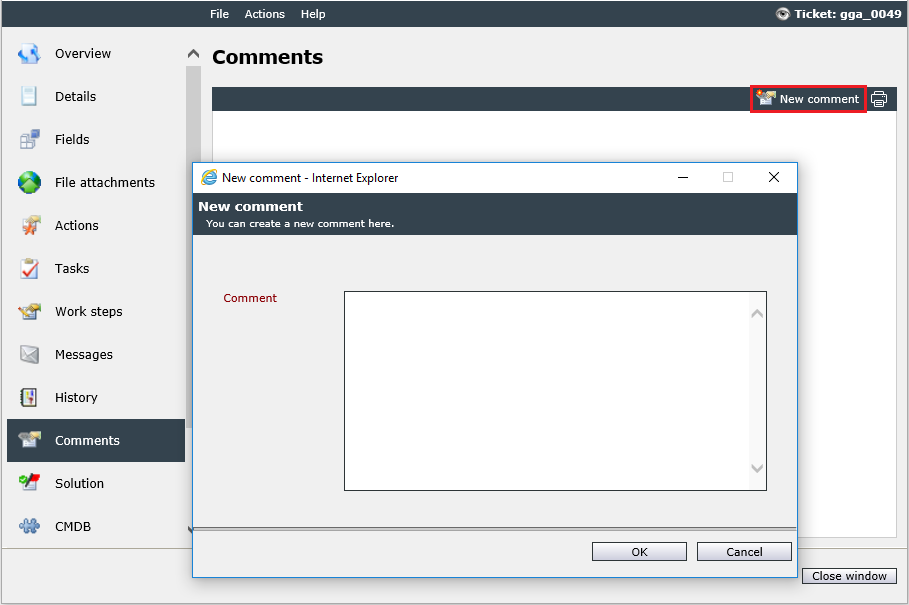
Comments can also be entered via the Comments tab.
- After clicking on the button New comment, a dialog for creating a new comment is opened.
- Comments will be attached to the previously defined prefix without a space.
- If there are several executable comment actions available, the desired action can be selected via a drop-down list.
On the Comments tab, comments can be deleted if this has been configured in an action.

Click the button with the X in front of the comment entry to delete the comment. A dialog box will open, displaying the selected comment once more. If multiple comment actions are configured with the delete option, you can also select an action in the dialog box. Clicking OK confirms the deletion. A log entry is created, indicating the date and time the comment was deleted. This information is also available at the Overview tab.
Note:
If the EnableWipeTicketContent configuration key is enabled, a comment can be completely removed from the system. If the key is enabled, you can select the Comment wipe option in the drop-down box in the delete dialog. At the Overview tab all entries belonging to this comment are removed.
With this action, a ticket can be added to an existing container ticket.
Configuration
During the configuration, the only required setting is whether another workflow is to be used for the respective ticket when this action is executed.
Executing the Action
This action can be found in the top menu, under Actions.
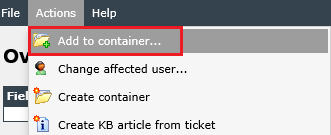
Enter the ticket ID of the designated container ticket and click on the Complete button. The ticket has now been added to the container.
This action is needed in order to be able to book an expense directly from the ticket without having to switch to the expense overview first. It provides a user with the option to book the expense directly in the ticket, on an additional tab under Actions. For this purpose, the user does not need the right to the expense overview.
Configuration
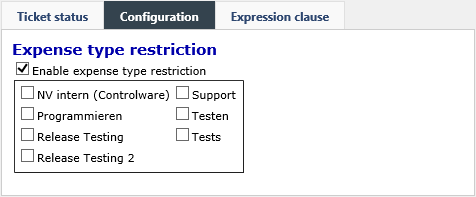
During the configuration of the ticket action, the only specification necessary is whether the selection of the expense types is to be limited. For this purpose, the option Activate limitation to expense types is available. If it is activated, all available expense types will be displayed and can be selected individually.
The extended configuration is used for deactivating certain selection fields. The user will be still able to see them, but not to change them. For this purpose, the field to be deactivated has to be specified in the text box. The following can be selected:
- HideUser: deactivates the selection of the user
- HideType: deactivates the selection of an expense type
- HideClearingType: deactivates the selection of the clearing type
Warning:
The extended configuration must explicitly be activated in the databases.
Every option is to be written into a separate line here.
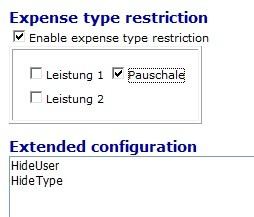
The configuration in the figure above will look as follows when the action will be executed:
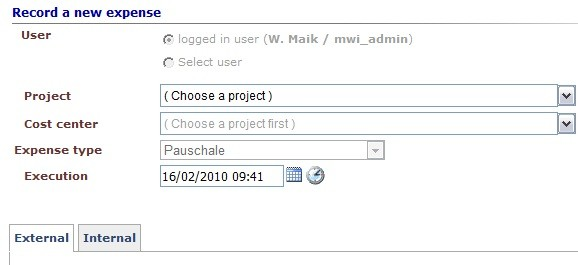
The user selection and the expense type have been deactivated and thus cannot be changed by the user.
Executing the Action
In the ticket, the action Book expense can be executed by the user on the Actions tab.
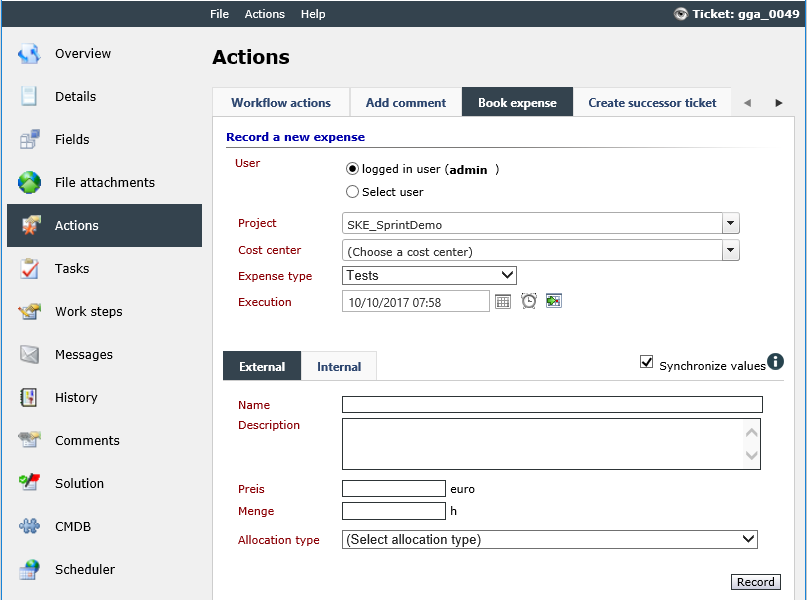
There are only few differences between the form for creating expenses and the one of the expense page. For the External and Internal arrays, different information can be entered respectively, if the owner has permissions to both of them. If only one of both areas is displayed, the respective array not displayed will be synchronized automatically when the expense is booked.
Alternatively, expenses can be booked on the Expenses tab in the ticket. For this purpose, the button New expense is available. Similar to the list of expenses and as described in the Expense Management chapter, multiple expenses can be booked at once by selecting Book several expenses in the Actions menu.
Via this action, an origin ticket as well as tickets and tasks created from this ticket can be canceled. In the process, the status set as the canceled status for the tickets’ and tasks’ schema will be set.
Configuration
The configuration of this action is fairly simple. If the ticket this action is to be executed from is to be closed as well, the option Cancel ticket associated to this action has to be checked.
Executing the Action
The action can be executed by selecting the tab for the action on the Actions tab on the right and then using the Cancel button.
Here, the affected user of a ticket can be changed or additional affected users can be edited. 
Configuration
It must be defined whether the tickets are to run through another workflow after the affected user has been changed. Furthermore, restrictions for the user browser can be defined.
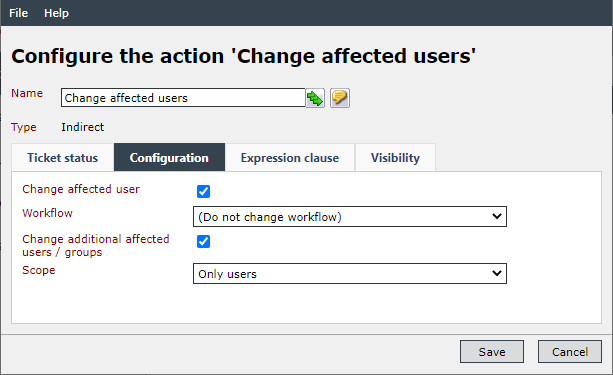
The following options are possible:
- Only groups
- Only users
- Users and groups
Executing the Action
The action is can be found as Change affected user ... under Actions in the top menu.
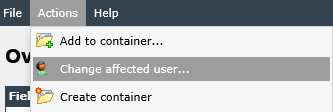
In the following dialog, the new affected user can be selected. If the user is in more than one group, the affected group can be selected here as well.
Change additional affected users / groups option:
In an open ticket, the entry Modify list of additional affected users can be found under Actions in the top menu. In the in the following dialog, users and groups can be selected via the New user button.
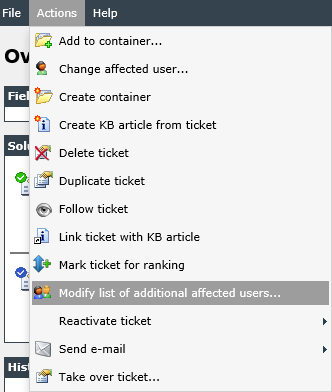
You can find the list of affected users on the Details tab in the ticket dialog under Affected users. This action does not change the affected user specified in the header data of the ticket.
Via this action, another user can become the creator of a ticket.
Configuration
In the menu item Configuration, a workflow the ticket has to run through after the creator has been changed can be selected. If the field has been left empty, no extra workflow will be triggered.
Executing the Action
In order to change the creator of a ticket, the action Change creator has to be selected on the Actions tab. The desired user can now be searched and selected via the user browser. After the dialog has been closed, the action will be completed by clicking on the Change button. As soon as the change has been saved by the system, the new user will be the ticket’s creator.
This action allows you to change the geographical position.
Configuration
This action does not require a separate configuration.
Executing the Action
The Change geographical position button is available on the Actions tab. With this button it is possible to enter the latitude and longitude again.
Via this action, the service transaction, the service, and the service catalog of a ticket can be changed. The change is limited to service transactions based on the same process schema.
Note:
This action is only available for tickets of process schemas.
Configuration
If the service transaction of a ticket is changed, it may be necessary to move the ticket into another workflow or to let it execute additional workflow tasks. The option Loopway workflow allows for selecting a workflow the ticket is to be moved into.
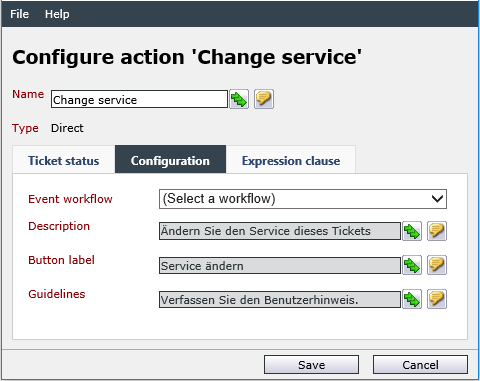
Via the rest of the options in this action’s configuration, various texts can be defined, e.g. the label of the button. The explanatory text will be displayed on top of the items during the execution of the action and can be used for giving hints on what to select and how this action works to the executing user.
Executing the Action
The action will be displayed as a separate tab on the Actions Tab in the ticket.
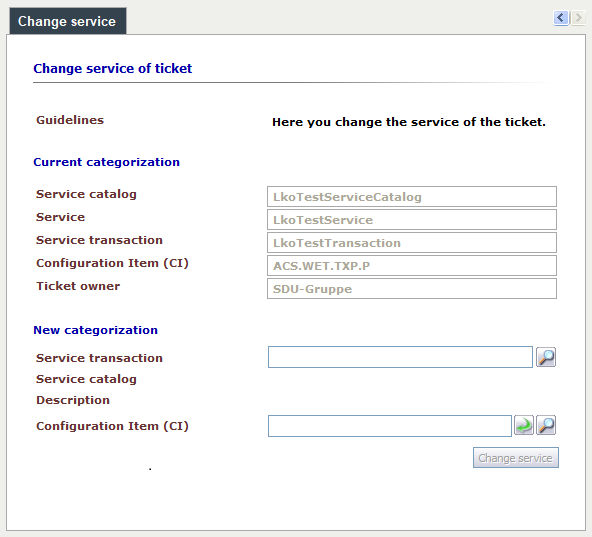
When the action is executed, the current service transaction with the corresponding CI will be displayed once again. Below it, you can select the new service transaction (the available service transactions are limited to those based on the same process schema). Subsequently, the change can be confirmed and applied via a click on the Change service button.
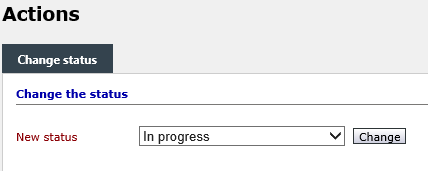
With this action, a ticket’s status can be changed manually.
Warning:
It is mandatory to coordinate this action with the workflows.
Configuration
No separate configuration is necessary for this action.
Executing of the Action
The tab Change status can be found on the Actions tab. Here, a new status for the ticket can be selected.
This action allows for setting downtimes for CIs linked to the ticket.
Configuration
The configuration dialog offers the following options:
CI schemas: Limits the selection for CI schemas. If other objects apart from IT equipment are managed in the CMDB as well, the selection can be limited to computer hardware, for example. Multiple items can be selected by using the [SHIFT) or [CTRL] key. However, at least one schema has to be selected here, as otherwise no CIs will be displayed.
"From" value prefill expression: An expression for reading out the start date of the down-time, e.g. from a ticket field, can be specified here.
"To" value prefill expressions: An expression for reading out the end date of the down-time, e.g. from a ticket field, can be specified here.
The following three controls are used for editing the table view in the ticket: "CI" column header text, "From" column header text, and "To" column header text allow for an individual, localized modification of this table.
Workflow: If a ticket is to run through another workflow after this action has been executed, this workflow can be specified here.
Executing the Action
In order to use this action, the ticket has to include at least one linked CI from a CI schema allowed in the configuration. On the Actions tab, a table displays all the CIs downtimes can be created for.
If expressions for the from-to-values have been entered, the table entries are predefined.
After all values have been entered correctly, pressing the Save button writes all downtimes in the corresponding CI.
New downtimes can be distinguished from existing ones via the Info icon.
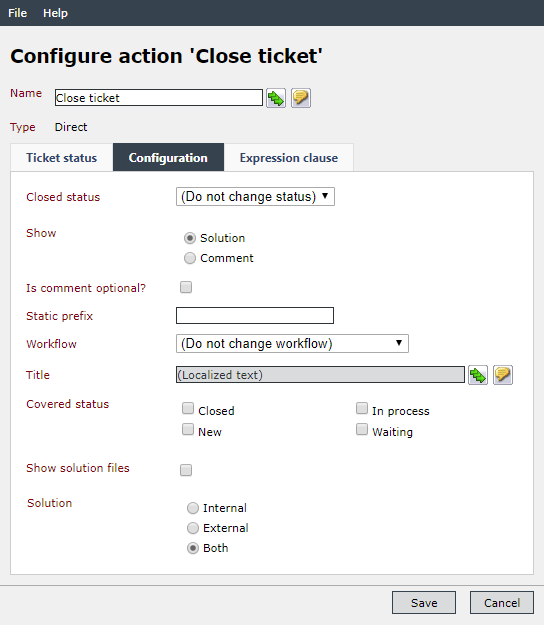
With this action, a ticket can be closed immediately, without having to run through the entire workflow first.
Configuration
Closed status: Specifies, which status the closed tickets are supposed to obtain.
Show: Defines, whether a comment or a solution is to be entered later on for closing the ticket.
Is comment optional?: If this option is activated, entering a comment is optional. Otherwise an appropriate entry must be made (default: Not activated).
Static prefix: If Comment has been selected under Show, this option defines a static prefix for it. It will be put directly in front of the comment (without space) later on. The static prefix will be ignored for the option Solution.
Workflow: The workflow determined here will be run through by tickets closed via this action.
Title: A title for the action can be entered here. It will be only displayed on top of the tab for this action on the Actions tab later on.
Covered statuses: This option defines the statuses to be marked as reached by SLM to avoid a subsequent escalation.
Solution: Depending on the setting made here, an internal, external, or both solutions can be entered when executing the action.
Executing the Action
The action Close ticket will be available in the Actions tab of a ticket. Depending on whether Solution or Comment has been configured, it is possible to enter one or the other. Via the Close button, a comment will be placed or a solution recorded and then the ticket will be closed afterwards.
In order to convert a ticket from one ticket schema into another, this action is needed. The converted ticket then will be subject to the actions and workflows of the target schema.
Configuration
As the ticket conversions are configured in the settings (see also Ticket Conversions), this action does not have to be configured separately.
However, a ticket conversion template has to be available for the ticket schema.
Executing the Action
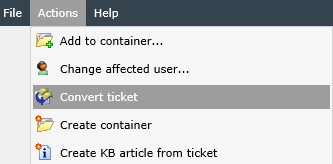
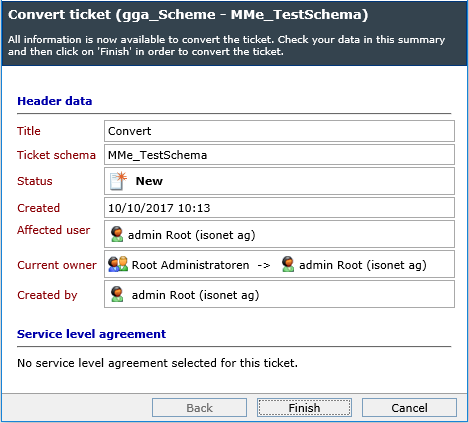
Under Actions in the top menu of the ticket, the option Convert ticket can be found.
In the following dialog, information on the conversion will be displayed. If it meets all requirements, a click on the Finish button will create the new ticket.
Via this activity, tickets from the same ticket schema can be pooled, e.g. if many tickets on the same problem are available. These can be arranged into a container, leading to only one container instead of many different tickets. The ticket list, however, will still display the individual tickets.
Configuration
During the configuration, a workflow can be defined, which the newly created container has to run through later on.
Executing the Action
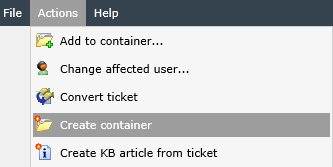
For creating a new container, the menu item Create container can be found in the Actions menu.
After selecting the menu item, a dialog will open, in which the tickets to be added to the container can be selected.
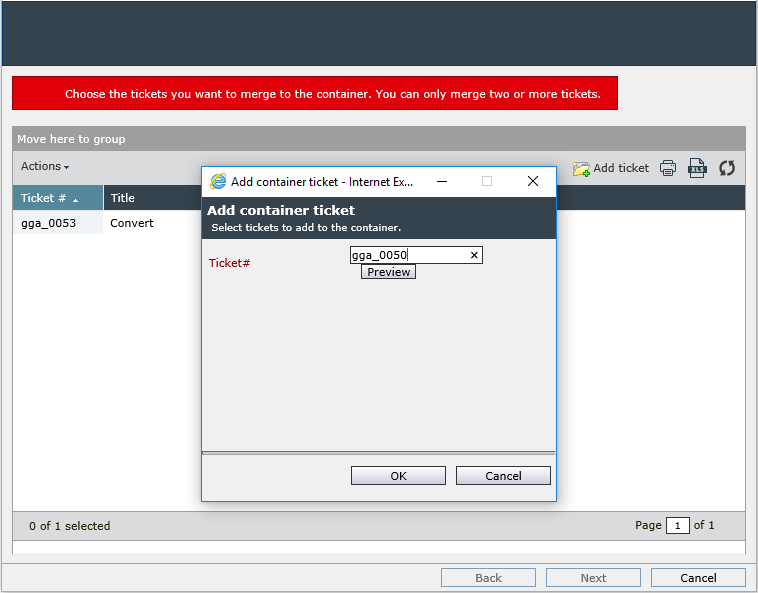
At least one further ticket has to be added to the container; otherwise the container cannot be created.
Next, the transfer ticket has to be selected. This is a ticket, which has already reached the desired progress in the process (status). All the other tickets will then adopt this status as well.
In the last step, the name and description of the container ticket have to be defined. In the next dialog, the solution of the container ticket can either be adopted from an existing ticket or entered manually. Eventually, the new owner of the container is to be selected.
After this information has been entered, the wizard for creating a container ticket has been completed and the new container ticket will open.
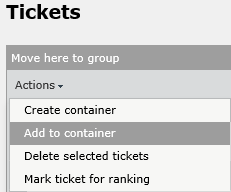
Alternatively, it is also possible to create and extend containers via the ticket list. The following two entries in the Actions menu serve this purpose:
- Create container: If multiple similar tickets have been selected using [SHIFT] or [CTRL], and the action Create container or Add ticket is available for them, a container can be created via this button,
- Add to container: If an existing container is available, one or multiple tickets can be added to it via this button.
This action will assist in converting a ticket solution into a Knowledge Base article. Thus, an article for the Knowledge Base can be created directly and without detour.
Configuration
The desired field mappings have to be created, i.e. which ticket field content is to be transferred to which KB article field.
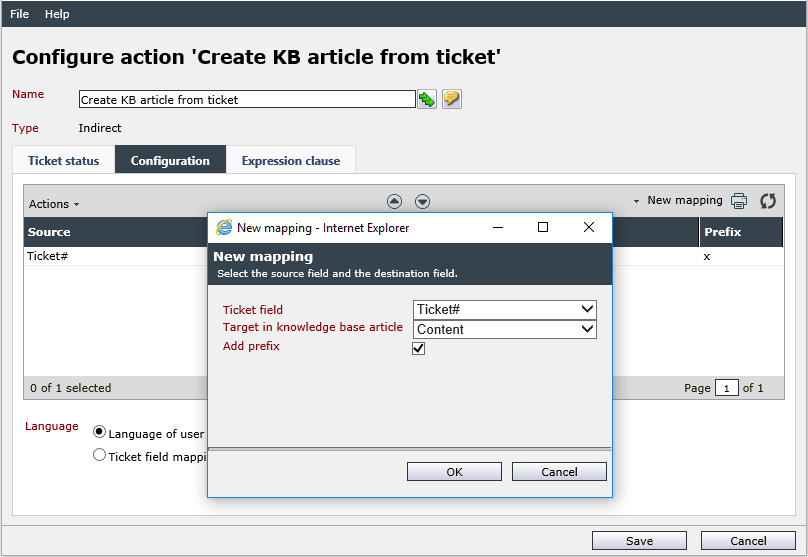
Via the Actions menu, these mappings can be deleted again as well.
Language: Defines the language the KB article is to be created in. The user’s language depends on the language set in the user settings. Via a ticket field mapping, it is possible to create customized ticket field language mappings.
Executing the Action
In the Actions menu of the ticket, the menu item Create KB article from ticket will now be available.
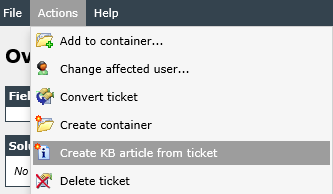
Via this option, a KB article will be created automatically using the preset field mappings. It will open automatically after the conversion has been completed.
With this action, schedules and tasks for users can be created.
Note:
An Exchange connection in necessary for this action. An Exchange alias is required for every user an appointment or task is to be created for.
Configuration
Free/Busy Setting: The availabilities from the SLM can be selected (see also Configuration of Free/Busy times).
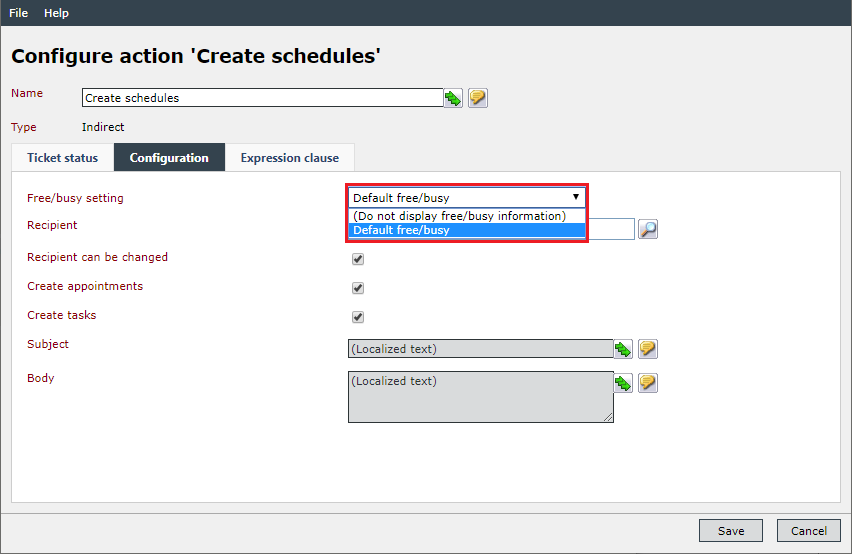
Recipient: Specifies a predefined user as the recipient of an appointment.
Recipient can be changed: If this option is activated, the recipient can be changed after appointment creation.
Create appointments: If this option is activated, the user is allowed to create appointments.
Create tasks: If this option is activated, the user is allowed to create tasks.
Note:
In order to use the action Create schedules, at least one of the options Create appointments or Create tasks has to be activated.
Subject: The subject of the appointment or task can be specified here. It is possible to enter a static text or to use expressions (e.g. access to a certain ticket field). For multilingual systems, a different expression can be entered for every available language.
Body: The content of the appointment or task can be specified here. It is possible to enter a static text or to use expressions (e.g. access to a certain ticket field). For multilingual systems, a different expression can be entered for every available language.
Executing the Action
The button New appointment can be found on the Scheduler tab in the ticket. Here, an appointment or a task can be created for a user.
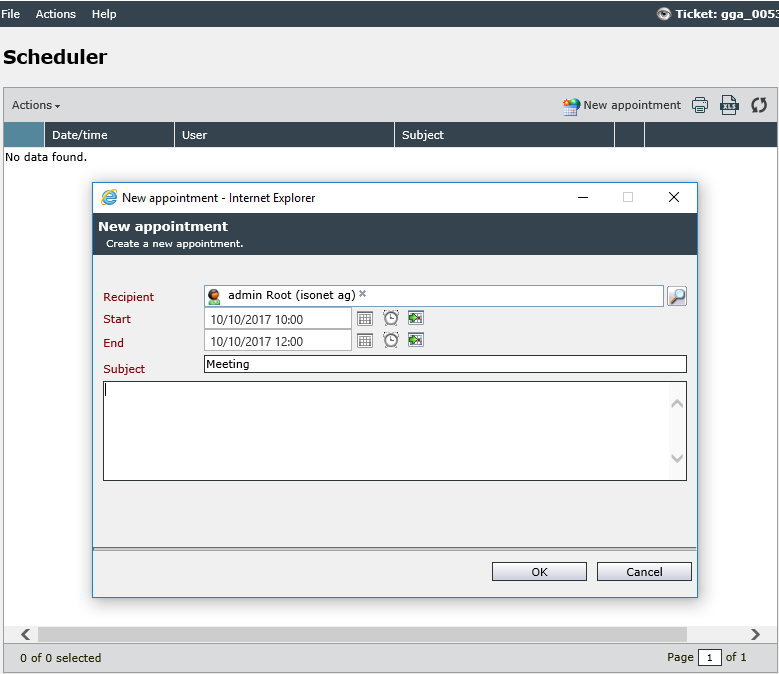
A ticket or its solution can possibly result in further tickets, which have to be handled as well. This ticket action allows for creating a such a successor ticket to an existing one.
Configuration
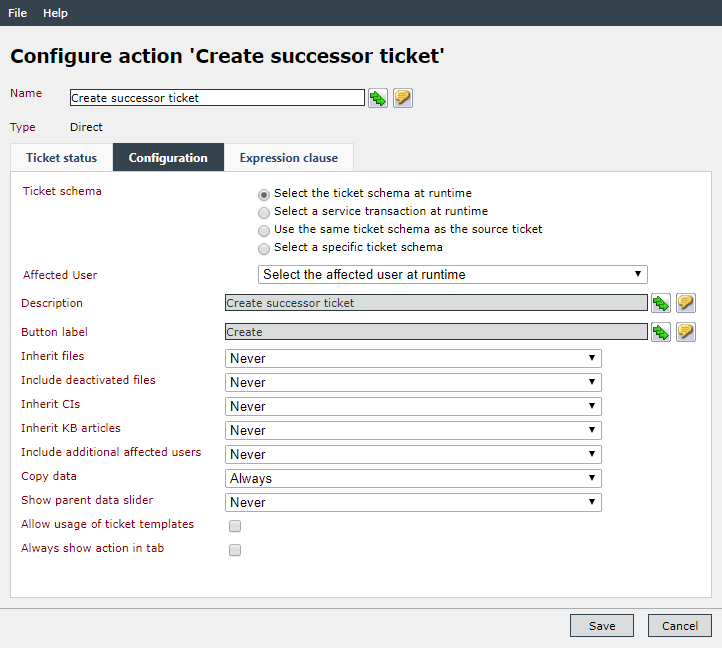
Ticket schema: When configuring this action, the ticket schema to be used for the creation of the successor ticket is to be selected first. The following options are available here: Either the ticket schema or service transaction can be selected at runtime or the same ticket schema the origin ticket has will be used. As an alternative, another ticket schema can be selected in the configuration. The ticket schema selected here cannot be changed during the creation of the successor ticket.
Affected user: In the second option, the user to be adopted as the affected user of the successor ticket has to be selected. The following options are available here:
- Select the affected user at runtime: The affected user can be selected via the user browser during the creation of the successor ticket.
- Use the same affected user as the source ticket: The affected user will be set automatically by the system, depending on the user currently set as affected user in the source ticket.
- Logged in user: The current user will be set as the affected user during the creation of the successor ticket.
- Current owner: The user set as affected user in the source ticket will automatically be the affected user of the successor ticket.
Description: The text box allows for entering a description for the action. This will affect the text displayed as a description above the button later on. The description and the button label will only be used, if the action is displayed as a separate tab under Actions. As soon as several languages have been activated, this description can be localized.
Button label: This text appears on the button for creating the successor tickets. The button label can also be localized, if several languages have been activated.
The following options determine the information and data to be adopted from the origin into the successor ticket.
-
Inherit files: All attached files will be inherited by the successor ticket.
-
Include deactivated files: This option refers to the option Inherit files. If activated, deactivated attachments will be included in the successor ticket as well.
-
Inherit cis: All linked CIs will be incorporated into the new ticket.
-
Inherit kb articles: KB articles attached in the solution and linked KB articles will be inherited by the new ticket.
-
Include additional affected users: If further users were added as affected in the starting ticket, they can be accepted using this option.
-
Copy data: The ticket’s data (text fields and text arrays) will be copied into the ticket wizard automatically, but can still be edited during ticket creation. The contents of the fields are transferred to the (possibly existing) ticket fields of the schema of the successor ticket, if these fields have the same FriendlyName as the fields of the original schema.
Note:
1. If this option is activated, the default settings of the affected user properties are not overwritten. The affected user is a special case; all other default values (such as expressions) are overwritten.
2. The contents of fields that are not used in the ticket wizard are also taken over.
-
Show parent data slider: This option allows for displaying an additional panel in the ticket wizard, similar to the one for the placeholders in message templates.
-
Allow usage of ticket templates: If this option is set then all ticket templates that the current user is allowed to see and for which he is allowed to create tickets will be rendered in the Action tab.
-
Always show action in tab: This option is only accessible via the Actions tab in the ticket.
Executing the Action
Depending on its configuration, this action can be found either as an entry in the Actions menu or as an additional tab on the Actions tab.
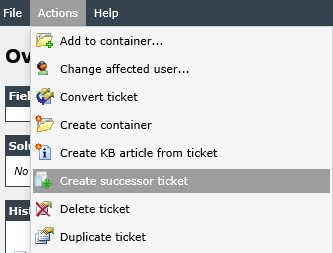
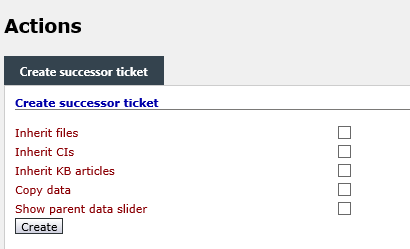
If the option to incorporate files, CIs or KB articles into the successor ticket is available, the objects to be inherited can be selected on the Actions tab. Via a click on the button to create the successor ticket, the ticket wizard is opened and all necessary information for the new ticket can be entered there.
If there are ticket fields in the original ticket that can be inherited, the field for adopting data is displayed on the right side. In order to inherit data from the original ticket, open the field via a mouse over. The data of the original ticket can now moved into the desired field in the wizard via drag and drop. When the mouse button is released, the value from the original ticket will be written into the field the cursor is located in.
This type of data transfer is only available for text fields and text areas. Other fields (like date fields or CI fields) cannot be inherited in this way.
This action allows for creating tasks from a ticket.
Configuration
Schema: The task schemas that can be used for creating a new task can be set here.
Assign to: Here, the assignment of the task to users, groups, or users and groups can be specified.
Executing the Action
The action Create task can be found on the Actions tab.
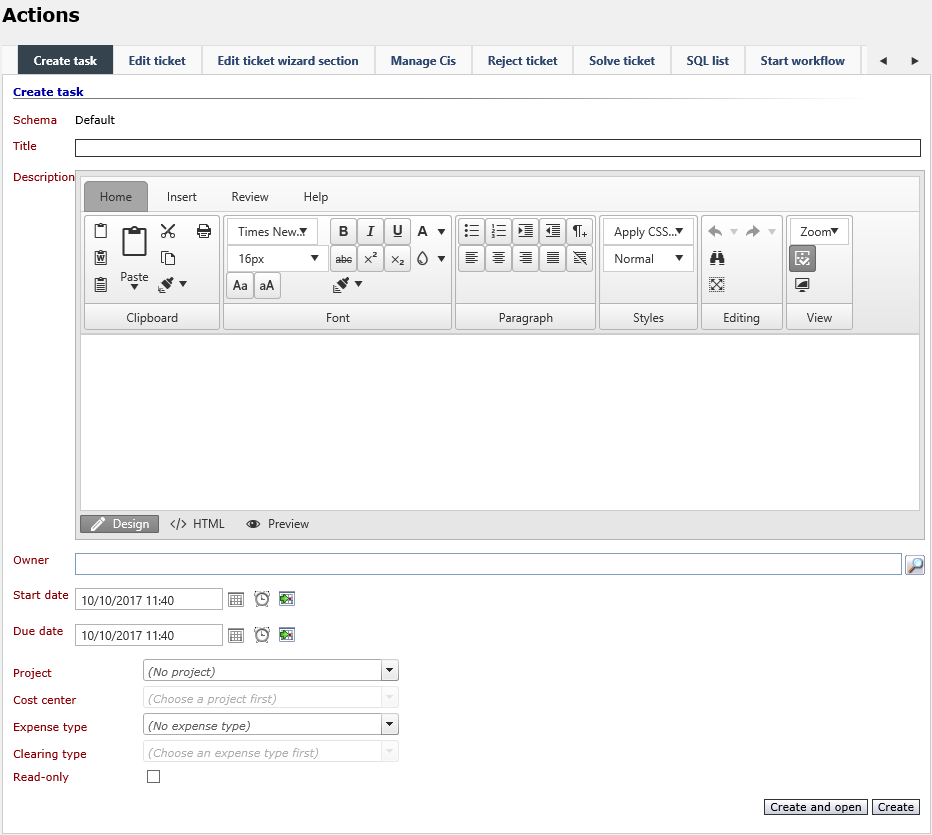
If multiple task schemas have been selected in the action configuration, the schema the task is to be created with can be chosen under Schema. If projects and cost centers have been defined in the Expense Management, the task to be created can be linked to them. On the Tasks tab, every task created from the current ticket will be displayed.
The options Project and Cost center will be prefilled automatically, if these values have been predefined on the Expenses tab in the ticket. However, they can still be edited during task creation.
This action allows for creating a new ticket from an existing ticket. The ticket data can be edited in the ticket wizard in the process.
Configuration
Ticket creator: Either the creator from origin ticket or the executing user is entered.
Copy additional affected principals: If the option is activated, all affected users are accepted in the duplicated ticket.
Executing the Action
The action can be found in the Actions menu.
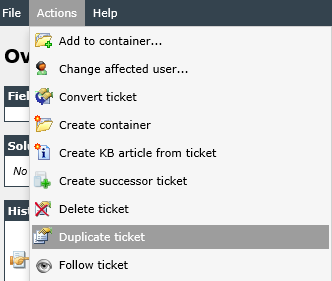
After selecting the menu item Duplicate ticket, the ticket wizard for creating a new ticket will open and all necessary information can be entered there.
This action is needed for changing the escalation priority of a ticket retroactively. The priority can be edited in the ticket detail dialog.
Configuration
The menu item Configuration allows for selecting a workflow to be run through by the ticket after the action has been executed by the user. If the field is left empty, no additional workflow will be triggered.
Executing the Action
On the Service Level Agreement tab of the detail tab of a ticket, there is one active button next to the fields Contract, Service, and Priority, respectively. Via a click on it, the respective settings can be changed.
Escalation times are normally calculated via the linked contracts and then assigned to the ticket automatically. In order to be able to change these times afterwards as well, this action has to be added to a ticket schema.
Configuration
No separate configuration is necessary for this action.
Executing the Action
After opening the detail dialog of a ticket, click on the Service Level Agreement tab. Next to the field Escalation time, an active button can be found. Via a click on this button, the escalation time for the ticket can be changed manually.
Note:
If escalation times are changed, dependent, dynamic escalation times will not be recalculated.
Via this action, the default settings for new expenses in a ticket can be changed. This includes the project and the cost center. These fields will be then prefilled whenever the user adds a new expense.
Configuration
No separate configuration is necessary for this action.
Executing the Action
On the Expenses tab, the dialog for the default settings for new expenses can be faded in via the small arrow icon on the right.
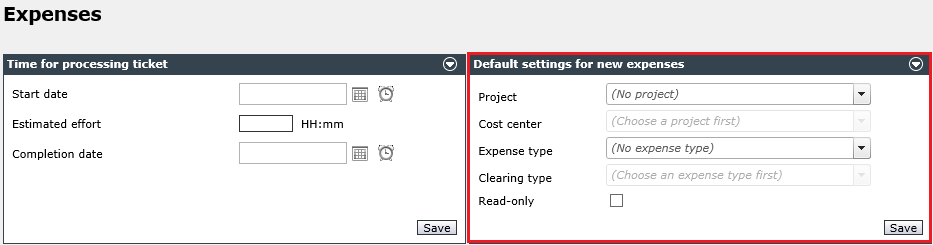
The project and cost center can be edited here using a drop-down menu. A click on Save applies the changes.
This action allows for the addition and documentation of single work steps for a ticket.
Configuration
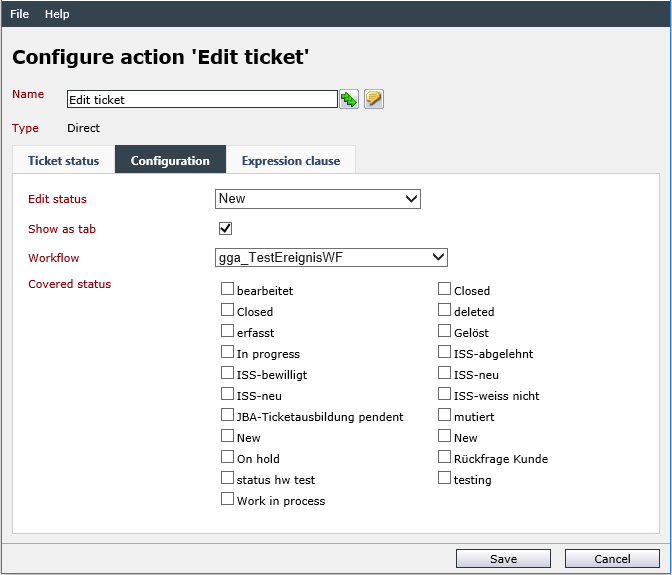
Edit status: You can specify in which status the ticket should change after processing.
Workflow: The workflow can be changed.
Covered statuses: The option can be used to specify which status is to be marked as reached by the SLM.
Example:
If a ticket life cycle consists of the status New, In process and Closed, and if Status is set to Closed, a ticket is closed after processing. If the ticket action can now be used in the status New, the status In processing would never be reached. To ensure that the ticket does not escalate in the future, the status In process must be marked as Covered status.
Executing the Action
Click on Edit ticket on the Actions tab. Now, a new work step can be entered.
Alternatively, the button New work step on the Work steps tab can be used in order to enter such a work step.
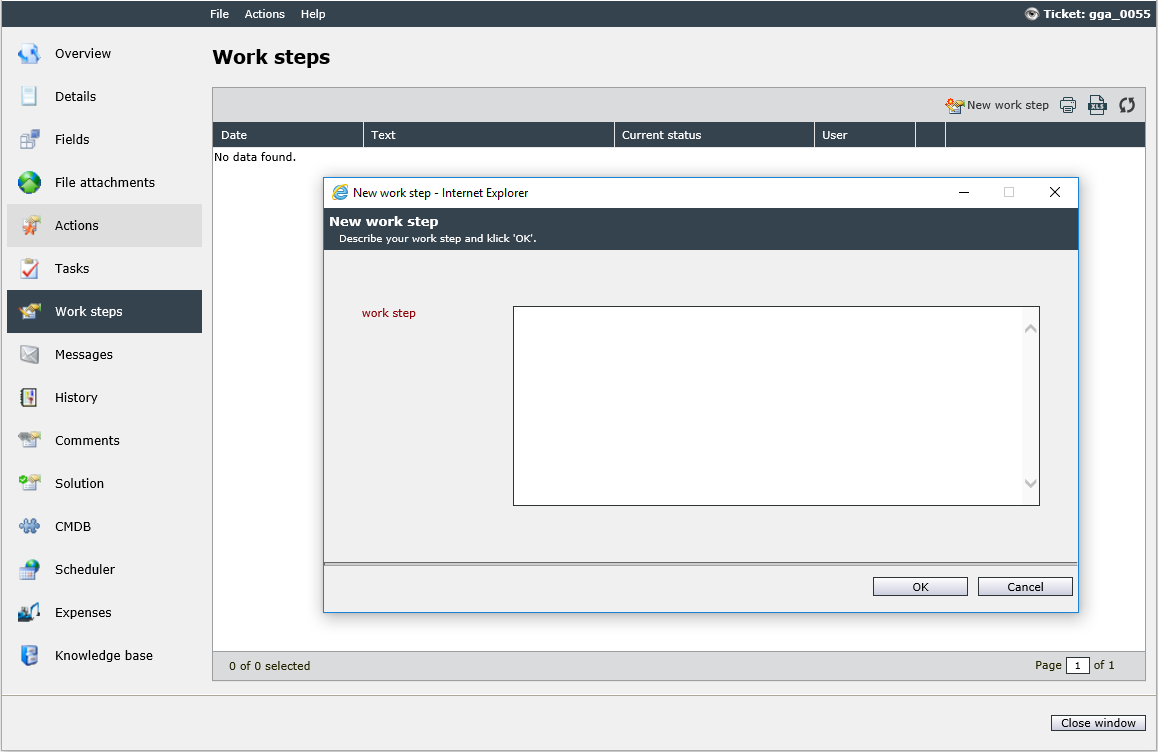
A click on OK subsequently saves the work step.
With this action, ticket fields filled in during ticket creation can be edited retroactively.
Configuration
The configuration is limited to the specification of a Workflow, which can be executed after the ticket fields have been edited.
Executing the Action
On the Fields tab of a ticket, the Edit button is available in the wizard view. Alternatively, the Edit ticket fields function can also be accessed via the top menu, under Actions. As soon as the Save button is clicked after editing, the changes will be saved and the workflow will be triggered, if configured.
Via this action, the completion date can be edited.
Configuration
The configuration is limited to the specification of a Workflow, which will be triggered after executing the action.
Executing the Action
On the Expenses tab, the start date, the estimated effort, and the completion date can be entered.
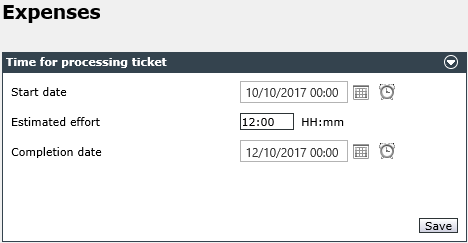
After all of the specifications have been entered correctly, the values will be written into the ticket by clicking on Save.
With this action, a page from the ticket wizard of the respective ticket schema can be edited on a separate tab in the ticket detail dialog.
Configuration
During thew configuration of this ticket action, the desired Page to be modified has to be selected. All pages included in the ticket wizard will be displayed for selection.
At the same time, a Loopway workflow can be selected. This workflow will be triggered as soon as the page modification is finished.
The option Show data slider allows for moving existing data from successor tickets via a data slider and drag and drop. The fields of a successor ticket to be displayed, based on every existing ticket schema, can be specified here.
The text field Schema-independent fields allows for entering non-localized names of a ticket field. If, for instance, several ticket schemas contain the field Email, it can be entered here. The field will then be considered in the data slider for every successor ticket – irrespective of the schema it has been created with.
Executing the Action
The ticket detail dialog offers a separate tab on the Actions tab for editing the configured ticket wizard page.
If successor tickets for the ticket to be edited are available, field contents of the ticket fields configured in the action will be displayed in a data slider and can be moved into the fields of the current ticket via drag and drop.
As soon as the modification is finished, the page can be saved by clicking on Save and the selected workflow will be triggered.
With this action, one or multiple sections of the ticket wizard for the specific ticket schema can be made available for editing on a separate tab in the ticket dialog.
Configuration
During configuration of this ticket action, the desired sections have to be selected. All available sections of the ticket wizard will be displayed for selection.
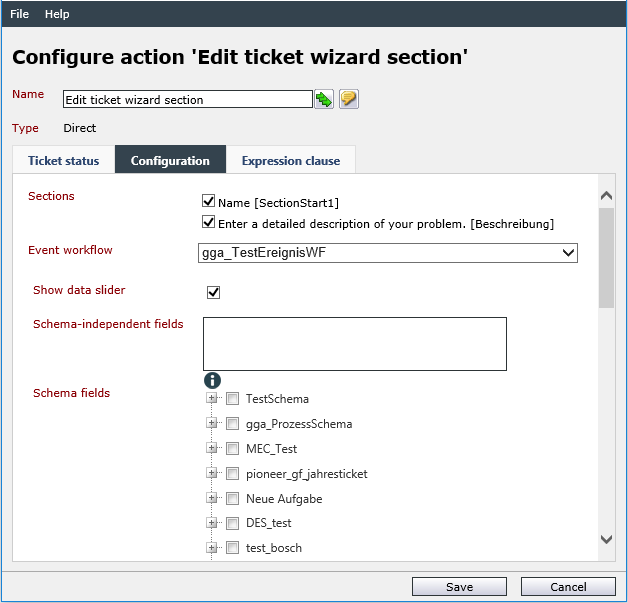
At the same time, a Loop way workflow can be selected to be triggered as soon as the editing of the section has been finished.
The option Show data slider allows for moving existing data from successor tickets via a data slider and drag and drop. The fields of a successor ticket to be displayed, based on every existing ticket schema, can be specified here.
The text field Schema-independent fields allows for entering non-localized names of a ticket field. If, for instance, several ticket schemas contain the field Email, it can be entered here. The field will then be considered in the data slider for every successor ticket – irrespective of the schema it has been created with.
Executing the Action
In the ticket detail dialog on the Actions tab, a separate tab for editing the configured wizard sections can be found. The sections will then be displayed one below the other.
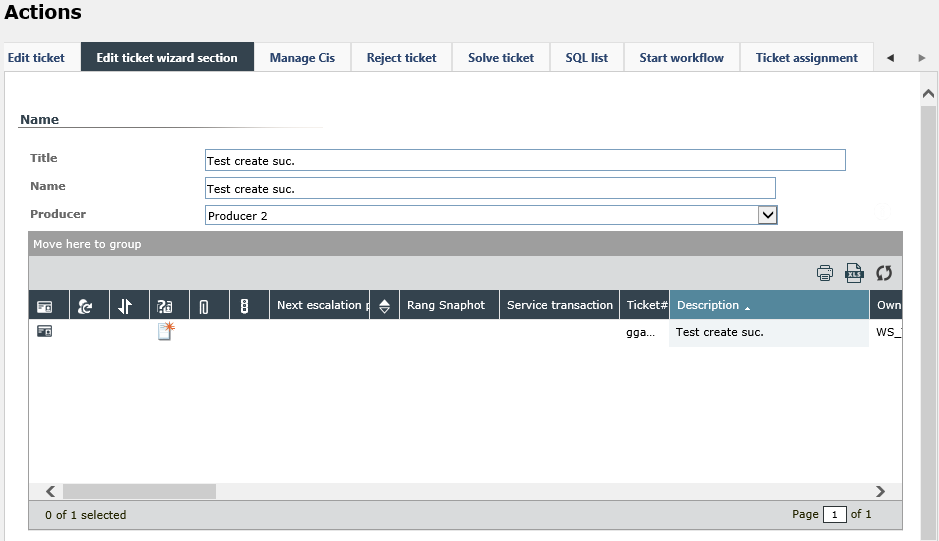
The sections will be displayed here just like in the ticket wizard.
If successor tickets for the ticket to be edited are available, field contents of ticket fields configured in the action will be displayed in a data slider and can be moved via drag and drop into the fields of the current ticket.
During the configuration of the ticket wizard, there is an additional option for sections to hide the section in the wizard during the creation of the ticket.
Via this action, web sites with certain ticket content can be accessed.
Example:
If the URL
http://www.google.com/search?q={$ Ticket.Ticket# $}
is entered under Configuration, the ticket number of the current ticket will be searched in Google.
Configuration
URL: The URL of the page to be displayed in the tickets later on is to be entered here. Additionally, expressions can be used in order to read dynamic page content out from ticket fields, for example. An overview of the available expressions can be found in the Expression Reference.
Include field overview: With this option, an overview of all ticket fields will be displayed below the array containing the external link.
Show as tab: If this option has not been activated, the external link can only be accessed via Actions > External Link, which will open a new window. Otherwise, the action can be accessed via the Actions tab in the left sidebar.
Executing the Action
In the Actions menu, the new option External link can be found. After a click on it, the previously defined link will be opened in the ticket window. A link icon can be seen above the open link. With a click on it, the entire external link will be opened in a new window.
With this action, a ticket that has been pooled in a container with other tickets can be extracted from the container.
Configuration
Workflow (empty Container): A drop-down box allows you to select an event workflow. The container ticket is moved into this workflow as soon as the last contained ticket has been removed from the container. 
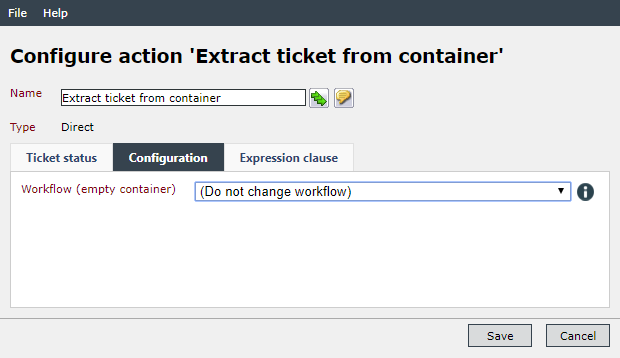
Executing the Action
This ticket action can be found in the Actions menu as soon as a ticket is pooled in a ticket container with other tickets. This action is neither executable nor visible in the container ticket itself as well as in the last remaining ticket within the container.
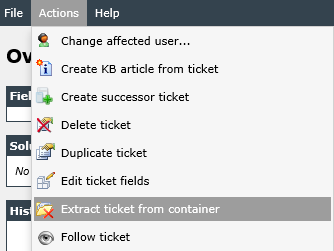
Via a click on this action, the ticket will be removed from an existing container.
The action allows for forwarding an e-mail, which has been received and assigned to a ticket.
Configuration
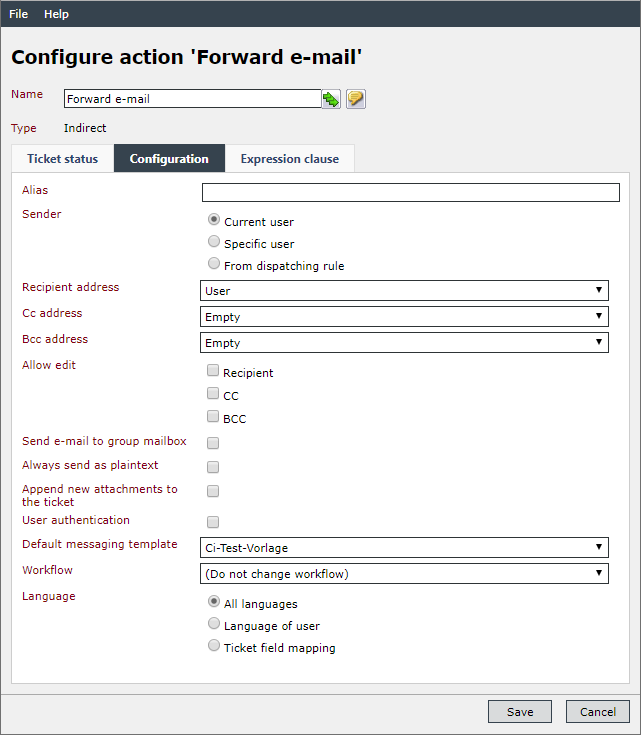
The configuration is similar to the configuration of the action Send mail, only the configuration of the recipient’s e-mail address is missing.
Executing the Action
The e-mail to be forwarded has to be selected on the Messages tab. Afterwards, the action can be executed.
A new dialog opens and displays the e-mail to be forwarded. It can be still edited and the recipient can be entered as well.
If attachments have been received with the original e-mail, they will be attached to the forwarded e-mail automatically.
Otherwise, the functions of this action are similar to those of the action Send mail.
If this action has been configured for a certain status, all tickets created as successor tickets will be hidden in each specified ticket status for each specified user.
Configuration
No separate configuration is necessary for this action.
The configuration contains two checkboxes that enable or disable either linking or removing a ticket as a ticket action. 
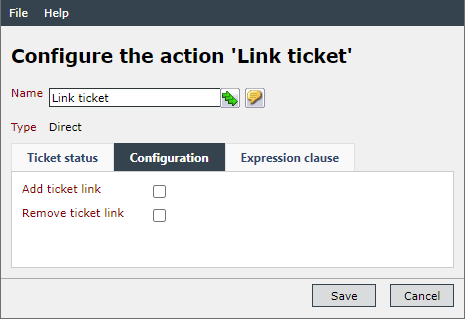
With the linking, two or more tickets can be linked together. For this purpose a new tab with a search option for tickets is provided under Actions. With the second option ticket links are removed.
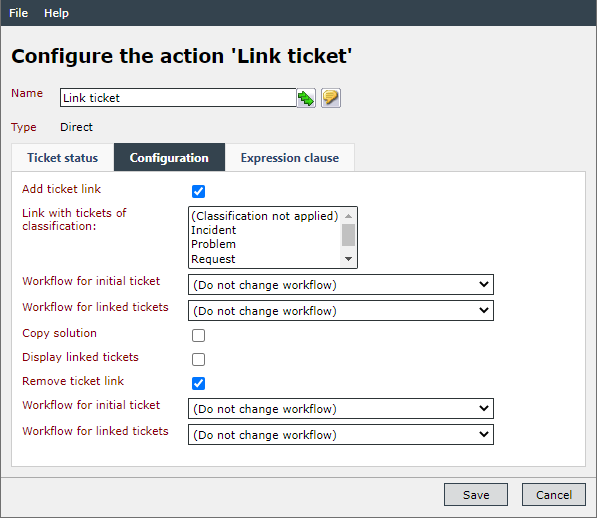
Configuration
Link with tickets of classification: Defines, to which tickets of the selectable classifications the tickets of the schema can be linked. If the action is to be useable for multiple ticket classifications, they can be selected by holding the [CTRL] key.
Workflow for initial ticket: As soon as an action is executed in a ticket, the selected workflow for this ticket is started.
Workflow for linked tickets: As soon as an action is executed in a ticket, the workflow selected here for the newly linked tickets is started.
Copy solution: If this option is activated, the solution from the linked ticket will be copied into the current ticket later on.
Display linked tickets: This option allows for displaying linked tickets in the tab available under Actions.
Executing the Action
By selecting Link ticket on the Actions tab, the user can search for specific search keys. As soon as the user clicks into the search field, the following search expression will be available:
- Status
- StatusGroup
- Schema
For example, the input of Status="New" leads to a search for all tickets with the current status New .
At the same time, multiple search keys can be combined via and and or.
Example:
Status="New" and Schema="Incident"
Thus results in a search for tickets created with the schema Incident and currently having the status New.
For further information on the search, a short help text can be accessed via the small help icon on the right.
If the desired ticket has been found, it can be selected by a simple click and then linked to the current ticket by clicking on OK.
If a ticket is opened, in which linked tickets are to be removed, this action can be found on the Details tab. In the overview of the Linked tickets tab, an Actions menu is available. The ticket will be removed by selecting one or multiple tickets (via [SHIFT] or [CTRL]) and then clicking on the entry Delete in the Actions menu.
This ticket action provides the users with the option to link a ticket to an existing KB article.
Configuration
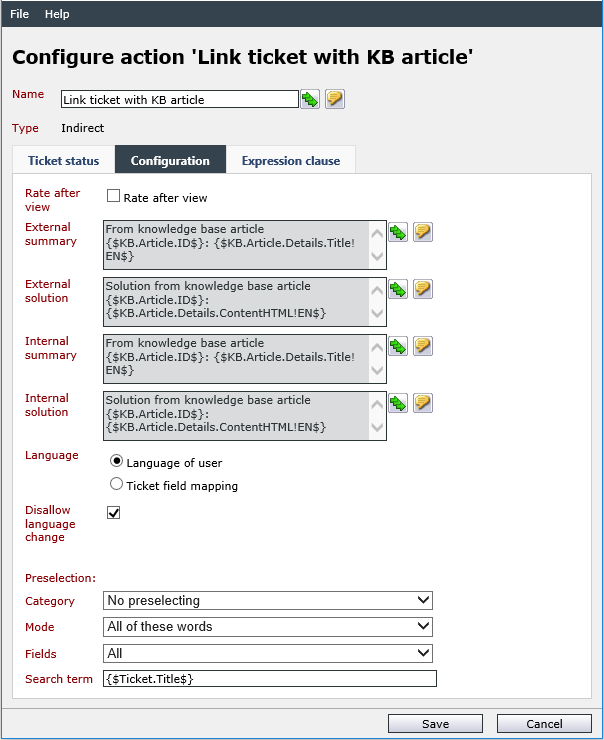
Rate after view: If this option has been activated, the executing user has to rate the article after reading it. This rating, however, does not have any direct impact on the KB article itself. The rating of the article here will only be added to the history of the respective ticket and be used for showing the usefulness of the article in solving the problem. The KB article itself will not be changed.
External summary: Here, localized expressions can be entered, which will write information from the KB article for the external summary into the corresponding ticket fields automatically.
External solution: Here, localized expressions can be entered, which will write information from the KB article for the external solution into the corresponding ticket fields automatically.
Internal summary: Here, localized expressions can be entered, which will write information from the KB article for the internal summary into the corresponding ticket fields automatically.
Internal solution: Here, localized expressions can be entered, which will write information from the KB article for the internal solution into the corresponding ticket fields automatically.
Note:
The texts specified here (including expressions) are added to the respective existing contents. This extends the respective entry if it is linked several times.
Language: Via this option, the origin of the language setting can be determined, when the text will be transferred from the KB article to the ticket.
Note:
This setting only affects the display of the article in the ticket, not the preview before linking.
Disallow language change: This option concerns the language and prevents a user from changing the applied language of the article as soon as it has been activated.
Preselection:
Category: You can choose between No preselection and Last selected category.
Mode: The preselection of the mode includes:
- All of these words
- Any of these words
- This exact phrase
Fields: The following fields can be preselected for the search:
- All
- Identity
- Title
- Keyword
- Description
- Content
- File attachment
Search term: You can enter the search term (also as expression: {$Ticket.Title$}).
Executing the Action
The Actions menu now includes the ticket action Link ticket with KB article. The KB article browser is opened when executing the action. If configured, the fields Category, Mode, Fields and Search term are passed and the search is performed for the first time.
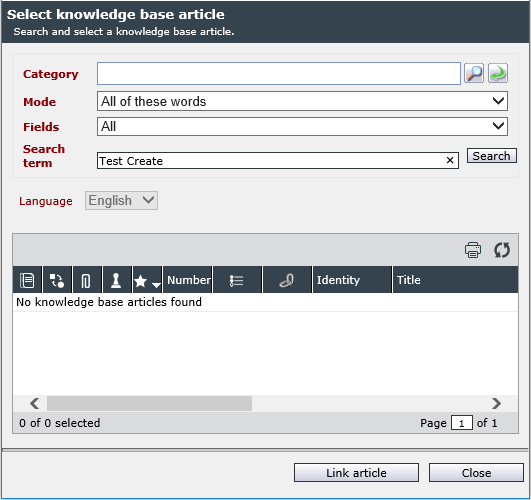
In the article browser it is possible to restrict the search by further criteria. It is possible to search in a certain category, to change the search mode and to limit the search to certain fields. If the Category field remains empty, all categories are searched.
If an internal article is linked to a ticket, a warning will appear.
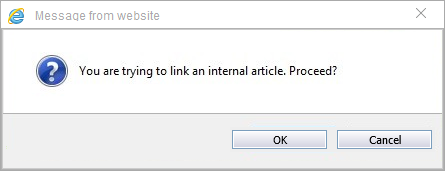
Before linking an article to a ticket, it is possible to open and view every article via a double click.
For systems with an activated version management, the following applies:
In the results list, only published versions of an article will be displayed. When linking KB articles to tickets, only the currently published revision should be linked to the article. This version will remain linked to the article until the link will be updated.
After the article has been linked, it can be viewed in the ticket detail dialog on the Knowledge Base tab. Via a double click, the article can be opened, in order to view and edit its properties.
Via this action, configuration items (CIs) can be managed. These CIs have to be defined and configured in the CMDB (Configuration Management Database) previously.
Configuration
Allowed Action: Here, you can select whether a configuration item can be added to and/or removed from a ticket.
Supply configuration: There are three different options of managing a CI to a ticket:
-
Affected user: All CIs having the same affected user as the ticket and not excluded by the choice limitation can be selected.
- None: All of the CIs not excluded by the choice limitation can be selected.
- Supplier: All CIs, whose supplier matches the affected user and which are not excluded by the choice limitation can be selected.
Workflow (Add CI): The ticket event workflow that is to be triggered when a CI is added can be selected.
CI data field (Add CI): The name of the data field in which the ObjectGuids of the added CIs (separated by commas) are available in the workflow can be specified.
Workflow (Remove CI): The ticket event workflow that is to be triggered when a CI is removed can be selected.
CI data field (Remove CI): The name of the data field in which the ObjectGuids of the remote CIs (separated by commas) are available in the workflow can be specified.
Multiple choice: This option allows for adding multiple CIs to the ticket.
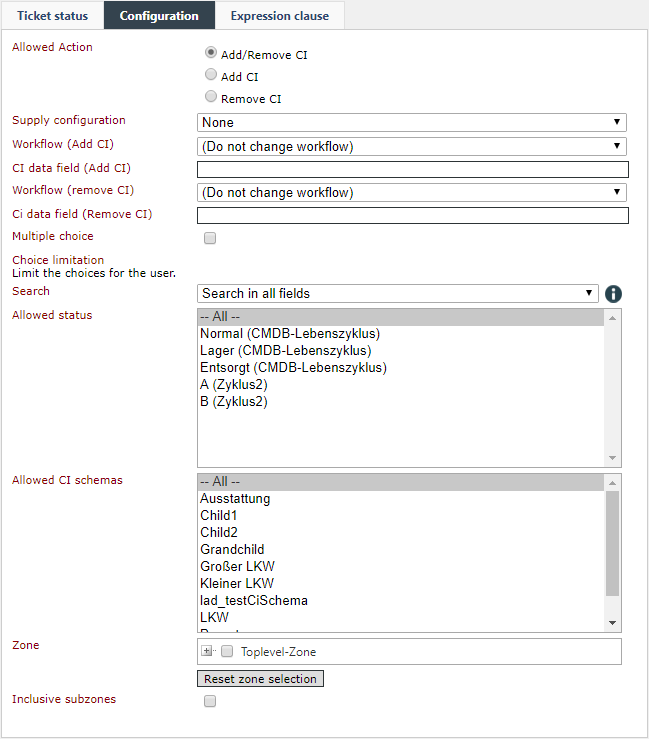
Choice limitation: If only CIs of a certain zone or a certain scheme or status are to be added to a ticket scheme, restrictions are to be defined with the selection limitation.
Search: This can be used to restrict the search for possible CIs to the following components:
- Search in all fields
- Search only caption
- Search only visible ID
- Search only visible ID and caption
Allowed status: A restriction can be made by the appropriate selection of allowed statuses (multiple selection possible).
Allowed CI schemas: A restriction can be made by the appropriate selection of allowed schemas (multiple selection possible).
Zone: Specification of a zone (multiple selection possible) to restrict the selection.
Reset zone selection: The selection of all zones is deleted.
Inclusive subzones: If this option is activated, the search is also performed in the subzones. This option then also appears in the CI browser (Search subzones).
Note:
Please note that no subzones are included in the selection of CIs from a zone. For this reason, the option Inclusive subzones has to be activated, if subzones of the selected zone are to be taken into account during the search as well.
Warning:
The settings only become effective after they have been saved.
Executing the Action
This action is a direct action for adding and can therefore be found as a tab in the Actions menu.
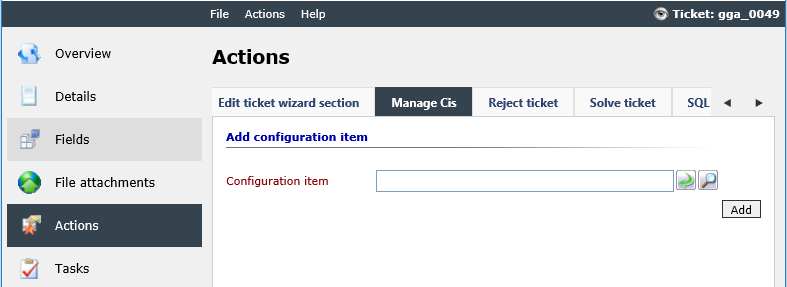
A click on either the field or the magnifying glass symbol opens a dialog in which the desired CI can be selected. A further click on the Add button connects the CI to the ticket and appears in the CMDB menu of the ticket.
If the action has been configured to remove CI, this can be done in the ticket register CMDB via the menu Actions > Delete.
If this ticket action has been configured for a ticket schema, tickets based on this ticket schema can be marked for the ticket ranking.
Configuration
A separate configuration of this action is not necessary.
Note:
However, it is important that the permissions for the ticket ranking (Ticket filter favorites) have been configured as well.
Executing the Action
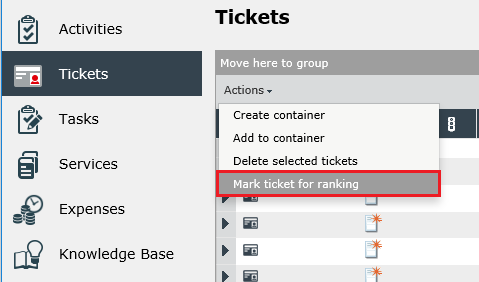
Top left on the ticket overview page, the Actions menu can be found. Tickets can now be highlighted in the ticket overview (multiple tickets via the [SHIFT] or [CTRL] key). After clicking on Mark ticket for ranking in the Actions menu, the tickets will be ready for ranking.
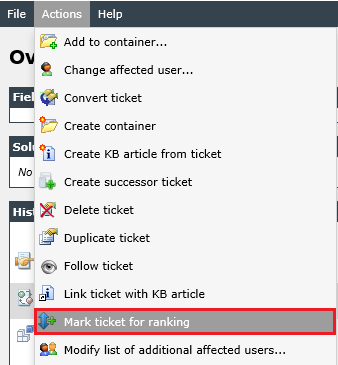
Alternatively, every ticket can be marked for ranking via the ticket’s Action menu as well.
The ticket can now be found in the ticket ranking.
This action allows for moving incoming e-mails from the Messages tab of a ticket to another ticket.
Configuration
A separate configuration of this action is not necessary.
Executing the Action
Select the desired e-mail on the Messages tab. A click on Move email will save this selection.
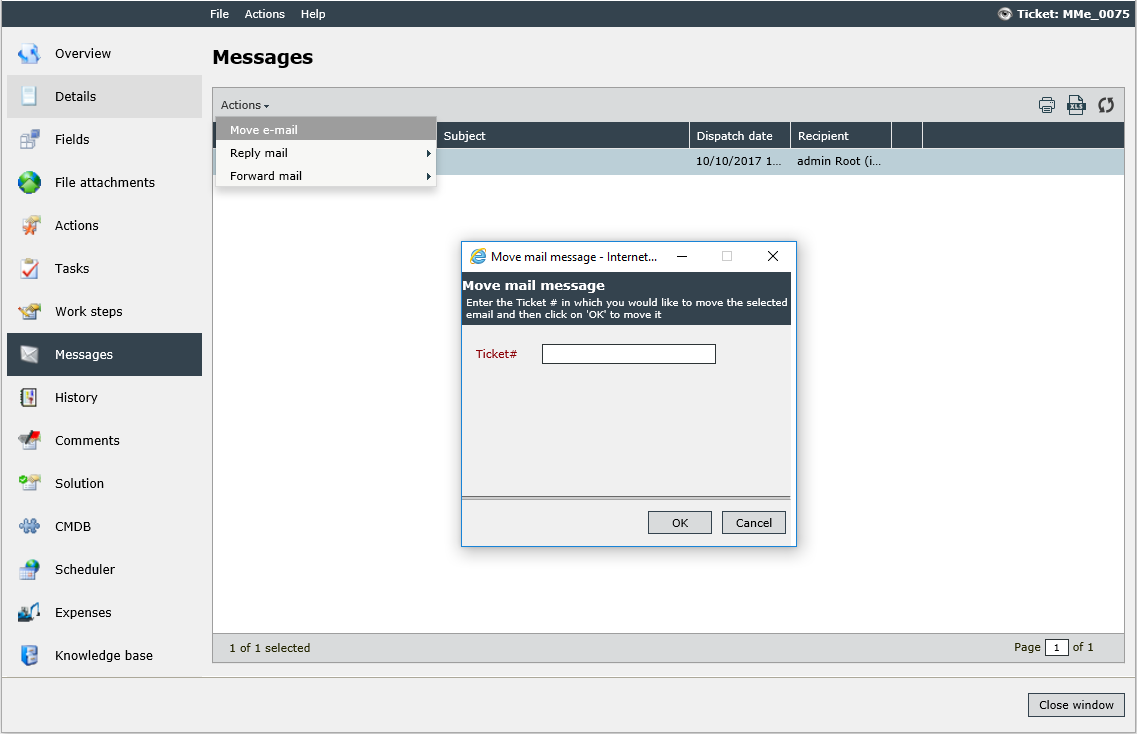
In the following dialog, enter the ticket number of the ticket the e-mail is to be moved to. After selecting OK, the e-mail will be moved.
This action allows for reactivating a closed ticket.
Configuration
During the configuration, a Workflow is to be specified, which can be used for a ticket after the reactivation.
Executing the Action
This action can be accessed via the top menu, under Actions.
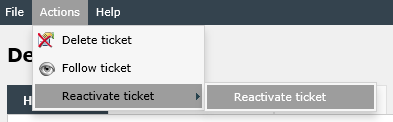
All further ticket properties will be set in the specified workflow (status, assignment to a group, etc.).
A ticket can be rejected with this action.
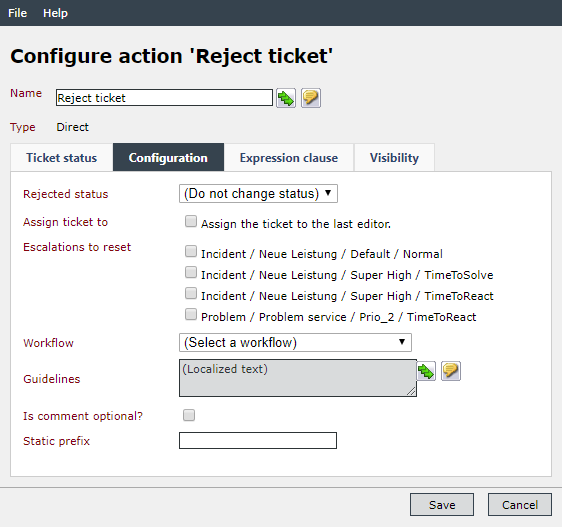
Configuration
Rejected status: The status defined here will be adopted by every ticket the action is executed in.
Assign ticket to: With this option, the ticket can be assigned automatically to the last user after rejection.
Escalations to reset: The SLAs to be automatically paused when the ticket is rejected can be selected here.
Workflow: The workflow set here will be run through automatically by the rejected ticket.
Guidelines: The notification entered here will be displayed during the execution of the action later on.
Is comment optional?: If this option is activated, entering a comment is optional. Otherwise an appropriate entry must be made (default: Not activated).
Static prefix: With the static prefix, the comment given for the rejection of the ticket can be found in the comment dialog of the ticket more easily.
Executing the Action
The action can be accessed via the Actions tab. A comment field will be displayed, in which a reason has to be entered. Subsequently, the ticket will be moved into a previously configured workflow or status.
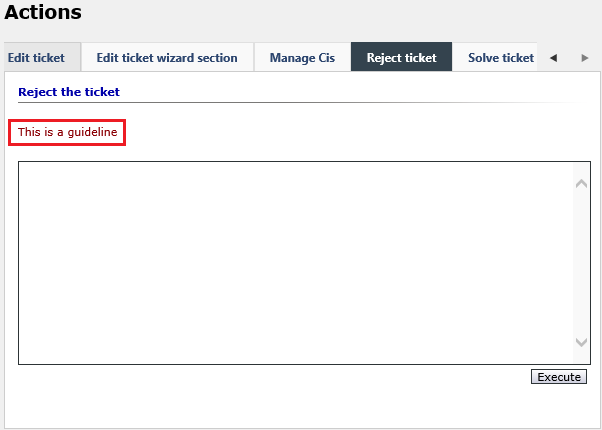
A comment can be entered on the rejection of ticket. If a guideline text has been entered, it will be displayed on top of the comment field (red box).
In the comment dialog, the comment on the rejection of the ticket will be displayed with the static prefix, if specified, later on.
Via this action, the user can reject a ticket. Additionally, users, groups, or teams, to which the ticket will be rejected, can be selected as a constraint here. Apart from that, the action is similar to the action Reject Ticket.
This option does not only allow for sending an e-mail to a single recipient, but to send an e-mail to all other recipients and copy recipients additionally.
Configuration
Generally, the configuration is similar to the ticket action Reply Email.
However, another control is available: Do not reply. E-mail addresses, users and groups (e-mail addresses of the group members will be used instead of the group e-mail address) that will not receive a reply even though they are listed in the e-mail can be specified here.
Executing the Action
The execution of this action is similar to the action Reply Email. It is possible to define multiple recipients, CC recipients, and BCC recipients, separated by commas.
With this action, an e-mail reply can be sent directly from the ticket. In the process, the text to be sent can be provided by using a message template. The executive user has the option to edit this text before sending.
Configuration
Sender: The sender of the e-mails to be sent is set here. During the ticket action configuration, different values can be predefined for the sender. For example, the sender can always be the user executing the ticket action or a defined user (e.g. a system user with a specific "Do-not-reply" e-mail address).
Allow edit: This option enables the executing user to modify the recipients preset in the messaging schema as well as the recipients of the carbon copy and blind carbon copy (CC and BCC).
Always send as plaintext: It is furthermore possible to specify whether the mail is always to be sent in plaintext format – irrespective of the settings in the workflow or for the user and group or messaging schema.
User authentication: If this option is activated, the executive user will have to enter his password when sending a message. Thus, misuse can be prevented, e.g. when the user leaves his workstation, but does not lock his computer. This provides the option to write a hash value into a ticket field in the process.
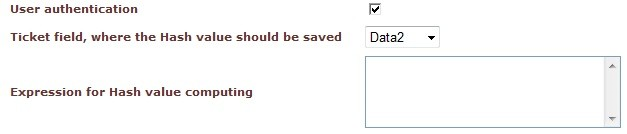
Next, a ticket field has to be selected, into which the computed hash value is to be written, and the fields the hash value is to be computed from and how, for example, has to be specified via expression.
Example:
A hash value could be computed from several ticket fields, in order to assess, whether those fields have changed. For this purpose, the following expression could be used:
{$ Ticket.Fields!Titel.Text & Ticket.Fields!Description.Text $}
Default messaging template: Here, the template to be used for sending can be selected. The executing user has the option to change the message’s text before it will be sent.
Preferred media: The way the message is to be sent can be configured here: Email, HTML email, or plaintext email. This option will not be taken into account when Always send as plaintext has been activated. If an SMS Deliverer has been configured, it is possible to select SMS as a preferred medium alternatively. If the entry (Default) is selected, the default medium configured in the database will be used.

Workflow: This option defines, whether the ticket is to be moved into another workflow when this action is executed – if yes, the workflow has to be specified here.
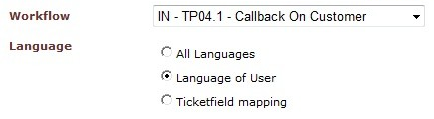
Language: Determines, in which language this action is to be displayed in the ticket. If All languages has been selected, the action will be displayed for all available languages in the Actions menu in the ticket and the user can freely choose, in which language the message is to be sent. Language of user is the default setting and specifies that the action will be displayed and executed in the language of the logged in user. The option Ticket field mapping specifies, whether the language is to be used due to a ticket field. For example, if the creator of a ticket can select his preferred contact language in a field, it can be specified here that the language of the message to be sent is to be set due to this choice.
Executing the Action
On the Messages tab of a ticket, a previously received e-mail can be selected and after a click on the Reply Mail button, the action will be executed.
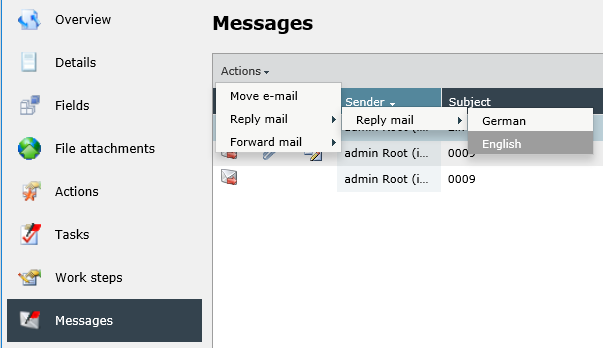
Subsequently, a dialog opens, in which an answer to the received e-mail can be entered. The sender is now either a predefined user or the currently logged in user.
The recipient is preset and matches the sender of the received e-mail. However, further e-mail addresses can be specified under Recipient, CC and BCC, if configured for the action. If multiple e-mail addresses are to be entered into the CC field, for example, they can be divided by using semicolons.
The subject is preset as well, but can be edited freely.
The subject and text will be adopted from the messaging template and can also be edited in this dialog. Further information for using the WYSIWYG editor can be found here.
At the bottom of the dialog, the e-mail’s priority (as known from Outlook) can be edited as well.
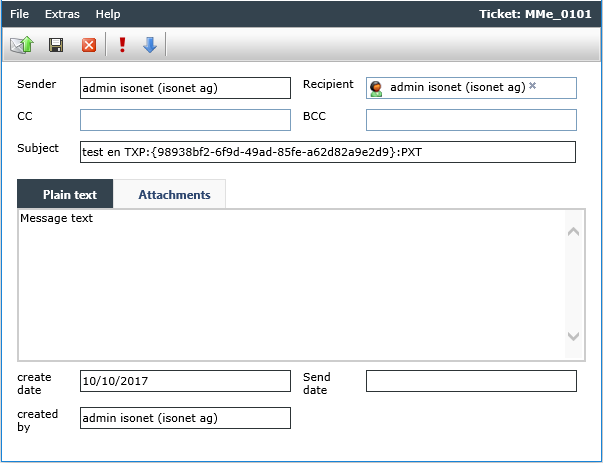
File attachments can be added on the Attachments tab.
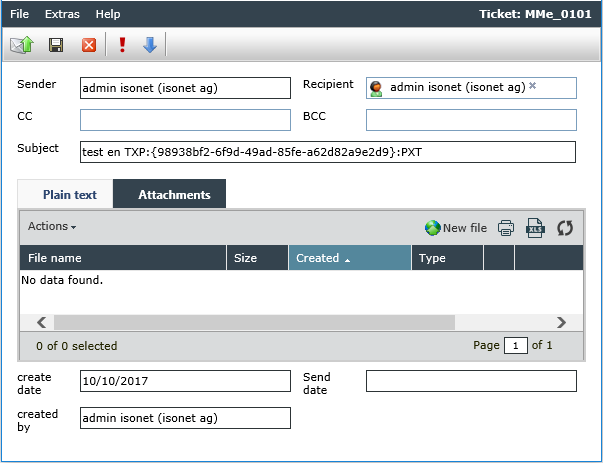
Using the New file button, new files can be attached to the message. The option for deleting attachments can be found in the Actions menu.
Moreover, Knowledge Base articles can be added as attachments to the e-mail as well. This option can be found under Extras.
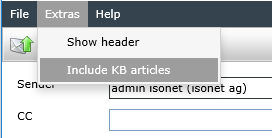
When this menu item is selected, the KB article browser will open and articles can be added. An illustration of the general functions of the KB article browser is available in the action Link ticket with KB article. An additional option can be found here: The attachment can be attached either as a text or as a file.

If As file is selected, the KB article will be attached to the message as a ZIP file. If Inline is selected, the article’s text will be displayed at the beginning of the message text.
Via the Extras menu, an e-mail header – if existing - can be displayed as well.
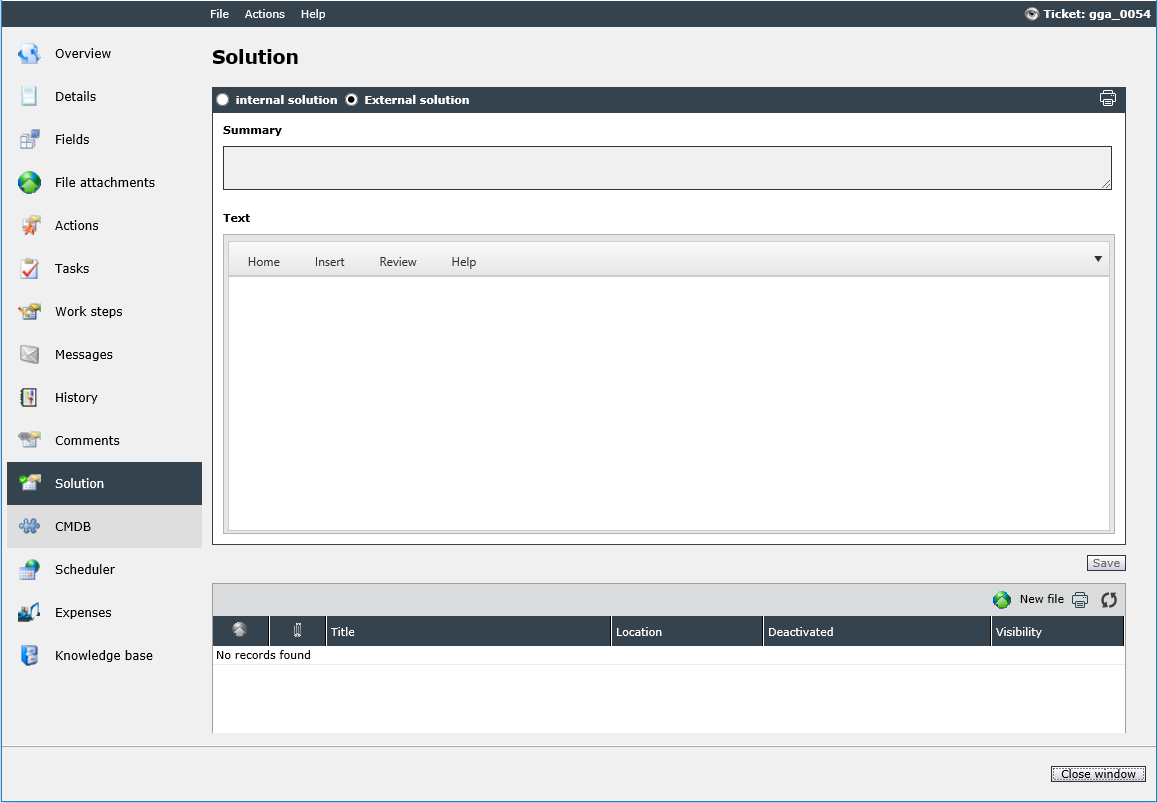
This action allows for saving the solution directly in the ticket detail dialog under Solution.
Configuration
The configuration dialog only requires the specification whether an external, an internal, or both solutions may be entered. A further configuration is not necessary for this action.
Executing the Action
After clicking on the Solution tab in the open ticket, a summary and an detailed text for the solution can be entered. Further information for using the WYSIWYG editor can be found here.
The ticket action Send e-mail enables the user to send an e-mail to various recipients directly from the ticket. The text used in the message template can be preset here. Nevertheless, the user will have the option to edit the text before sending.
Configuration
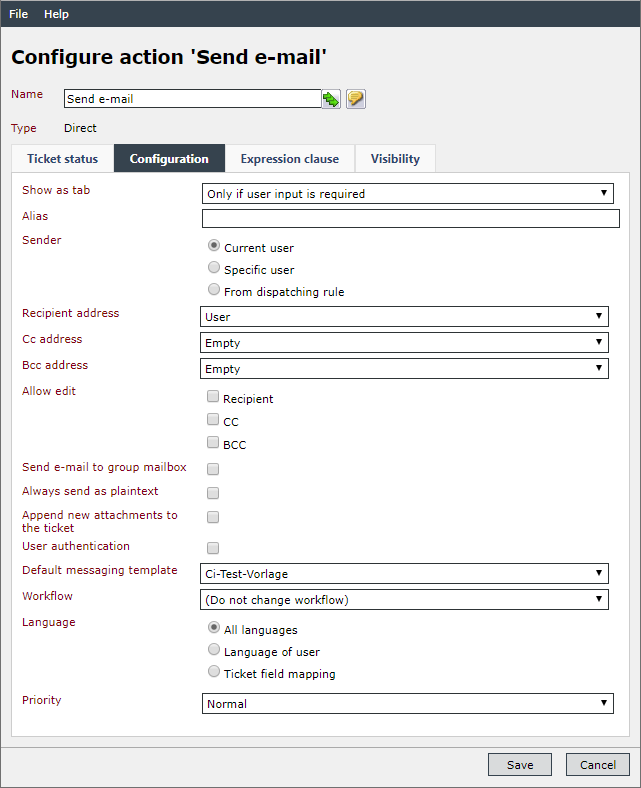
Show as tab: This option defines whether this ticket action will be displayed as a tab under Actions. If the option Only if user input is required is activated, the action will be available under Actions in the top menu, unless user input is necessary for sending a message. In this case, the action will be displayed on the Actions tab. Another option is to select always Always in order to always display the action as a tab under Actions.
Alias: A text can be entered here that is to appear at the recipient instead of the concrete sender.
Sender: During the configuration of this ticket action, different values can be provided for the Sender. The sender can, for example, always be the user executing the ticket action or a specific user (e.g. a system user with a special Do-not-reply e-mail address). Moreover, the sender can be provided by a dispatching rule.
The following options are available for the Recipient address and for Cc and Bcc (Carbon Copy and Blind Carbon Copy):
Additional affected users: Other affected users can be specified as recipients of the e-mail.
- Affected group: All members of the groups marked as affected by the ticket will be set as recipients. This applies to additional affected groups as well.
Affected user: The user set as the affected user in the ticket will be selected as a recipient. If additional affected users have been defined, they will be set as recipients automatically as well.
Creator: The user that created the ticket will be the e-mail recipient.
- Editor(s): The editor of the ticket is the recipient of the e-mail (depending on license - all users for whom a log entry was written).
E-mail field: The recipient’s address is read out from the ticket field to be specified and then transferred into the e-mail.
- Empty: The recipient field will be displayed as an empty text box and the executor of the ticket action can enter arbitrary e-mail addresses.
Group: The group, whose members are to receive an e-mail, can be selected in the ticket at runtime.
Owner: The user set as the owner of the ticket will be the recipient of the new e-mail.
- Owner (user or group): The user or user group marked as the owner of the ticket is the recipient of the new email.
Owner group: All members of the current owner group will be recipients of the e-mail.
Specific user/group: A user or a group to receive the e-mail has to be specified.

Team: All team members are set as recipients.
User: The recipient field is displayed as a user browser; only users can be selected.
User/group: The recipient field is displayed as a user browser; users and groups can be selected.
Note:
The BCC field and its contents are only displayed if you are the sender of the email.
Allow modifications: This option allows for delimiting the modification of the various recipients.
Send email to group mailbox: If this option is activated and if the group has been configured with a deliverer and e-mail address, the message will be sent to the group mailbox. If one of the attributes is missing, the e-mail will be sent to each user of this group individually.
Always send as plaintext: Here can be specified, whether the mail is always to be sent in plaintext format – irrespective of the settings in the workflow or for the user. Therefore, the HTML formatting tab will not be displayed in this action. In case of e-mails in HTML format which are already sent, both tabs will are shown; new e-mails have only the HTML tab.

Append new attachments to the ticket: If this option is enabled, the new file attachments are connected to the ticket.
User authentication: If this option is activated, the user will have to enter his password when sending a message. Thus, misuse can be prevented, e.g. when the user leaves his workstation but does not lock his computer.
If this option is activated, a hash value can be written into a ticket field.
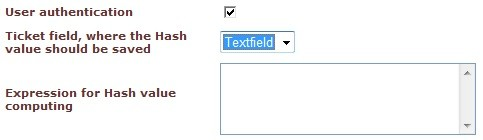
A ticket field the computed hash value is to be written into has to be selected and a value has to be specified, how or from which fields the hash value is to be computed. In the specification of this option, expressions can be used.
Example:
A hash value could be computed from several ticket fields in order to establish later on, whether the fields have changed. For this purpose, the following expression could be used:
{$ Ticket.Fields!Titel.Text & Ticket.Fields!Description.Text $}
Default messaging template: The template to be used when sending is selected. The user can change the text of the message before sending it.
Workflow: It is specified whether the ticket is to be moved to another workflow when this action is executed.
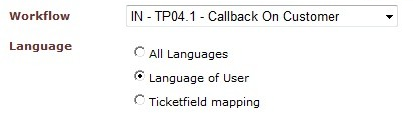
Language: The language in which this action is displayed in the ticket is determined by the setting of this language option. If All languages is selected, the action will be displayed for all available languages in the Actions menu and the user can freely choose, in which language the message is to be sent. Language of user is the default setting and specifies that the action will be displayed and executed in the language of the logged in user. Via the option Ticket field mapping, you can specify, whether the language is to be used due to a ticket field. For example, if the creator of a ticket can select his preferred contact language in a field, one can specify here that the language of the message to be sent is to be set due to this choice.
Priority: The priority of the e-mail messages sent via this action can be determined.
- High
- Low
- Normal
Executing the Action
If the Recipient has been set to Empty, Defined User/Group, or to an e-mail field during the configuration, the action will appear in the Actions menu as the menu item Send mail (it may be called differently your system, depending on the configuration).
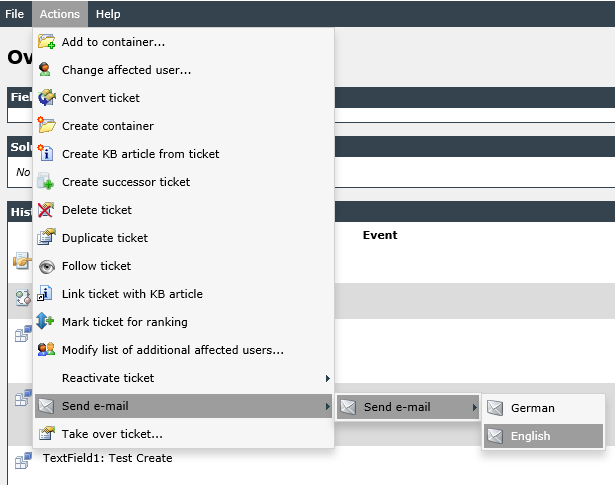
If the option has been set to User, Group, or User/group, the action will be displayed as a tab under Actions in the ticket.
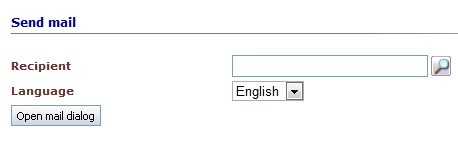
Via the user browser, a user or group can be selected as recipient – depending on the configuration. Only users/groups from the User Management can be selected here, and among them only those, the user has rights to.
Moreover, the language, in which the message is to be generated, can be selected.
Subsequently – after a click on the Open mail dialog button – the message dialog will open. If the action is available in the menu, the message dialog will open directly after the selection of a menu item.
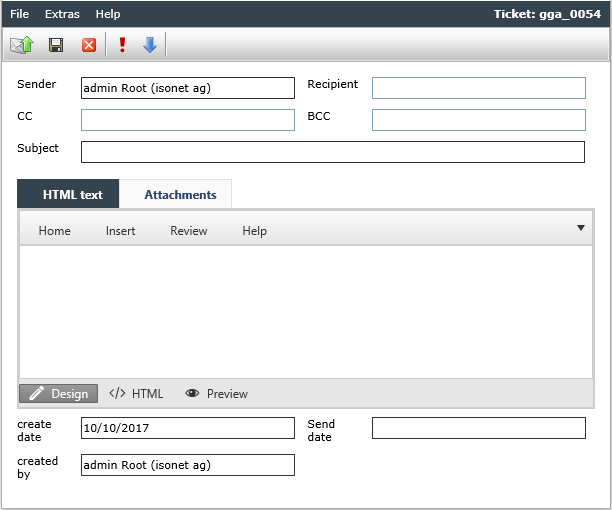
Top right, the field for the recipient can be found. Here, a user from the User Management has been selected. This field always will be filled in, unless the option Empty has been configured. Then, this field will be empty and entries can be made. In all other cases, the field will be write-protected. The fields for CC and BCC can be always filled in additionally.
The subject and text are inherited from the configured message template and can still be changed in this dialog. Expressions and placeholders configured in the template will be already replaced during the display of the message dialog. Further information for using the WYSIWYG editor can be found here.
Note:
When closing the e-mail dialog, the question Are you sure you want to close the mail dialog? appears. The user can choose between OK or Cancel.
At the bottom of the dialog, the priority of the mail (as known from Outlook) can be adjusted as well.
In order to add file attachments, simply switch to the Attachments tab.
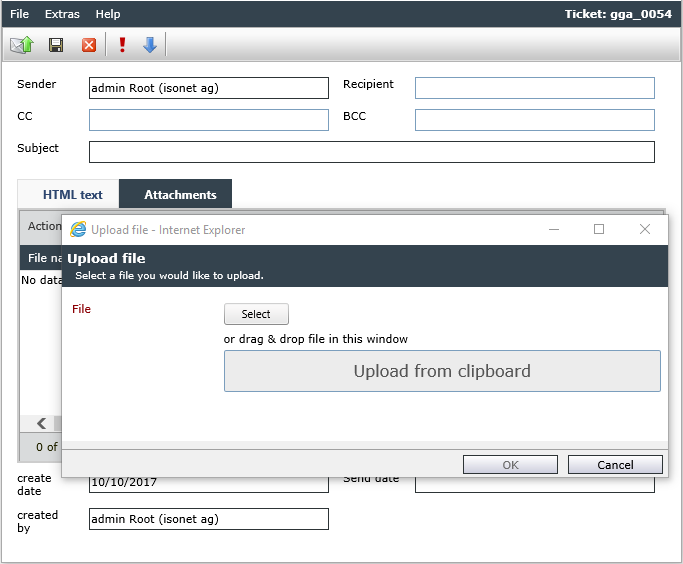
Via the New file button, new files can be attached to the message. An option for deleting attachments can be found in the Actions menu.
Moreover, Knowledge Base articles can be added as an attachment to the message. This option can be found in the Actions menu.
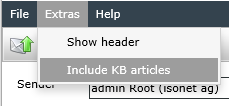
When this menu item is selected, the KB article browser will open and articles can be added. An illustration of the general functions of the KB article browser can be found in the section Link ticket with KB article. An additional option is available here: The attachment can be either attached as a text or as a file.

If As file is selected, the KB article will be attached to the message as a ZIP file. If Inline is selected, the article’s text will be displayed at the beginning of the message text.
Via the Actions menu, an e-mail header – if existing - can be displayed as well.
If the user authentication has been activated for this ticket action during the configuration, a dialog, in which the user name and password has to be specified, will appear after a click on Send.
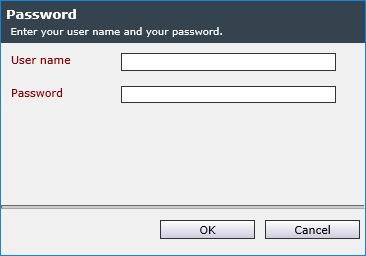
A currently logged in user has to enter his user name and password here. No other user of the system is allowed here. This increases the security in cases, in which a staff member leaves his workstation without locking it. Thus, a user having access to the workstation cannot send any e-mails in the name of the logged in user.
This option allows for sending an e-mail to a recipient set in the messaging schema. In doing so, the e-mail cannot be edited.
Configuration
A messaging schema has to be selected in the action.
Executing the Action
The action can be found on the Actions tab of a ticket. Via the Send button, the e-mail will be sent.
A form of type Action is displayed on the Actions tab.
Configuration
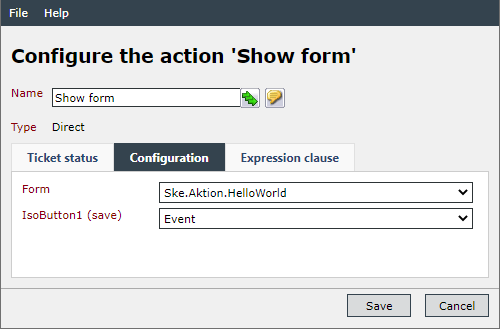
During configuration, after entering the form, a selection for the workflow to be started appears for each button on the form. A maximum of 10 buttons can be configured.
Executing the Action
On the Actions tab, the Show form button is available.
This action allows for displaying an individually created HTML page in the ticket.
Configuration
For creating an HTML page, a WYSISWYG editor will be displayed. Similarly to the KB article, the desired content can now be entered. Further information for using the WYSIWYG editor can be found here.
Note:
See also String Conversions of Sharp-Expressions.
Executing the Action
As soon as a defined ticket status is reached, the HTML page will be displayed for the defined users as a new tab under Actions.
Via this action, a ticket can be solved, irrespective of its position within the workflow.
Configuration
Solved status: This status will automatically be assigned to a ticket that has been solved via this action.
Workflow: This workflow is to be run through after the action is executed.
Title: If a specific title is to be specified for the action, it can be entered here. It will only be displayed on the Actions on this action’s tab later on.
Covered statuses: This option specifies, which statuses are to be marked as Achieved by the SLM in order to avoid a subsequent escalation.
-
No action: Die ticket action is executed.
-
Close ticket: After executing the action, the ticket will switch to the status for Closed.
-
Change tab: The tab specified here will be opened in the side bar of the ticket.
Solution: Depending on the setting made here, it is possible to enter an internal, an external, or both solutions during the action’s execution.
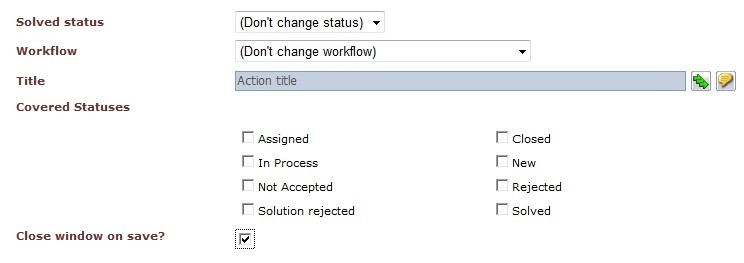
Executing the Action
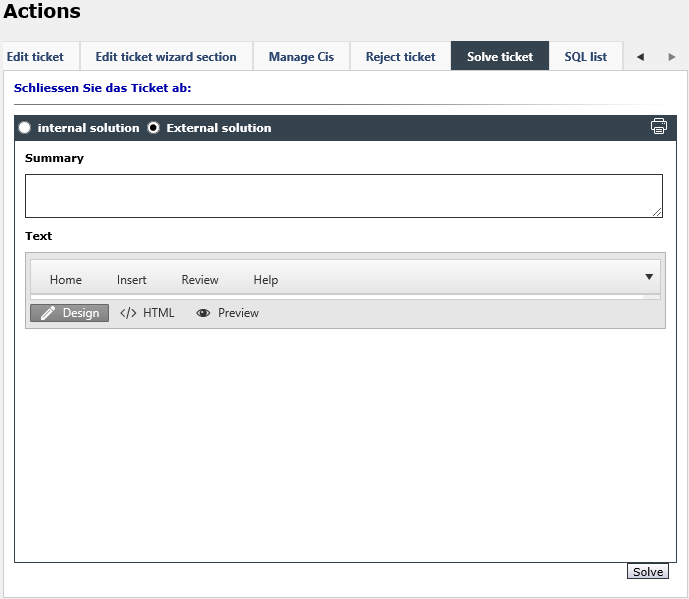
The action Solve ticket will now be available on the Actions tab. A solution for a ticket can be entered here. If a title has been specified for the action, it will be displayed above the summary. Further information for using the WYSIWYG editor can be found here.
This action allows for starting an SQL query and displaying it in the ticket dialog.
Warning:
Entire datasets can be influenced. The action should therefore be used with caution.
Configuration
Provider: Specifies the type of the data source.
Connection string: The string for connecting to the database is to be entered here.
Example:
Server=isosrvtest;
initial catalog=test;
user id=sa;
password=yourpassword;
SELECT statement: The SELECT statement for a database query including conditions is to be entered here.
Example:
SELECT TOP 100 [id] ,[name] ,[average] ,[city] ,[birthdate] FROM [test].[dbo].[testtable_one]
Column headers: This option allows for entering localized or user-defined column headers. For this purpose, a list separated by semicolons has to be created for each available language.
Example:
name=FirstName;average=Average;city= Current location;birthdate= DateofBirth
Default values: Defines predefined values for columns as soon as a new entry is to be created. A list separated by semicolons has to be created here as well.
Example:
average=1,5;birthdate=1.1.1980
Localized columns: Localized columns can be used to display content from multiple columns in one column as soon as the edit mode is activated.
Example:
If there is a column name as well as the two localized columns ItalianName and GermanName, you can use the following statement to display only the column name, containing three text boxes changing the localized columns:
name={Italian=ItalianName,Deutsch=GermanName,English=Name}
If the edit mode is activated, multiple text boxes containing the different names will be displayed.
Allow inserts: If this option is activated, entries can be added to the list.
Allow edit: If this option is activated, existing entries can be edited.
Allow delete: If this option is activated, entire entries can be removed from the database.
Hide read-only fields: If fields are marked read-only and if this option is activated, these fields will not be displayed in the ticket action.
"Edit columns" location: The icons for editing an entry can be displayed either on the left or the right side.
Executing the Action
The Actions tab provides a new tab with the name of the action.
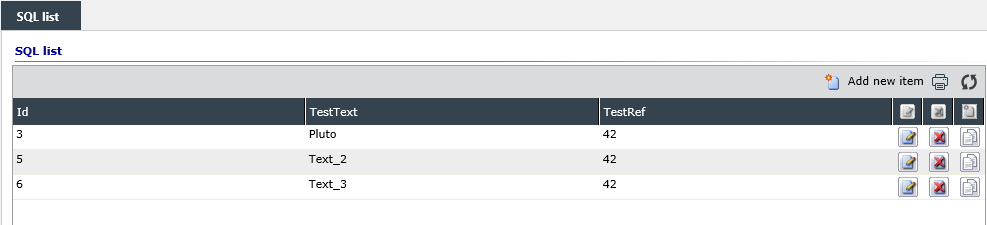
Depending on the configuration, new entries can be added, edited, and deleted or viewed only.
A event workflow can be started with this ticket action.
Configuration
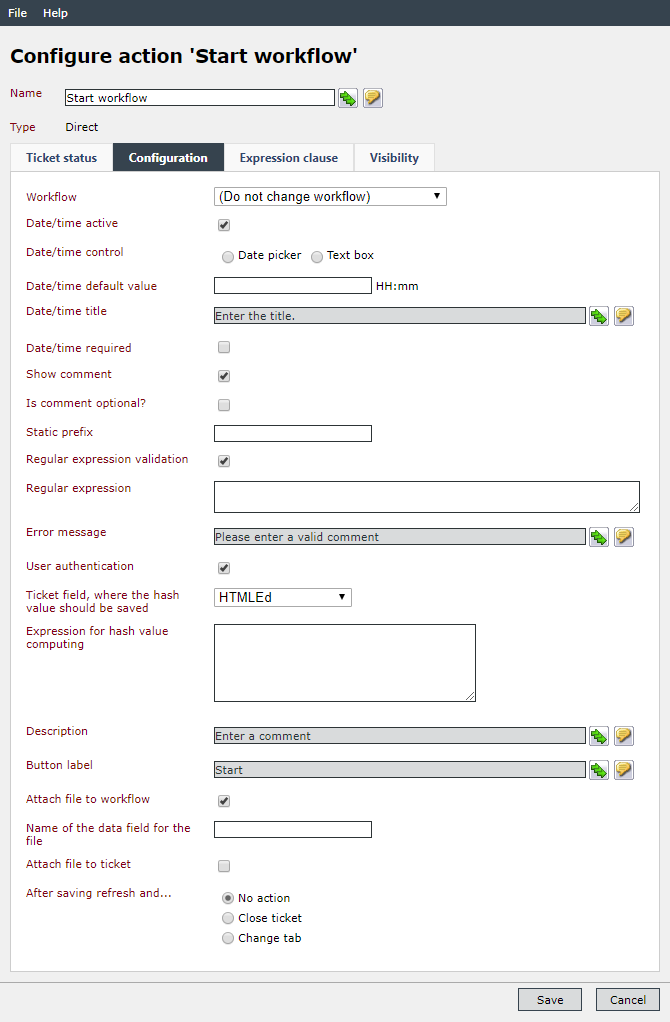
Under Configuration the following options are available:
Workflow: The event workflow to be started.
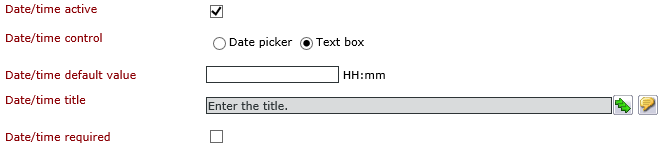
Date/time active: This option can also be used to specify additional times.
Show comment: If the comment function is activated, the next entries are possible.
Is comment optional?: If this option is activated, entering a comment is optional. Otherwise an appropriate entry must be made (default: Not activated).
Static prefix: The static prefix specified here will be written into the history right before the comment automatically.
Regular expression validation: If this checkbox is activated, the options for the regular expression will be displayed and it can be used in order to check whether a valid comment has been entered.
User authentication: If this option is activated, the user has to enter a password for authentication on order to execute the action. Thus, fraudulent use can be prevented, e.g. if the user leaves his desk but does not lock his computer. Further entries:
Ticket field, where the hash value should be saved.
Expression for hash value computing
Description: This is the text to describe the comment to be entered.
Button label: This label will be written on the button that executes the action.
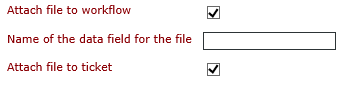
Attach file to workflow: This option allows for attaching further files to the specific workflow item of the ticket.
After saving refresh and ...: This option specifies, which action will be executed after the ticket action. The available options are:
-
No action: Die ticket action is executed.
-
Close ticket: After executing the action, the ticket will switch to the status for Closed.
-
Change tab: The tab specified here will be opened in the side bar of the ticket.
Executing the Action
The action Start Workflow can be found on the Actions tab of a ticket.
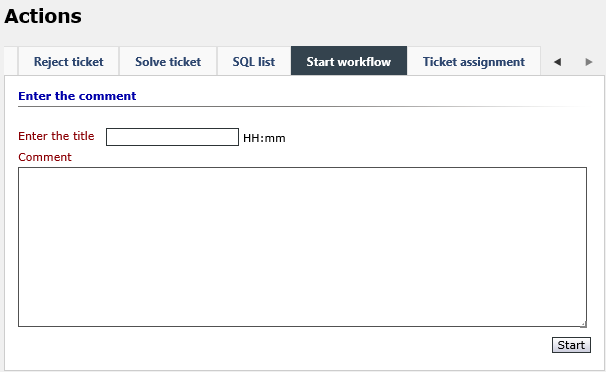
Depending on the activated options, the action can look different from the figure above. Here, a comment can be entered and possible files to be uploaded as an attachment can be selected via the file browser. When all inputs are complete, the event workflow is started by clicking the Start button.
Via this action, users can take over a ticket.
Configuration
An event workflow can be selected.
Note:
If the executing user is member of an administrator group, this ticket action will not work with the restrictions in the Expression clause.
Executing the Action
In order to take over a ticket, the entry Take over ticket can be found under Actions in the top menu. After a click on the action, the ticket will be taken over.
A ticket can be assigned to a certain user or group that by that will become the ticket’s owner.
Configuration
Scope: Defines a restriction, e.g. to only assign a ticket to users, groups, or a team.
Assign to this group and its sub groups: This user browser allows for delimiting the ticket assignment to a certain group and its sub-groups.
Filter results by conditions: In this text box, an expression can be entered for further limiting the constraint on a group.
Workflow: You can specify a specific workflow that the ticket is to run through after assignment.
Free/Busy Setting: Here you can select the availability of the selected contract of the SLM (see also Configuration of Free/Busy times).
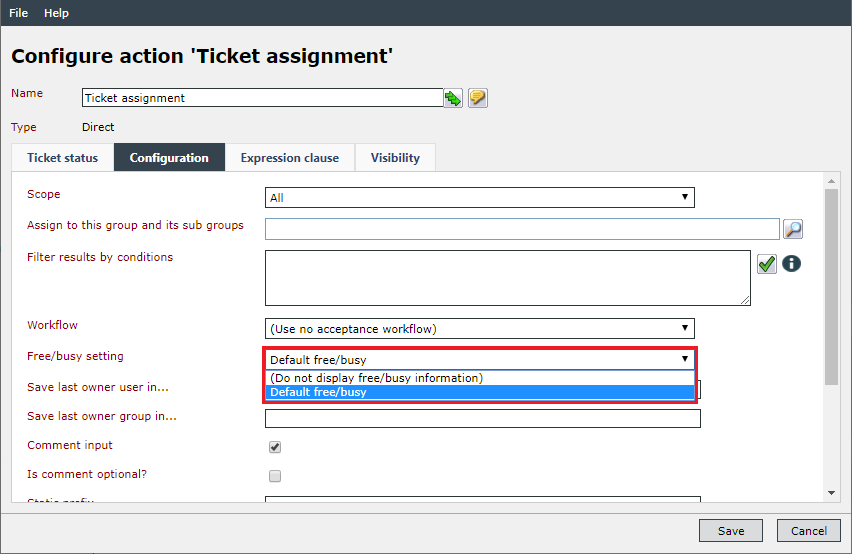
Save last owner in ...: A data field to save the last owner in (e.g. for tracking purposes) can be specified here. The data field will not be displayed in the ticket, but may be read out by a workflow plug-in, for example.
Save last owner group in ...: A data field to save the last owner group in (e.g. for tracking purposes) can be specified here. The data field will not be displayed in the ticket, but may be read out by a workflow plug-in, for example.
Comment input: If this checkbox is activated, a comment has to be entered in order to execute the action. The following option appears at the same time:
Is comment optional?: If this option is activated, entering a comment is optional. Otherwise an appropriate entry must be made (default: Not activated).
Static prefix: The static prefix specified here will be placed directly before the comment. Thus, it is easier to trace which comment belongs to the action.
Remarks: The message will be displayed when the cursor hovers over the question mark icon in the ticket action.
After saving refresh and ...: This option specifies, which action will be executed after the ticket action. The available options are:
-
No action: Die ticket action is executed.
-
Close ticket: After executing the action, the ticket will switch to the status for Closed.
-
Change tab: The tab specified here will be opened in the side bar of the ticket.
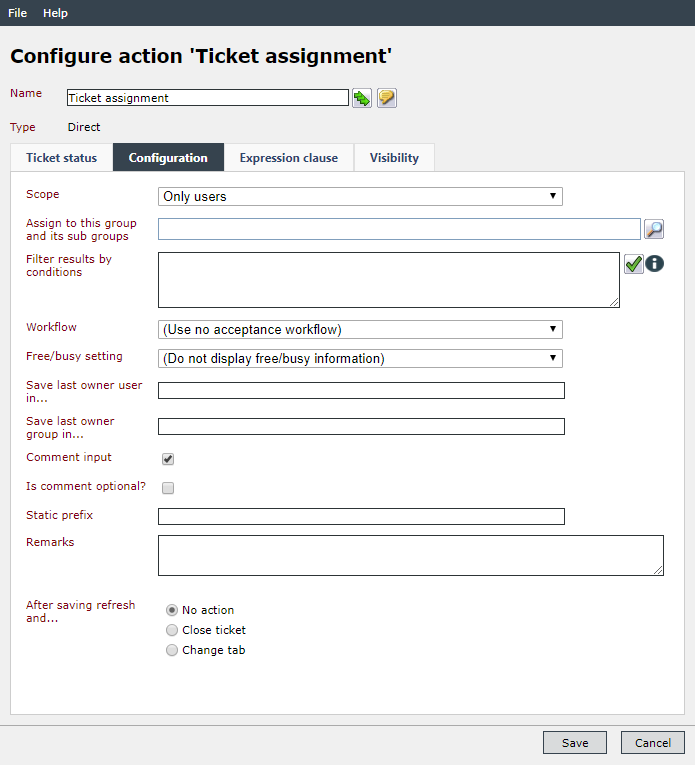
Executing the Action
The Actions tab contains the ticket action Ticket Assignment.
If the option Assign to this group and its subgroups has been activated during the action’s configuration, the user browser is prefilled with the group or user configured there.
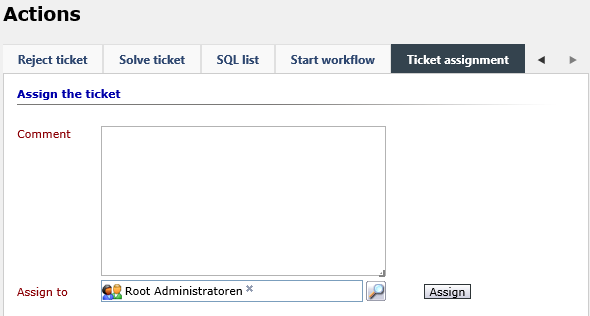
If the option Comment input is activated, a comment can be entered. Otherwise, the desired user or group can be selected by using the magnifying glass icon and the user browser. Via a click on Assign, the ticket will be assigned.
Via this action, tickets can be assigned to groups or individual users via dispatching rules.
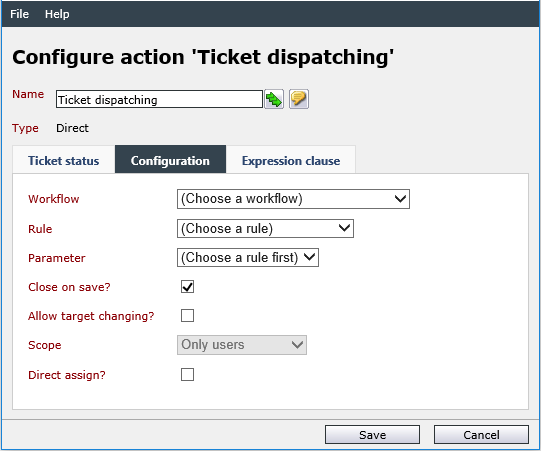
Configuration
Workflow: The workflow to run through by the ticket as soon as the action is executed.
Rule/Parameter: The dispatching rule and its corresponding parameter to be applied on the ticket.
Close on save?: This option closes the ticket as soon as the Save button is used.
Allow target changing?: If target changing is allowed, the determined user or group can be changed subsequently via the user browser.
Scope: The restrictions made here determine the options of target changing.
Direct assign?: Allows for assigning directly.
Executing the Action
The action can be accessed via the Actions tab in the ticket.
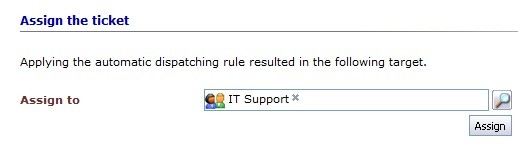
If an incorrect assignment has been made by the automatic dispatching, another user or user group can be selected via the magnifying glass icon, if target changing has been allowed. With the Assign button, the ticket will be dispatched to the selected user/group and, if configured this way, closed automatically.
This ticket action allows for adding file attachments to a ticket as well as managing existing file attachments.
Configuration
A separate configuration of this action is not necessary.
Executing the Action
Via the File attachments tab on the left sidebar, file attachments can be accessed. In the dialog, an upload from the clipboard can be started via the Actions menu or a file can be uploaded as an attachment via the New file button. For this purpose, select the desired file, specify its type and add an optional comment in the dialog. Afterwards, the file will be uploaded and displayed under File attachments. The available storage capacity for file attachments is displayed (configured in the ticket scheme under Memory limit for attachments per ticket).
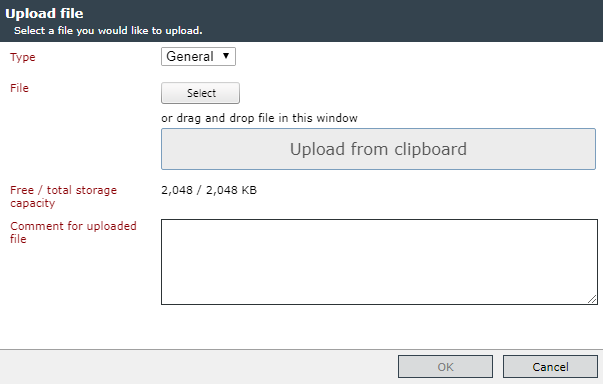
Note:
Restrictions on permitted file formats - see FileUploadFilter.


 Copyright (c) 2000-2026 Isonet AG