Default Configuration
Context Menu
For the plug-in configuration, a context menu is available for every plug-in.
This context menu allows for editing the name and description of the plug-in as well as adding inputs and outputs. Furthermore, the GUID of the plug-in can be displayed, e.g. in order to compare it to errors found in the log file.
Note:
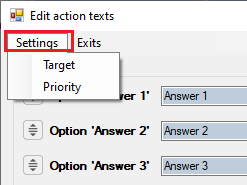
The following options can be set via Settings ( ):
):
- Target
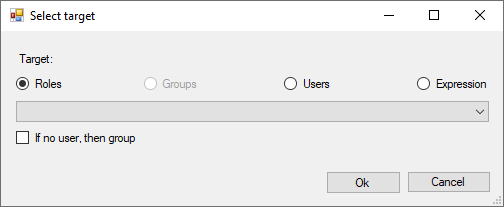
- If no user, then group
The activity goes to the group if no user is set.
Currently, this option causes the owner or owner group to always be the target of the activity. If the group does not exist or is empty, an error is generated.
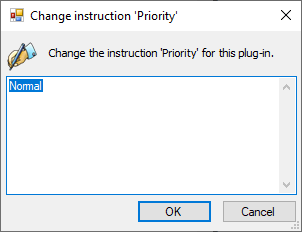
- Priority
Note:
To add a fully configurable output for activity plug-ins, a new output must be added via the Exits menu item within the configuration dialog.
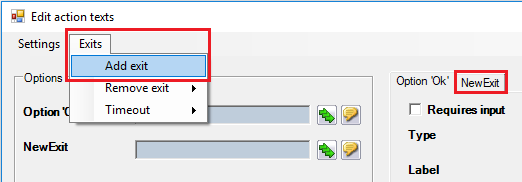
It is recommended not to use special characters and spaces for the name of another output when adding it.
Note:
For activity plug-ins, it is possible to configure a timeout exit. The option Use service times for timeout has the effect that any service time linked to the ticket is taken into account in the time measurement.
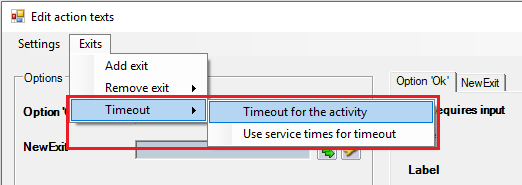
The option Show XML enables the administrator to manipulate the plug-in directly at code level. However, this option should only be used by experienced administrators and will not be explained in detail here.
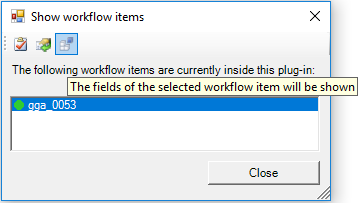
Via the option Show workflow items, all workflow items currently in the plug-in, like tickets or tasks, can be displayed.
Tip:
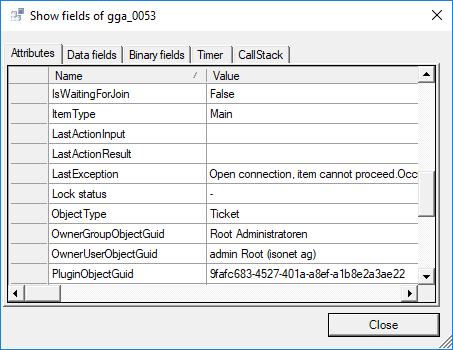
The right icon opens a window in which the fields of the workflow item can be viewed.
In the Attributes tab, for example, the LastException field can be used for troubleshooting.
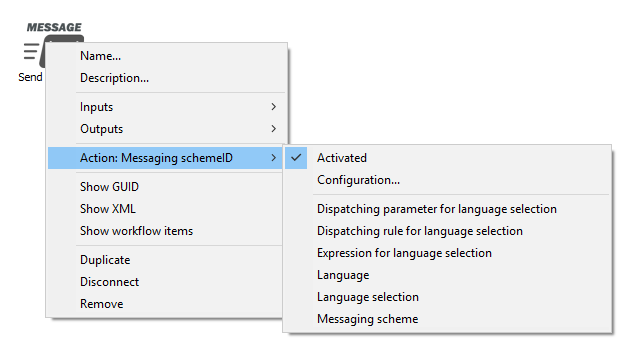
The three last options allow for duplicating a plug-in (incl. its configuration), disconnecting a plug-in (all outputs and inputs will be disconnected from adjacent plug-ins), and removing a plug-in. The removal of a plug-in is irrevocable.
The most important option is Action The settings for the desired functionality of the plug-in can be defined here. Chapter Plug-ins Description illustrates the setting options for every plug-in individually.
Tip:
Each plug-in has a button for directly opening the configuration when it is mouse-overed via the plug-in icon.
Configuration Dialog
For most plug-ins there is a special configuration dialog that simplifies the settings. This can be seen by moving the mouse over the plug-in and a small gear wheel appears at the upper right corner of the plug-in.
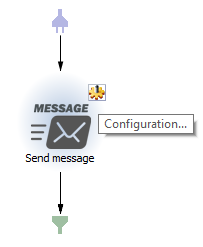
Plug-ins with a separate configuration dialog are indicated by the gear wheel icon. Clicking on this icon will open the configuration dialog.
Configuring of Action Texts
For plug-ins in need of a user interaction (e.g. questions to be answered or orders to be executed, in which the execution is to be confirmed positively or negatively), action texts can be configured.
These texts can always be edited for all available languages.
Default Configuration
The configuration options described here refer to the menu item Action: ActivityName in the context menu of every plug-in.
Many plug-ins have similar configuration options. For example, often a group or user an activity is to be assigned to can be selected.
The following section details these frequent configuration options, so they have not to be repeated for every individual plug-in. Whenever a plug-in offers specific configuration options not mentioned here, they can be found in the respective plug-in’s entry.
Configuration for User
In this dialog, a user can be selected, e.g. the user a certain ticket action is to be assigned to.
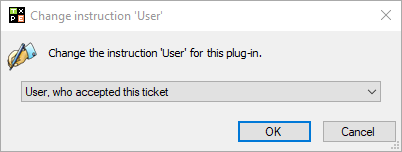
Several default values or a specific user can be selected here.
Note:
If the key ShowAllUsersInWorkflowPlugin is set to True, all users appear next to the roles.
Configuration for Group
The configuration for the group is similar to the user configuration. In this case, several default values for groups are available or a specific group can be selected.
Configuration for Priority
You can use this setting to control whether the activity is hidden in the User or Group activity list. To do this, the value defined in the key ActionPrioritiesToExclude (Settings > Administration > Configuration settings) must be specified.
Configuration forEdit Texts
If the option Edit texts is available in the context menu, this refers to texts provided to the user during an action. This can be questions to be answered or tasks to be executed, for which the execution is to be either confirmed or declined.
All texts can be entered in all available languages of the system.
As an example, the action Common Task User (Yes/No) is used. All other dialogs for Edit Texts are analogous.
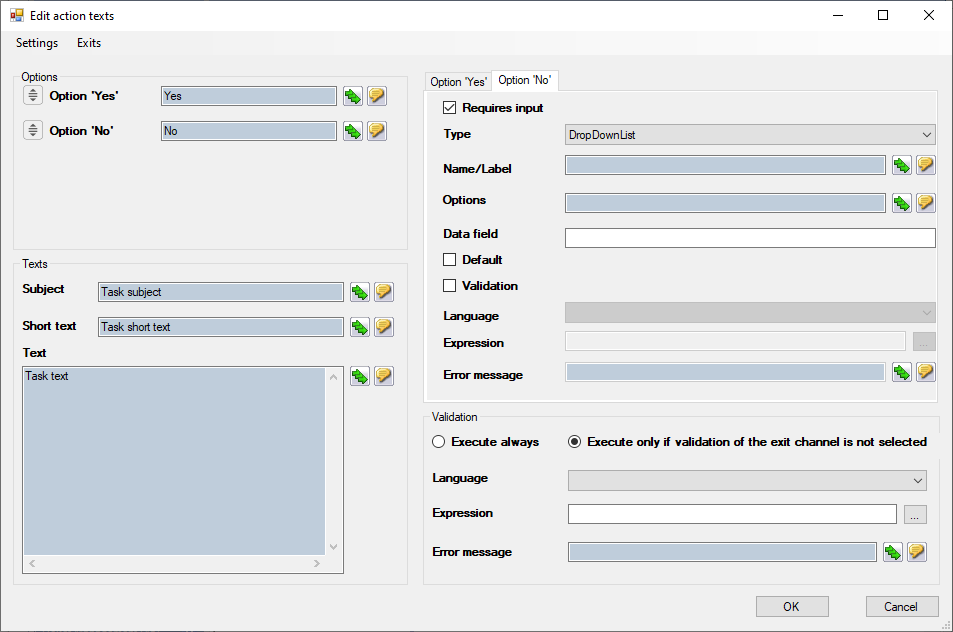
The Options area displays all buttons and selection lists available to the users in the selected action. Their number can vary depending on the action. The labeling of the buttons can be adjusted in the text boxes (e.g. Confirm instead of Yes). For each user input, it is necessary to select a field under Data field, in which the user input will be saved.
Tip:
The individual options can be moved up or down with the mouse using a move button ( ). The tabs on the right side change analogously in the corresponding order.
Conversely, the tabs of the input area can be moved to the right or left with the mouse, so that the text fields of the options move up or down.
The set order then appears in the action list of the workflow according to the configured option type.

The Input area on the right provides the option to request a reason for the user’s selection choice, for example. In the following configuration, the user is asked to provide a reason whenever he selects No (and thus Decline).
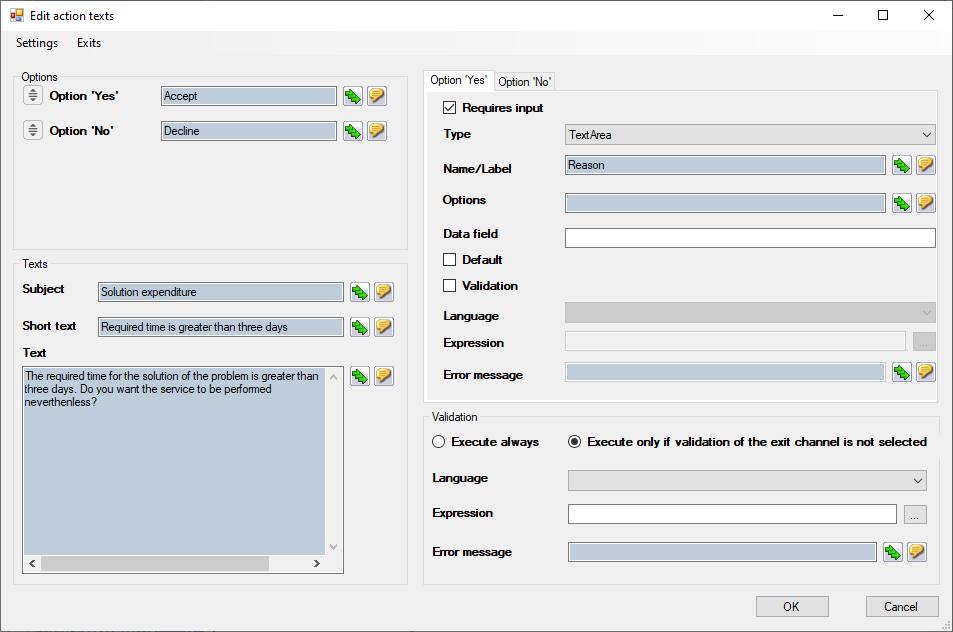
Activating the option Requires input results in a button change in the final interface view as well. Instead of buttons, selection fields will be displayed.
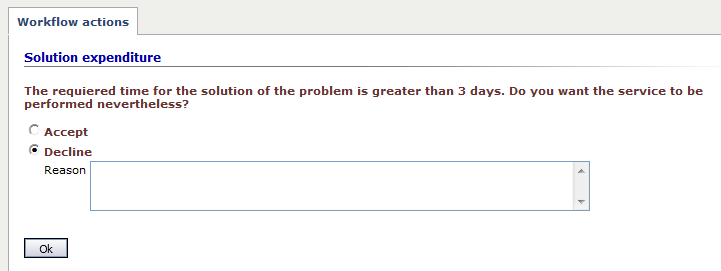
If the user selects the option Decline, a dialog will open, prompting him to enter a reason. This reason will be saved as a comment in the ticket.
In the following figure, a data field has been specified. This is a virtual data field in the Workflow Manager. In this field, the user input is saved in order to be reused later on if necessary (e.g. to save the comment in a ticket field).
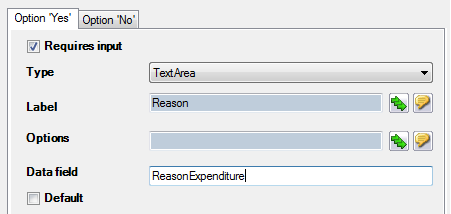
The following field and button types are available:
DropDownList: Using a list of options with comma separated values. The list will provided to the user as a drop-down list.
DynamicDropDownList: The dynamic drop-down list allows for reading out an XML file and displaying its values in a drop-down list.
Under Options a data field must be specified which contains the XML.
The XML structure can either be given statically or taken from a data field. Please note that for each language a separate XML can be used (localization).
Example:
<Options>

<Option selected ="true">
<Value>1</Value>
<DisplayText>CHGE: Changemanagement</DisplayText>
</Option>

<Option>
<Value>2</Value>
<DisplayText>Divitel</DisplayText>
</Option>

<Option>
<Value>3</Value>
<DisplayText>Finances/Personnel</DisplayText>
</Option>

<Option>
<Value>4</Value>
<DisplayText>g2m Vision</DisplayText>
</Option>

<Option>
<Value>5</Value>
<DisplayText>Senior management</DisplayText>
</Option>

</Options>
Note:
The exact spelling of the XML elements must be observed (case sensitive). The Value element must be above the DisplayText element. Only the inner texts of Value and DisplayText can be freely assigned.
An option can be set as preselected. This is done by using the text <Option selected ="true"> instead of <Option> (in the example Changemanagement).
At runtime, the user is shown a drop-down list filled with the contents of the XML text. The DisplayText is then shown. The corresponding Value is written into the configured data field after an entry has been selected.
TextArea: Provides the user with a text field, in which a reason can be entered, for example.
TextBox: Displays a text field.
TextBoxPassword: Displays a text field with a hidden text.
Date: Entering a date value.
DateTime: Entering a date and time value.
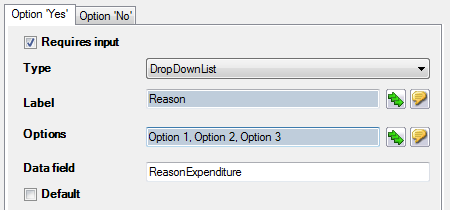
If the type DropDrownList has been selected, default answers can be stored in the Options field (separated by commas).
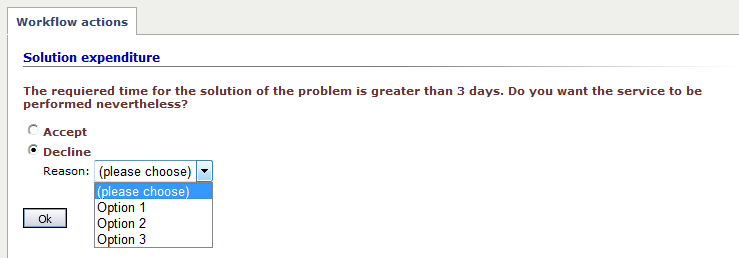
The user can then select one of these options in the activity:
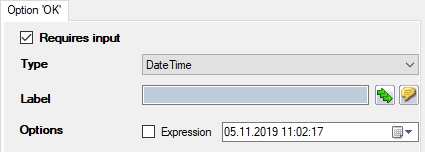
When the Date or DateTime type is selected, a date or date and time picker is displayed.
With the Expression option, the picker can be switched to a text field in which an expression can be entered.
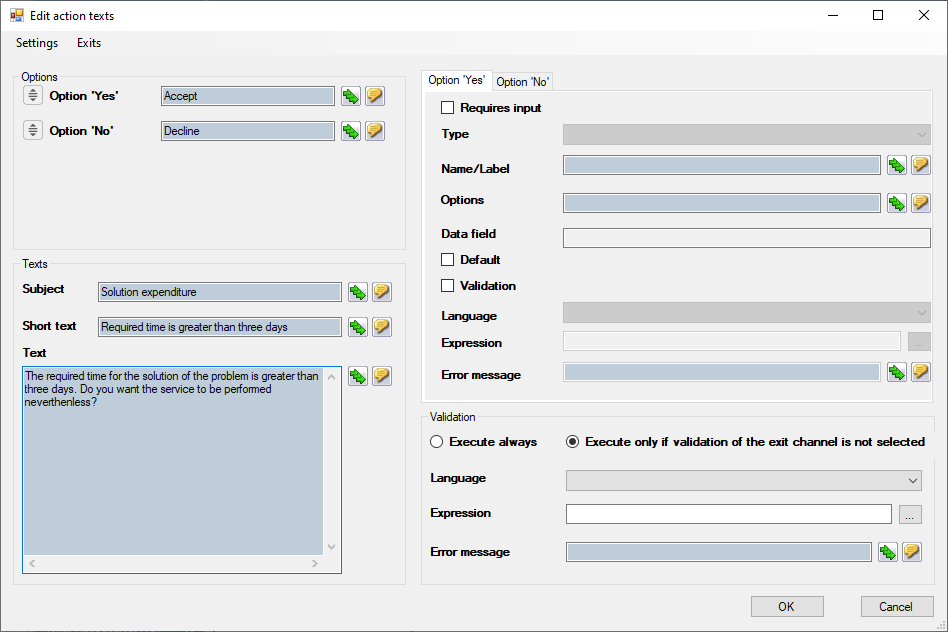
In the Text area, questions or tasks can be devised and the texts to be displayed in the activity list, for example, specified.
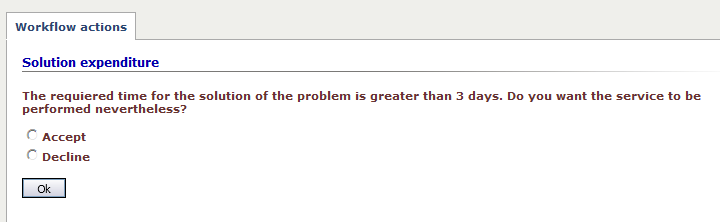
The above configuration would be displayed in the ticket detail dialog as follows:
Note:
As soon as an input is required, the entered content is available in some plug-ins (e.g. Create comment and Set Ticket field) via the Last action option after exiting the activity plug-in. If a data field is also specified, the input is also stored in this field and can be used via expressions.
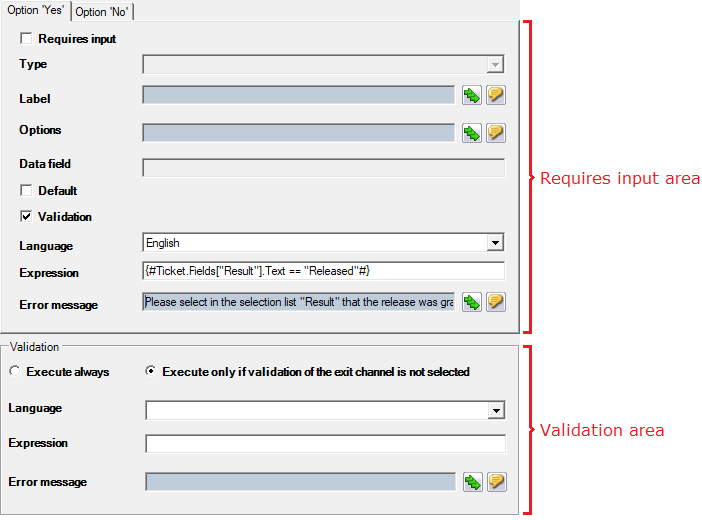
Option Validation in the Requires input area
During validation, the results of the entries made can be checked specifically for the selected outcome. After selecting this option, the following input fields are activated:
- Language: An installed language can be selected from a list. This is used to evaluate the expression of Expression.
- Expression: An expression that must result in True for the selection to be allowed.
- Error message: Text that is displayed in the event of an error.
Validation area
The following two options are available:
- Execute always: The specified validation is always executed, in particular in addition to any existing validations of individual outputs.
- Execute only if validation of the exit channel is not selected: Validation is performed for each output that does not have its own validation.
Language: An installed language can be selected from a list. This is used to evaluate the expression of Expression.
Expression: An expression that must result in True for the selection to be allowed.
Error message: Text that is displayed in the event of an error.
Tip:
The use of validation in an activity plug-in can be used to check the input against a regular expression (RegEx). Since the value has not yet been stored anywhere at the time of validation, it cannot be accessed in a Sharp-Expression. Prefixing regex: causes the input value to be checked against the regular regular expression.
Example: Decimal number with two decimal places
regex:^[0-9]+,[0-9]{2}$


 Copyright (c) 2000-2026 Isonet AG
Using Regular Expressions to Select Characters
A common use of regular expressions is to find special strings in a set of strings. A regular expression is made up of the characters of the underlying alphabet in combination with the metacharacters [ ] ( ) { } | ? + - * ^ $ \ . (partly context-dependent), with some implementations also : ! < =. The meta property of a character can be overridden by a preceding backslash (\). All other characters of the alphabet stand for themselves.
Square brackets can be used to define a character selection ([ and ]). The expression in square brackets then stands for exactly one character from this selection.
For example, a circumflex ^ at the beginning of a character class definition means that the character class is negated or inverted (in the sense of complement formation). However, if a circumflex is somewhere else in the definition, it is to be understood literally. The meaning of the hyphen sign (-) also depends on the context. If there is a hyphen - between two characters in the class definition, for example [a-g], it is to be understood as a to-dash, i.e. as a description of a character interval or character range with respect to the ASCII table.
The specific syntax rules vary depending on the specific implementation, programming language, or library in use. Because regexes can be difficult to both explain and understand without examples, interactive websites for testing regexes are a useful resource for learning regexes by experimentation (e.g.: https://regex101.com). The following table contains a basic description of some properties of regular expressions:
if ($string1 =~ m/...../) {
print "$string1 has length >= 5.\n";
}
Output:
Hello World
if ($string1 =~ m/(H..).(o..)/) {
print "We matched '$1' and '$2'.\n";
}
Output:
We matched 'Hel' and 'o W'.
if ($string1 =~ m/l+/) {
print "There are one or more consecutive letter \"l\"'s in $string1.\n";
}
Output:
There are one or more consecutive letter "l"'s in Hello World.
if ($string1 =~ m/H.?e/) {
print "There is an 'H' and a 'e' separated by ";
print "0-1 characters (e.g., He Hue Hee).\n";
}
Output:
There is an 'H' and a 'e' separated by 0-1 characters (e.g., He Hue Hee).
if ($string1 =~ m/(l.+?o)/) {
print "The non-greedy match with 'l' followed by one or\n";
print "more characters is 'llo' rather than 'llo Wo'.\n";
}
Output:
The non-greedy match with 'l' followed by one or more characters is 'llo' rather than 'llo Wo'.
if ($string1 =~ m/el*o/) {
print "There is an 'e' followed by zero to many ";
print "'l' followed by 'o' (e.g., eo, elo, ello, elllo).\n";
}
Output:
There is an 'e' followed by zero to many 'l' followed by 'o' (e.g., eo, elo, ello, elllo).
{0,N} matches "at most" N times.
x* y+ z? is thus equivalent to x{0,} y{1,} z{0,1}.
if ($string1 =~ m/l{1,2}/) {
print "There exists a substring with at least 1 ";
print "and at most 2 l's in $string1\n";
}
Output:
There exists a substring with at least 1 and at most 2 l's in Hello World
if ($string1 =~ m/[aeiou]+/) {
print "$string1 contains one or more vowels.\n";
}
Output:
Hello World
if ($string1 =~ m/(Hello|Hi|Pogo)/) {
print "$string1 contains at least one of Hello, Hi, or Pogo.";
}
Output:
Hello World
if ($string1 =~ m/llo\b/) {
print "There is a word that ends with 'llo'.\n";
}
Output:
There is a word that ends with 'llo'.
[\p{Alphabetic}\p{GC=Mark}\p
in Unicode, where the Alphabetic property contains more than Latin letters, and the Decimal_Number property contains more than Arab digits.
if ($string1 =~ m/\w/) {
print "There is at least one alphanumeric ";
print "character in $string1 (A-Z, a-z, 0-9, _).\n";
}
Output:
There is at least one alphanumeric character in Hello World (A-Z, a-z, 0-9, _).
[^\p{Alphabetic}\p{GC=Mark}\p
in Unicode.
if ($string1 =~ m/\W/) {
print "The space between Hello and ";
print "World is not alphanumeric.\n";
}
Output:
The space between Hello and World is not alphanumeric.
if ($string1 =~ m/\s.*\s/) {
print "In $string1 there are TWO whitespace characters, which may";
print " be separated by other characters.\n";
}
Output:
In Hello World there are TWO whitespace characters, which may be separated by other characters.
$string1 = "Hello World\n";
if ($string1 =~ m/\S.*\S/) {
print "In $string1 there are TWO non-whitespace characters, which";
print " may be separated by other characters.\n";
}
Output:
In Hello World there are TWO non-whitespace characters, which may be separated by other characters.
same as [0-9] in ASCII;
in Unicode, same as the \p{Digit} or \p{GC=Decimal_Number} property, which itself the same as the \p{Numeric_Type=Decimal} property.
if ($string1 =~ m/(\d+)/) {
print "$1 is the first number in '$string1'\n";
}
Output:
99 is the first number in '99 bottles of beer on the wall.'
if ($string1 =~ m/\D/) {
print "There is at least one character in $string1";
print " that is not a digit.\n";
}
Output:
There is at least one character in Hello World that is not a digit.
if ($string1 =~ m/^He/) {
print "$string1 starts with the characters 'He'.\n";
}
Output:
Hello World
if ($string1 =~ m/rld$/) {
print "$string1 is a line or string ";
print "that ends with 'rld'.\n";
}
Output:
Hello World
if ($string1 =~ m/\AH/) {
print "$string1 is a string ";
print "that starts with 'H'.\n";
}
Output:
Hello World
if ($string1 =~ m/d\n\z/) {
print "$string1 is a string ";
print "that ends with 'd\\n'.\n";
}
Output:
Hello World
if ($string1 =~ m/[^abc]/) {
print "$string1 contains a character other than ";
print "a, b, and c.\n";
}
Output:
Hello World
Further descriptions and examples can be found under the following link:
[Quelle: Wikipedia]