Configuration
The Service Level Management can be accessed via Settings > Service Level Management > Service Level Management. The various Service Level Agreements, coverage ranges, services, priorities, and escalation times can be managed here.
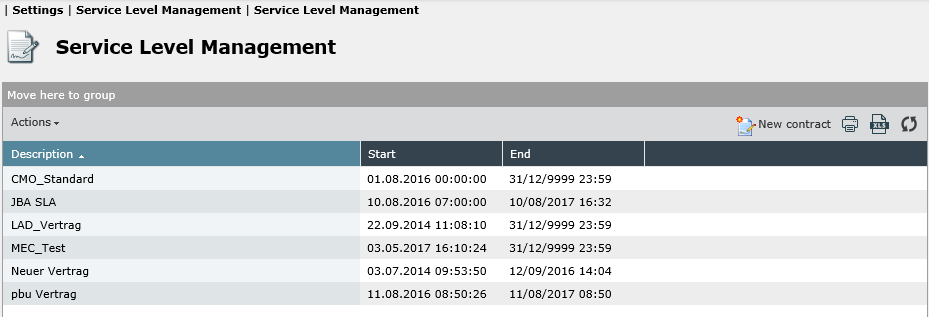
Important settings:
Creating and Managing Contracts
The SLM overview displays all contracts already created and provides the option to create new contracts via the New Contract button top right. Via the Actions menu on the left, already existing contracts can be copied and deleted. A double click on an existing contract allows for editing it subsequently.
Creating New Contracts
For creating a new contract, a New contract button can be found. A click on this button opens a new dialogue window, in which the first information on the contract can be entered. Until the first saving, only the Settings tab will be visible and usable here.
Copying Existing Contracts
In order to copy an existing contract, it has to be highlighted on the contract list. The menu item Copy in the Actions menu has to be selected subsequently. Now, a new dialogue will open, in which the new contract’s name can be entered.
Tip:
Coverages and file attachments will not be copied when copying a contract and have to be recreated manually.
Managing Contracts
In order to display the contained information of an existing contract and change it if necessary, a double click on a contract on the SLM overview opens the properties dialog of each contract.
In the following sections, the individual configuration pages and parameters will be described.
This tab allows for entering and managing general information on the contract. As long as the contract has not been created yet, this is the only tab that can be filled in.
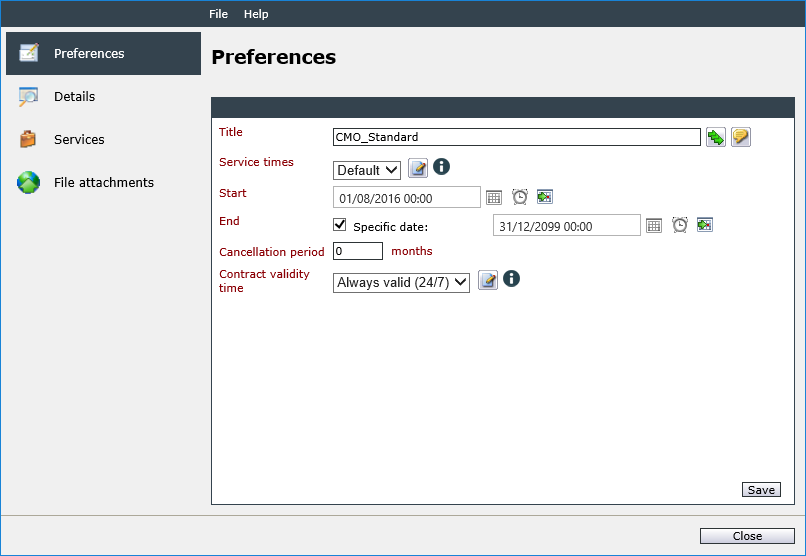
The following information and options can be configured here:
Name: The name for the contract for identifying it distinctly. If multiple languages have been activated, the localization buttons are displayed.
Service times: Defines operation or contract times for the contract. Often used times are already included by default. If the service times mentioned in the contract are not available here, new service times can be created via the Edit button on the right.
The service times configuration and management will be explained in the following section.
Start: Defines the date, on which the contract comes into effect.
End: If the contract is temporary, it is possible to define the contract end via the date and time feature. For this purpose, there is a Specific date? checkbox. If it is enabled, the date and time can be defined via date selection field and the drop-down list for times just like for the beginning of contracts. If the option is deactivated, the contract is to run indefinitely.
Cancellation period: In case of a contract with an indefinite validity period, there is a cancellation period which must be adhered to in most cases. It can be deposited here; however, the value entered here is purely descriptive and has no further tasks.
Validity period of the contract: The validity period of the contract defines the periods of time, in which this contract will be applied to certain items automatically. Pre-set time values are available here. If these deviate from the times agreed on in the real contract, they can be edited via the Edit button on the right.
If all of the information has been entered correctly, a click on the Save button creates the contract. The remaining tabs will now be available.
Service Times
Service times are used for defining operation and contract times and for reproducing a contract’s validity coverage. For this purpose, an arbitrary amount of service times can be defined, which then will be used for computing the individual escalation times. These service times can be saved in contracts as well as in individual services.
The service times do not only define the general operation times, but they also include special leave days. Such days (e.g. fixed and moveable holidays) override the contract times. They can be entered as specific days in a year (day, month, and year) or as annual days (day and month). An example for such a contract time consisting of general service times and specific special leave days could look as follows:
| Day of the week | Start | End | Start | End |
|---|---|---|---|---|
| Monday | 08:00 | 12:00 | 13:00 | 17:30 |
| Tuesday | 08:00 | 12:00 | 13:00 | 17:30 |
| Wednesday | 08:00 | 12:00 | 13:00 | 17:30 |
| Thursday | 08:00 | 12:00 | 13:00 | 17:30 |
| Friday | 08:00 | 12:00 | 13:00 | 17:30 |
| Saturday | ||||
| Sunday |
| Special day | Start | End | Start | End | Week day |
|---|---|---|---|---|---|
| January 1st | All | ||||
| January 2nd | All | ||||
| May 1st | All | ||||
| Good Friday | All | ||||
| Easter Monday | All | ||||
| Ascension Day | All | ||||
| Whit Monday | All | ||||
| August 1st | All | ||||
| December 24th | 08:00 | 12:00 | 13:00 | 16:00 | Mo. - Fr. |
| December 25th | All | ||||
| December 26th | All | ||||
| December 31st | 08:00 | 12:00 | 13:00 | 16:00 | Mo. - Fr. |
Tip:
In the automatic SLA assignment for new tickets, only services and priorities with a start date before the ticket creation date and an end date either in the future or undefined will be taken into account. Contracts with an expired validity period will be generally not taken into account.
Creating and Managing Service Times
Everywhere a service time or validity period can be selected, service times can be managed or newly created as well.
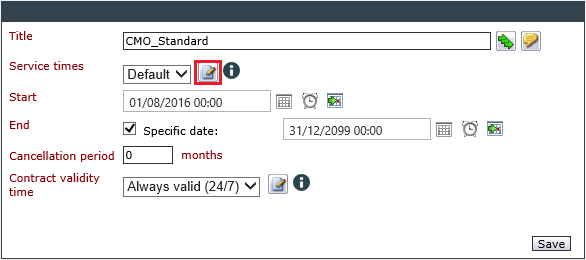
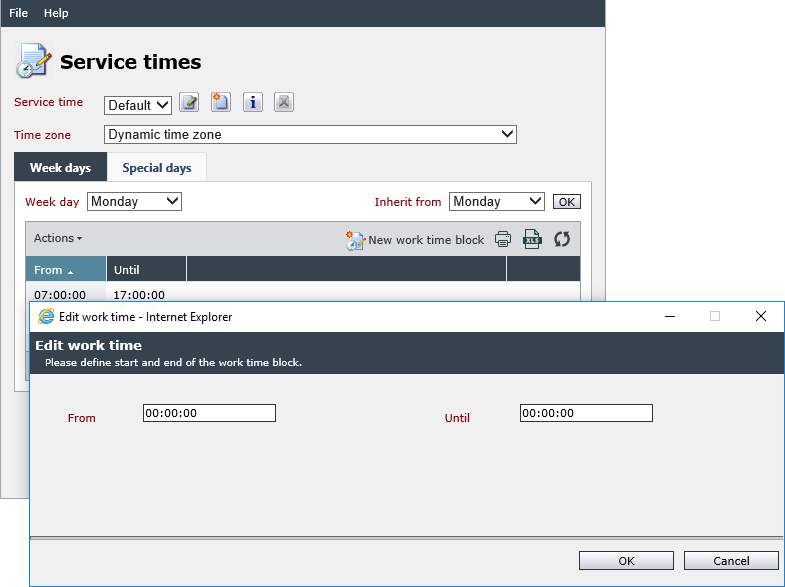
Right next to the drop-down box, the Show service times button is displayed. In the dialog it opens, the already existing service times can be displayed and new ones created.
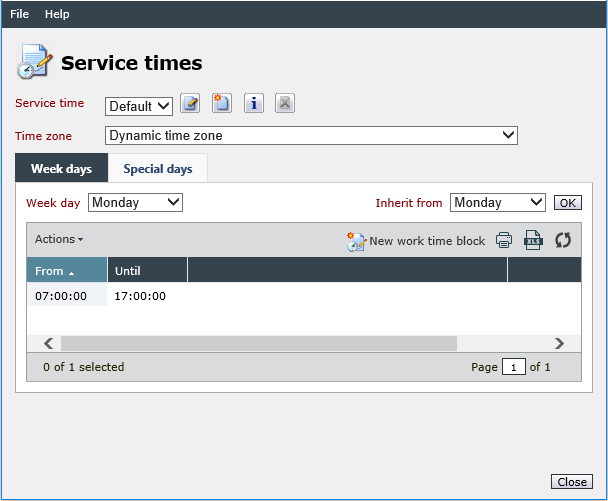
In this dialog, new service times can be created as well as existing ones edited.
Service time: This drop-down box allows for selecting already existing service times. The buttons right next to it have the following functions (from left to right):
- Edit service time: Via this button, the currently selected service time’s name can be edited subsequently.
- New service time: With this, a new service time can be created.
- Show list: This button shows a summary of all already configured work times and all created special leave days of the currently selected service time.
- Delete service time: Via this button, individually created service times can be deleted. However, this is not possible for the already existing and pre-set service times!
Time zone: Here, the matching time zone for the current service times is configured.
Below, working time blocks can be configured via the two tabs Weekdays and Special days.
The configuration of Free/Busy times will be done via SQL in different databases and tables and also through the configuration settings of the system.
Configuration settings
A prerequisite for the usage of the service with a client in the 446 Plattform is a preconfigured Exchange service. The Configuration of the ClientConfiguration table contains relevant keys for the configuration. With key 'AttributeList' in the section 'Isonet.TxpEnterprise.BusinessEntities.Schedule.ExchangeScheduleProvider', administrators are additionally able to choose which login credentials should be matched with the exchange server (also see Table: Configuration Settings - Client). This is a comma separated list of user attributes used to find a user's email inbox. The calendar appointments are then read from the mailbox.
Database settings
A preconfigured Service Time is a prerequisite to complete the database configurations (see also Creating and Managing Service Times). From the table 'SlmContractTimes' and the database 'XPert' you obtain the 'ObjectGuid' of the according Service Time to be used for the Free/Busy service by using SQL. Here is an example with the 'FriendlyName' column:
Example:
SELECT ObjectGuid
FROM SlmContractTimes
WHERE FriendlyName = 'Isonet'
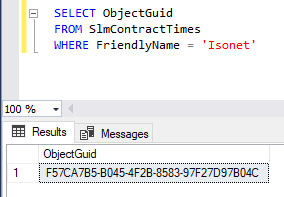
Now you use the 'ObjectGuid' of the Service Time afterwards to insert the Free/Busy settings into the table 'FreeBusySettings' of the database 'XPert' as follows:
Example:
DECLARE @contractTimeGuid AS UNIQUEIDENTIFIER = 'F57CA7B5-B045-4F2B-8583-97F27D97B04C'
DECLARE @blockSize AS INT = 60
DECLARE @showDays AS INT = 20
DECLARE @friendlyName AS NVARCHAR(100) = 'Isonet.FreeBusy'
INSERT INTO FreeBusySettings (ObjectGuid, SlmContractTimeObjectGuid, BlockSizeInMinutes, DaysToShow, FriendlyName)
VALUES (NEWID(), @contractTimeGuid, @blockSize, @showDays, @friendlyName)
Explanations regarding the columns of the table 'FreeBusySettings':
SlmContractTimeObjectGuid: The work schedule is read from the contract time.
BlockSizeInMinutes: Specifies how many minutes each block displays in the overview.
DaysToShow: Defines how many days are displayed per client in the free/busy overview of the FreeBusySettings table.
FriendlyName: A system-wide unique identifier for the resource.
With value of the column 'FriendlyName' you will receive a summary of the Free/Busy settings afterwards by issuing the following query:
Example:
SELECT ObjectGuid, SlmContractTimeObjectGuid, BlockSizeInMinutes, DaysToShow, FriendlyName
FROM FreeBusySettings
WHERE FriendlyName = 'Isonet.FreeBusy'
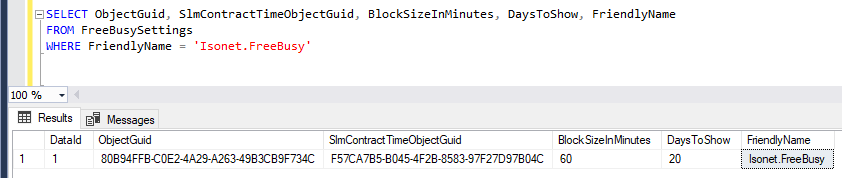
The working time of the SLM contract can be set via the 446 Plattform® user interface.
The free/busy information of a user is displayed in the following form (for example, when searching in the user browser):
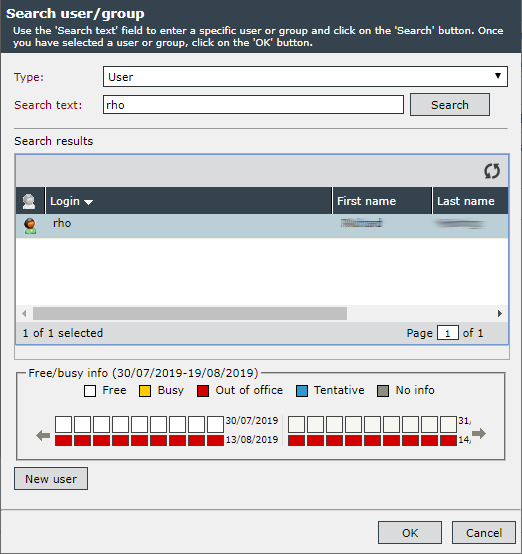
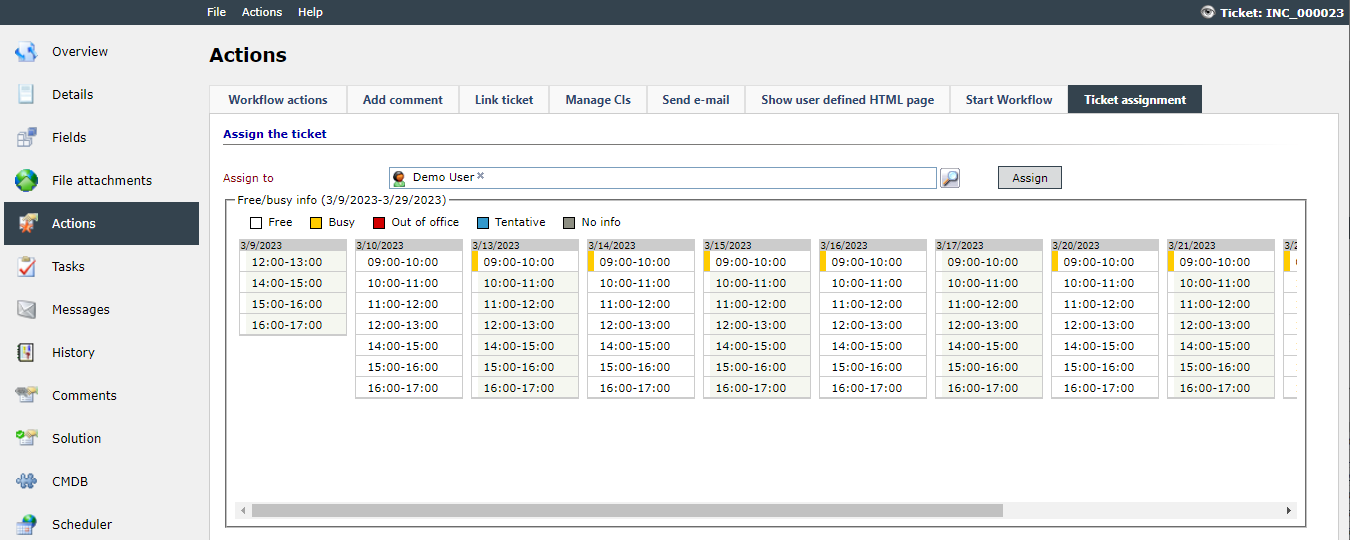
You can select the Free/Busy settings within the configuration of a Ticket Schema and the Ticket Action ''Ticket assignment" to display the availability information directly when performing the Action.
Week days
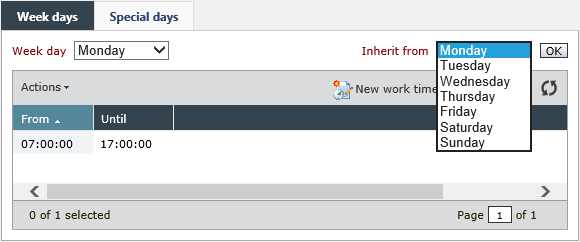
Week days (Monday to Sunday) can be provided with individual work time blocks (from-to-settings) or the settings of the preset week days can be applied.
Under Week day, the designated day can be set in order to define the start and end time of the new block via New work time block.
Alternatively, settings can also be taken over from pre-configured days.
Special days
The configuration of special days is different than the configuration of usual week days.
As soon as the tab Special days has been opened, the desired special day list can be selected. After the list has been selected, the section below will display the service times using this list. The three buttons next to the list provide the options to either create a new list, edit the current list, or delete this list.
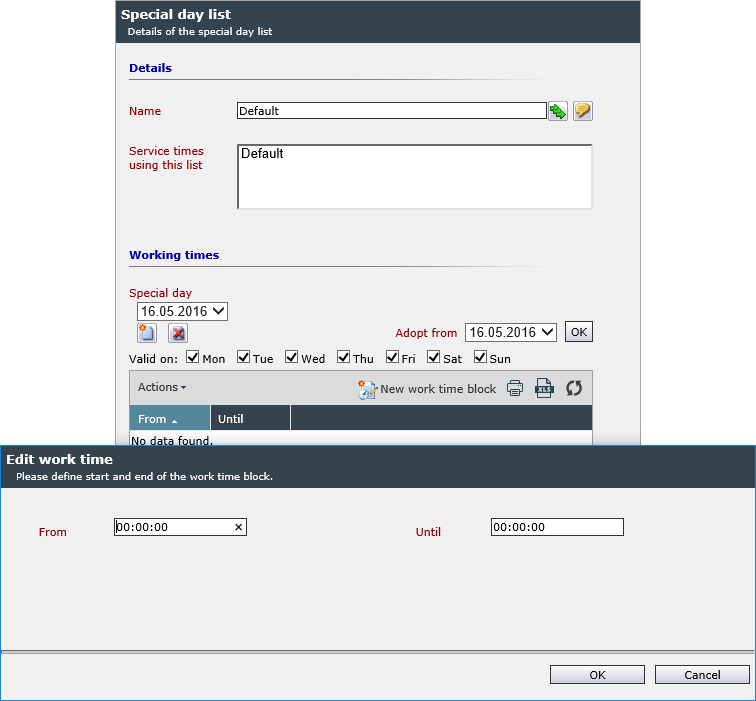
When editing the current list, the above dialog is displayed. Under Working times, either existing special days can be edited or new special days can be created. If a new special day is created, the work times can adopted from existing entries. Otherwise, proceed as follows:
- Click on the New special day button.
- Subsequently, a new dialog will open, in which the desired date can be entered.
- The date specification is to be entered in the DD.MM format for annually recurring special days or in the DD.MM.YYYY format including a year for special days occurring only once, irrespective of the selected language.
- After the creation of the special day, either settings from other, already existing special days can be applied or individual work time blocks can be defined.
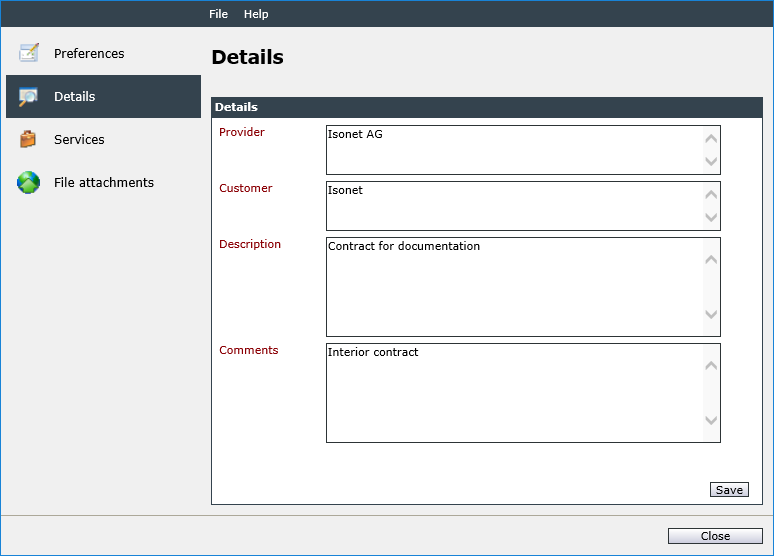
Details
On this tab, various details like Provider, Customer, Description, and Comments can be specified for the contract. These values are purely descriptive attributes for the contract and do not have any further impact on it.
On this tab, the various contract services including their service times, coverages, and priorities are defined. By clicking on New service top right, new services can be created. For this purpose, a new dialog will open, in which the information and settings for the respective service can be entered. Alternatively, this configuration dialog can be accessed via a double click on an existing service.
Settings
In the service preferences, the following options can be modified:
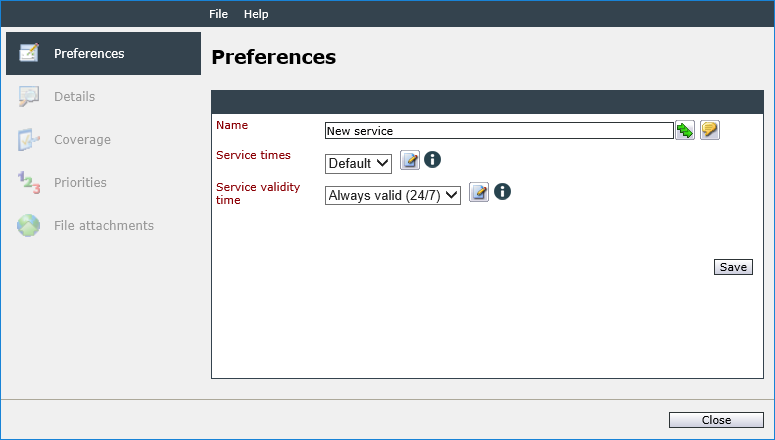
Name: Specifies the name of the service. If multiple languages have been activated, the localization buttons are displayed.
Service times: Defines the time periods the ticket with the current service can escalate in. The configuration is similar to the service times of a contract.
Service validity time: Defines the time periods a ticket has to be created in for this specific service to be applicable. This configuration is performed analogously to the configuration of the service validity time of the contract.
After a click on the Save button, the remaining tabs of the dialog will be available. A service cannot be used until at least one priority has been created for it.
Details
On this tab, various information like Description, Customer responsibilities, Provider responsibilities, Services, and Comments on the service can be entered. This information only consists of descriptive attributes on the service and has no further impact on it.
In doing so, service descriptions can be created, edited, and deleted via the three buttons next to the service selection box.
Coverages are necessary for the automatic assignment of the right SLA service to a newly created ticket.
After a click on New Assignment or a double click on an existing coverage in the table, a dialog will appear, in which all of the elements of a coverage line can be edited. At least one array has to be filled in (Affected user/group, Ticket/Ticket field, or CI/CI schema).
Affected user/group: In this field, either the user’s login name or the group’s name can be entered. If the respective name is found, the user or group will be displayed with the complete name in the field. Alternatively, the user browser can be used via the magnifying glass icon, in order to search for the correct user or group.
Ticket/Ticket field: Depending on the coverage type selected here, different fields will be displayed.
The following coverage types are available here:
- Ticket/Process schema: A ticket/process schema can be selected as well as a field and the required field content. In addition, it is possible to select a matching operator for certain field contents (e.g. text field) and thus define whether the ticket’s field content is to be equal or unequal to the specified value, for example.
- Service: This option is only available, if the Service Portfolio has been activated. A service can be selected from the Service Portfolio. Every ticket created via a service transaction that can be found below the service selected here fulfills the condition.
- Service transaction: This option is only available, if the Service Portfolio has been activated. A service transaction can be selected from the Portfolio. Every ticket created via this service transaction fulfills the condition.
CI/CI schema: In these fields, either a configuration item or a configuration schema (CI schema) and a matching configuration schema type (CI type) can be selected.
- Configuration item: Here, a configuration item (CI) can be selected from the CMDB. If a ticket is linked to it, the condition is fulfilled.
- CI schema/CI type: Here, existing CI schemas and the corresponding types can be selected. If a CI linked to a ticket belongs to schema and type, the condition is fulfilled.
Note:
It is possible to define a configuration item as well as schema and type. If both criteria are set, it is important that this results in a usable assignment and the settings are not mutually exclusive (configuration item A belongs to schema B, however, configuration schema C has been selected).
In doing so, an arbitrary amount of coverage areas can be defined. The individual coverage areas may overlap as well. If no coverage area is defined, all priorities defined within the service will still be available for the automatic assignment to tickets – albeit with a lover rank.
If, however, at least one coverage area has been defined and no coverage is compatible with the new ticket, none of a service’s priorities can be assigned to the ticket automatically.
There are several assignment criteria:
- All criteria that are combined within a coverage are linked via an AND relation. A ticket has to meet all criteria in order to make the coverage area relevant for this ticket.
- If multiple coverages with various criteria are defined, they are linked via an OR relation.
- When using the assignment criterion User/group in a coverage, an SLA service with the main group of the user included in the coverage area will be taken into account preferentially.
- If a ticket field, in which a user-defined date is to be entered, is defined as a criterion and this ticket field changes subsequently, the calculation of the completion and escalation times will be triggered once more.
Example: AND Relation
In one line of the coverage range, Supporter has been specified as the affected group and Scope = ‘IMAP’ as a ticket field. This coverage area will only be relevant for a ticket, if the affected user of the ticket is a member of the group Supporter and at the same time the ticket field Scope has the content IMAP.
Example: OR Relation
The individual lines of the coverage range table are linked to each other via an OR relation. For the service to be assigned to the ticket, the defined coverage area of at least one line has to match the ticket.
In the first line of the coverage range, only the group Supporter has been specified as an affected group, in the second line, only the ticket field Scope = ‘IMAP’ has been specified. This coverage range will be relevant for a ticket, if the affected user of the ticket is a member of the group Supporter or the ticket field Scope has the content IMAP or both applies.
How the automatic SLA assignment (contract/service/priority) works and how to select the correct ticket from the SLM configuration:
-
The ticket has a service transaction (i.e. created with Service Portfolio)
If a service level package is assigned to the service transaction and this package contains a specific priority, this SLA priority is selected.
If no service level package is available or if several SLA services or priorities are relevant, the further selection is done with procedure B.
-
The ticket does not have a service transaction or the service transaction does not define a unique priority
First, it is determined whether there are permanently assigned SLA priorities (Preferred priorities - via the ticket schema or via the Mail2Ticket account).
If the ticket was created via a Mail2Ticket account, it will first be clarified whether SLA priorities are directly stored in this account and, if so, whether they overwrite the configuration in the ticket schema (can be set as an option). If yes, the priorities stored in the Mail2Ticket account will be selected in any case. Otherwise, the SLA priorities stored in the ticket schema would overwrite those from the Mail2Ticket account.
If SLA priorities have been determined in the upper selection (is available as a list), the option Strong binding becomes effective. If the option is set, the top priority is assigned to the ticket (the list can be sorted via the arrows). The assignment rules then do not matter - the ticket receives exactly this priority. Thus, it is unnecessary to add more than one priority to the list.
If the option is not set and there are several SLA priorities, they will be marked. After evaluation of the assignment rules, they are taken into account.
The next step is the evaluation of the assignment rules, which can be stored in each case with the services and priorities in the Service Level Management module.
The selection is done step by step: First, all SLA contracts that are not applicable (start/end, as well as service time) are selected.
For all remaining contracts, all services are then reviewed: Only those whose service time is applicable (compatible with the ticket creation time) are considered.
Now the coverage area is analyzed for each service. Each entry is assigned a value if it matches:
-
CI: If the ticket is linked to exactly the CI (i.e., if one of the linked CIs of the ticket is exactly this CI) that is deposited in the coverage, this is considered the best match - value 1. If one of the CIs linked to the ticket is a parent CI of the CI deposited in the coverage, this is considered an indirect match and the value, starting from 1 per hierarchy level, is reduced by 5% in each case.
-
CI schema: If the schema of one of the CIs linked to the ticket matches the schema stored in the coverage, this is considered the best match - value 1. Schema hierarchies are not tracked.
-
CI schema type: If the type of one of the CIs linked to the ticket matches the type stored in the coverage, this is considered the best match - value 1. Type hierarchies are not tracked.
-
Ticket schema: If the ticket schema matches the ticket schema stored in the coverage, this is considered the best match - value 1.
-
Ticket field: If the content of the ticket field deposited in the cover matches that in the ticket, this is considered the best match - value 1.
-
Affected user/group: If the Affected user of the ticket corresponds to the user stored in the coverage, this is considered the best match - value 1. If a group is stored in the coverage and this group is the root group of the Affected user of the ticket, the value 0.975 will be used. If the stored group is not the root group of the Affected user but a superordinate group (no matter how many levels lie in between), the value (starting from 1) is reduced by 5% per hierarchy level.
-
Service (Service Portfolio): If the ticket has a service transaction and the service stored in the coverage is part of the service path of the ticket's service transaction, then the value 1 is used.
-
Service transaction (Service Portfolio): If the ticket has a service transaction and this corresponds to the service transaction stored in the coverage, then the value 1 is used.
So currently there are eight variants that can be stored when configuring the coverage. The more entries of the coverage list that apply, the more likely it is that the SLA service (or SLA priority) will be assigned to the ticket. The selection process works by first determining a factor of how many entries in the list apply to the ticket.
Formula: [number of hits] / 8 (8 = number of possibilities).
Thus, if only the ticket schema matches for one ticket, a factor of 0.125 is determined. If there are two matches (e.g. ticket schema + field), the factor increases to 0.25.
The same procedure is applied to all priorities of each eligible service. The key figure of the priority and not of the service applies: Priorities that are unsuitable due to their coverage area are weeded out. Priorities without their own coverage area are given neutral further consideration and priorities with suitable coverage area are given preference. The order of the entire procedure (first services, then the priorities of the best service) thus means that even an ideal coverage area of a priority that matches the ticket does not lead to the selection of this priority if the parent SLA service has not already been assigned to the ticket beforehand (e.g. all coverage entries are unsuitable).
The value determined above per variant is now multiplied by this factor. The result is the metric that is used to decide which SLA service (or priority) should be assigned to the ticket (the one with the highest metric). The result of the priority selection is a list of possible priorities (if the service has three priorities and all three have no coverage area defined, all priorities would be selected).
If several services or priorities have the same key figure, both are initially considered equally - an attempt is made to select further.
If a clear decision is possible on the basis of the respective key figure of each individual priority, the priority with the highest key figure is applied.
However, if more than one priority shares the highest metric, a check is made to see if one of these priorities is included in the list of preferred priorities. If yes, this priority is selected.
Now, if there is still more than one priority in the selection, those that are not defined as standard priority within their performance are removed.
If still no decision is possible, the last filter is applied - Smart Assignment. For this, first all priorities are weeded out that have the Disable Smart Assignment option set.
Warning:
Should this option be set for all priorities, the ticket would not be assigned an SLA priority at this point.
If there is still more than one priority in the list, no clear decision can be made between them. Thus, the SmartAssignment function will be applied. The last ticket that has already been created will be searched for, which matches the current ticket with essential header data (ticket schema, ticket wizard version, creator, affected person, and creation method) and which has been assigned an SLA priority that is contained in the filter list. If no such ticket exists, the current ticket will be assigned the first priority from the list (i.e. de facto randomly).
Note:
However, this will result in future SmartAssignments always applying the same priority to the same cases - without manual intervention (no random assignment).
On the Priorities tab of the service of a contract or a Service Level Agreement (SLA), the priorities can be found in a drop-down list. Below, all already existing escalation times of the selected priority are displayed.
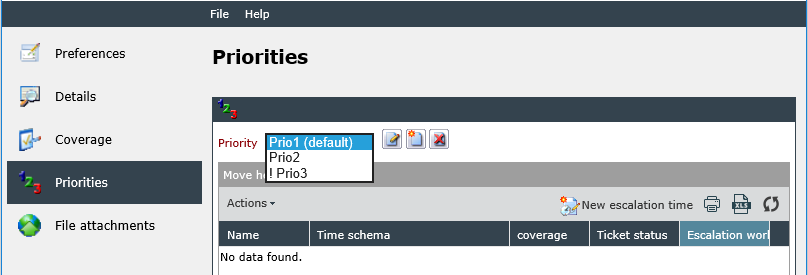
The drop-down box allows for selecting the priorities. The buttons next to it are used for editing, recreating, and deleting existing priorities
Priorities within a service are used for discerning the relative importance of a ticket based on its urgency and impacts. A priority defines the maximum necessary time requirement for the actions to be executed, which is represented using various escalation times.
Settings for a new priority:
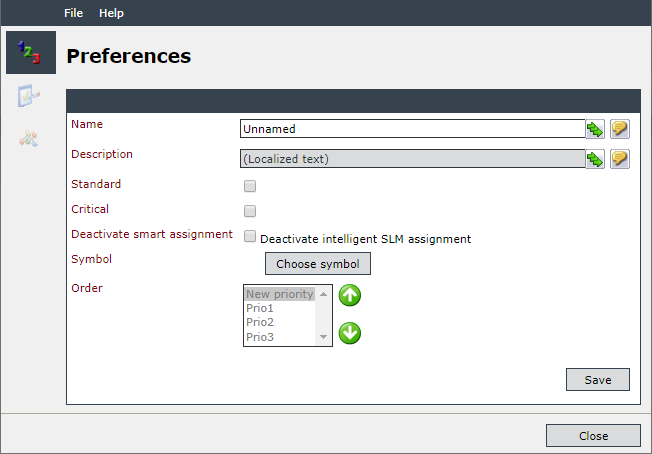
Name: The name of the priority to uniquely identify it. If several languages are activated, the localization buttons are displayed.
Description: A description of the priority can be entered here.
Standard: If this option is set, the priority is saved as the default priority.
Note:
If several priorities are set as default, the last one saved becomes the default priority.
Critical: Currently not in use.
Deactivate smart assignment: When this option is selected, this priority is not used for SLM assignment for similar tickets (default priority or coverage with the highest ranking).
Symbol: The symbol set here illustrates the respective priority and is displayed in the ticket view for better visualization of priorities, for example. A predefined set of icons is available. However, any other icons can be used as well. They have to be .GIF files at a size of 20 x 20 px.
Order: The order of the priorities in the drop-down field can be changed using the arrow keys.
The escalation times, which are displayed for each configured priority in the list below the priorities selection, represent the core of the SLA. They define the times after ticket creation, until which certain statuses have to be reached. For this purpose, any number of escalation times can be defined for every priority.
Tip:
A priority is only configured sensibly and usable, if at least one escalation time has been defined for it.
Escalations are used for observing the working times agreed upon with the customer in a Service Level Agreement. For instance, they can determine the time period, in which a member of support has to accept a ticket (reaction time) and then solve it (solving time). These times can be computed absolutely as well as relatively, based on the service times.
The configuration dialog for an escalation is opened when a new escalation time is created or via a double click on an existing escalation time.
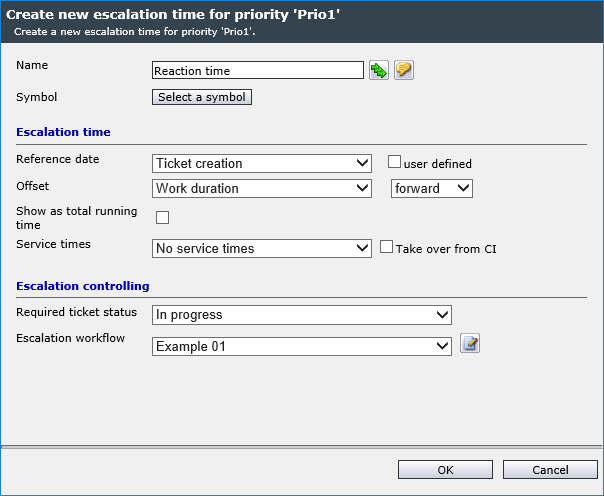
The following criteria for an escalation time are to be defined:
Name: The specific name of the escalation time. The localization buttons are displayed, if multiple languages have been activated on the system.
Symbol: A symbol to facilitate the identification of the escalation time can be defined here. Escalation symbols can be displayed in the ticket or activities list later on.
Reference date: There are a total of four options available as a reference date:
- Ticket creation: The escalation time is calculated based on the time of ticket creation.
- Ticket start: The escalation time is calculated based on the start of work defined in the ticket. It is mandatory to coordinate this option with the workflows. If the SLA calculation starts before the start of work has been entered (manually or automatically), it is not possible to calculate a reference date.
- Ticket completion: The escalation time is calculated based on the completion date defined in the ticket. This option has to be coordinated with the workflows as well.
- User-defined: As soon as this checkbox is activated, a user-defined expression can be entered here, which reads out the reference date, e.g. from an attached CI or a ticket field.
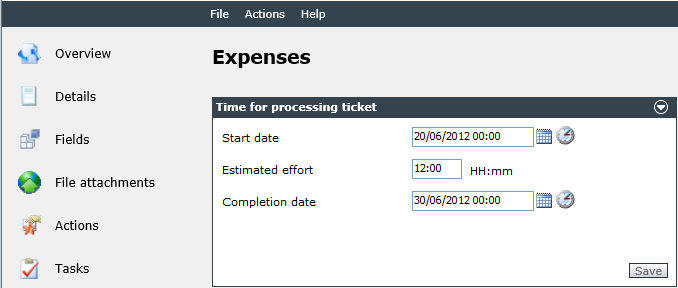
Offset: The offset defines a period of time that is set off against the reference date in order to define the escalation date. The predefined offset options here are Manual input (manual input of a time span in HH:MM:SS format; example: 03:30:00) and Work duration (estimated effort that can be specified in a ticket under Expenses). Finally, it is necessary to define whether the offset is to be added to the reference date (= forward) or subtracted from it (= backward).
Note:
If the offset is subtracted from the reference date, the escalation progress bar underneath the ticket view cannot be used.
Show as total running time: Defines the timer that can be displayed as a total escalation timer (escalation progress bar).
Service times: Defines the service times the calculation of the escalation times is to be based on. Via the checkbox right next to it, this can be automatically be read out from a CI attached to a ticket, which matches a certain CI schema and type.
Required ticket status: Defines the ticket status to be reached by the ticket for it not to escalate with the current escalation time.
Escalation workflow: If the necessary ticket status has not been reached and a ticket escalates, it is moved to the escalation workflow specified here.
Apply changes to existing tickets: If this checkbox is activated, all changes made to the escalation time will be applied to all existing tickets that are affected by this escalation time automatically.
File Attachments
Any number of file systems can be uploaded to the service, e.g. to better describe them or provide additional materials for them.
File Attachments
On this tab, file attachments to the contract (e.g. the contract’s text in wording or in multiple languages) can be uploaded.
After all the information relevant for the contract has been entered, the contract can be updated via a click on the Save button. The contract is now ready and can be used.


 Copyright (c) 2000-2026 Isonet AG