Configurations
Chapters:
In SQL Management Studio the node Databases > XpertMaster > Tables is extended via the Object Explorer.
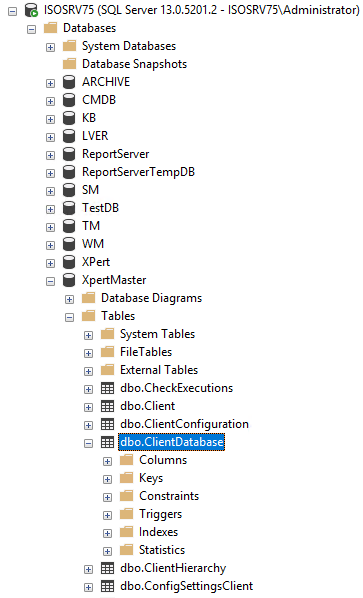
Right-click on dbo.ClientDatabase to select Edit Top 200 Rows from the context menu.

This figure shows the relevant databases that the 446 Plattform® uses internally to store data. Not included here are the databases for the Security Manager and the Xpert-Master database itself, as these are not client-dependent.
The DatabaseType column shows the type of the database. This column must not be changed and is only used for further configuration of the table.
In the FriendlyName column, you can assign an understandable name for the databases. The DatabaseType should be taken into account. The line with the DatabaseType WORKFLOW, for example, deals with the database of the Workflow Manager, which was created with the name WM in this example. As FriendlyName theoretically any name can be assigned, but names should be used which allow a quick identification of the databases.
The DatabaseProvider column contains the value SqlClient for all databases.
In the DatabaseServer column, you can enter the corresponding server and (if necessary) the corresponding instance. In the example, the SQL Server and all 446 Plattform-relevant services and Web pages are installed on the same computer.
The ID of the newly created user is entered in the DatabaseUserID column and the corresponding password in the DatabasePassword column.
The DatabaseCatalog column must be filled out accordingly for each DatabaseType. For the type WORKFLOW, the name of the database used for the Workflow Manager must be specified (in the example = WM and for the type CMDB in the example = CMDB, etc.).
If the DatabaseUserID and DatabasePassword columns are left empty, the integrated logon is used (the corresponding service account for authentication against the SQL Server is used).
The GlobalConfiguration table is opened. Global settings for the system that are not client-specific are made in this table.
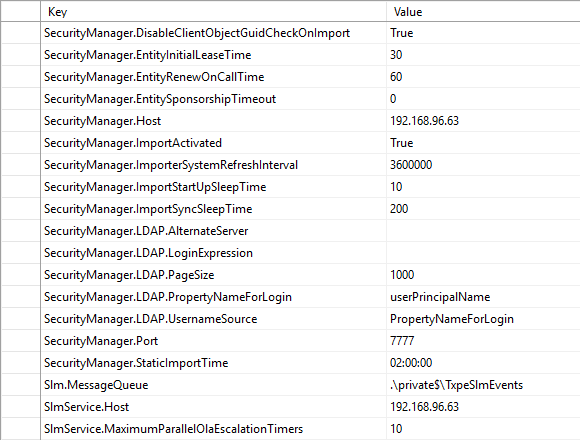
The figure above only shows a section of the table. The Key and Value columns are particularly important.
The keys and values for configuring this table are described below. If there are further entries in the database, their values cannot be changed. This essentially includes basic settings that do not need to be adjusted.
| Key | Value |
|---|---|
| Agent.Host | Host name or IP address of the Isonet Agent Host |
| Agent.Port | Port number of the Isonet Agent Service |
| EventManagement.BadEventsQueue | (Internal) path to the queue of the Isonet EventManagement for bad event notifications. |
| EventManagement.IncomingEventsQueue | (Internal) path to the queue of the Isonet EventManagement for incoming event notifications. |
| LoggingManager.Host | Host name or IP address of the Isonet Logging Manager Host |
| LoggingManager.Port | Port number of the Isonet LoggingManager service |
| M2TService.Host | Host name or IP address of the Isonet Mail2Ticket Hosts |
| M2tService.Port | Port number of the Isonet Mail2Ticket Service |
| MessagingManager.Host | Host name or IP address of the Isonet MessagingManager Host |
| MessagingManager.Port | Port number of the Isonet MessagingManager Service |
| SecurityManager. |
Provider for database access (default: SqlClient) |
| SecurityManager. |
Connection string for the database connection to the Security Manager database (Pendant to the ClientDatabases) |
| SecurityManager.Host | Host name or IP address of the Isonet Security-Manager Host |
| SecurityManager.Port | Port number of the Isonet SecurityManager Service |
| SlmService.Host | Host name or IP address of the Isonet Service Level Manager Host |
| SlmService.Port | Port number of the Isonet Service Level Manager Service |
| M2TService.AttachmentTimeout | ... |
| M2TService.DateTimeConversionErrorText | Enter the error message here that should be written to the log in the event of a date/time conversion error. Placeholders are allowed. |
| M2TService.Host | Hostname or IP address of the server running the Mail2Ticket service. |
| M2TService.MaxProcessAttempts | ... |
| M2TService.Port | Port number for the Mail2Ticket service. |
| M2TService.ProviderTimeout | |
| M2TService.ReplyWorkflowMonitoringTimeout | |
| M2TService.ThreadInterval | |
| M2TService.ThreadMonitoringInterval | |
| Txp.PluginPath | Path to the plug ins of Xpert.NET (default: ...\TxpEnterprise\PlugIns) |
| Txp.PublicWebServices. |
HTTP(S) path to the PublicFileService |
| Txp.PublicWebServices. |
HTTP(S) path to the PublicSecurityService |
| WorkflowManager.HistoryMessageQueue | (Internal) path to the queue of the Isonet WorkflowManager for history message notifications. |
Open the ClientConfiguration table in your master database. This table contains the client-specific configuration.
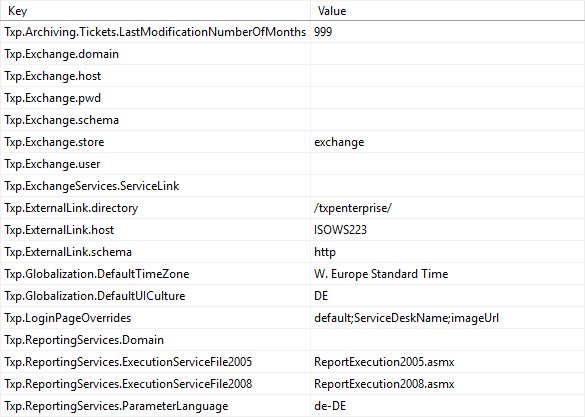
The figure above only shows a section of the table. The Key and Value columns are particularly important.
The keys and values for configuring this table are described below. If there are further entries in the database, their values cannot be changed. This essentially includes basic settings that do not need to be adjusted.
| Key | Value |
|---|---|
| 446Plattform.BaseUrl | Enter the base URL for the 446 Plattform. Example: https://servicedesk.isonet.ch |
| 446PlattformMobil.BaseUrl | Enter the base URL for the 446 Plattform Mobil. Example: https://servicedesk-mobil.isonet.ch |
| Hibernate.default.schema | Returns the internal path to the database of the knowledge base. |
| Txp.ActionPlugins. |
Path to the action plug-ins (default: ...\TxpEnterprise\PlugIns\Actions) |
| Txp.Customization. |
Path to the customizing file |
| Txp.Exchange.AuthentificationMode | The default value is 'OAuthAuthorizationCode'. Alternative values: None, Login, Plain, Cram-MD5, NTLM. |
| Txp.Exchange.OAuthExternalLoginGuid | The object GUID of the configured external login of type OAuth2 (see Necessary database adjustments). |
| Txp.Exchange.ProviderType | The default value is 'ExchangeWebservice'. Use 'OAuthGraph' for the MS Graph API. |
| Txp.ExchangeServices.ServiceLink | For the Exchange services you use 'https://outlook.office365.com/ews/exchange.asmx'. With the MS Graph API, you set 'https://graph.microsoft.com/v1.0/' instead. |
| Txp.Exchange.ServerVersion | 'Exchange2007SP1'. This value doesn't need to be changed. |
| Txp.ExternalUri.directory | Path to the 446 Plattform® for an external access. |
| Txp.ExternalUri.host | Host name for the connection for an external access. |
| Txp.ExternalUri.schema | Connection schema for an external connection (Default: HTTP). |
| Txp.Globalization. |
Default culture setting (default: de) |
| Txp.Hostheaders.Hostheader | Host header are used for the identification of the client (you can create several, with different values each) |
| Txp.MessagingManager. |
Default delivery type of the Messaging Manager (default: MessagingManager. |
| Txp.ReportingServices.Domain | Domain of the Reporting Service (used for the authentication of the user; Default: NULL) |
| Txp.ReportingServices. |
Language of the parameters assigned to the ReportingServices (default: de-DE) |
| Txp.ReportingServices.Pwd | Password of the user to be used for authentication in the ReportingServices |
| Txp.ReportingServices.ServiceUrl | URL to the website ReportServer in your installation |
| Txp.ReportingServices.StartFolder | The folder, in which the reports are saved in the Reports Manager (this value must start with an /) |
| Txp.ReportingServices.Uid | The user name to be used for authentication |
| Txp.UploadDirectory | Path to the directory, in which the uploaded files are to be saved |
| WorkflowManager. |
The namespace to be used as default for saving workflows for this client |
The configuration of the Messaging Manager is to be done in the table MessagingDelivererConfiguration of the database XPertMaster and within the configuration settings of the system. An already configured external login of type OAuth is recommended for the usage of the services (see also External login accounts).
Configuration settings
Administrators are able to setup different settings for the delivery of messages within the configuration settings of their system (also see Table: Configuration Settings - Client).
For instance, with the key 'DefaultDeliverer' you can control the medium used to dispatch messages.
Database settings
For the successful shipment of messages you have to set the following keys within the database XPertMaster and the table MessagingDelivererConfiguration:
| Name Space | Key |
Value |
|---|---|---|
| Isonet.MessagingManager.Deliverers.HtmlEmailDeliverer | DefaultFromAddress | The e-mail address that is being used as default sending address. |
| Isonet.MessagingManager.Deliverers.HtmlEmailDeliverer | SmtpServer | 'smtp.office365.com' (Default) |
| Isonet.MessagingManager.Deliverers.HtmlEmailDeliverer | SmtpPort | '587' (Default) |
| Isonet.MessagingManager.Deliverers.HtmlEmailDeliverer | SmtpAuthMethod | The default value is 'OAuthAuthorizationCode'. Alternative values: None, Login, Plain, Cram-MD5, NTLM. |
| Isonet.MessagingManager.Deliverers.HtmlEmailDeliverer | OAuthExternalLoginGuid | The object GUID of the configured external login of type OAuth2 (see Necessary database adjustments). |
| Isonet.MessagingManager.Deliverers.HtmlEmailDeliverer | DebugMode | 'True' for sending and receiving messages within a sandbox environment. 'False' for the delivery of messages in a production environment. See also Enabling debug mode for sending mail |
| Isonet.MessagingManager.Deliverers.HtmlEmailDeliverer | DebugAddress | The e-mail address that is being used as the default sender address if the value of the key 'DebugMode' is 'True'. |
| Isonet.MessagingManager.Deliverers.HtmlEmailDeliverer | AutoResponseSuppress | The default value is AutoReply and represents the X-Auto-Response-Suppress header value, where all messages except Out of Office (OOF) notifications will be suppressed. For example you can enter a combination of multiple values in the format 'RN,NRN' here. Within the Auto Response Suppress (learn.microsoft.com) there is a description of additional possible header values. The article Configuration of Free/Busy times contains more information regarding this topic. |
If extensive texts are to be stored in the data records of the databases, it is advisable to activate the full-text catalogs (enables a full-text search).
A full-text catalog can be created for the following databases:
- CMDB
- Knowledge Base
- LVER
- Security Manager
- Task Management
- Xpert
Some of these databases may not exist because the corresponding module was not licensed.
- Creating the full-text catalogs
Note:
Please make sure that the option Use full-text indexing is activated when creating the databases and that the Isonet services are not running.
Proceed as follows to create a full-text catalog:
- The corresponding table is marked and a right click on it opens the option Full-Text Index > Define Full-Text Index... is selected.
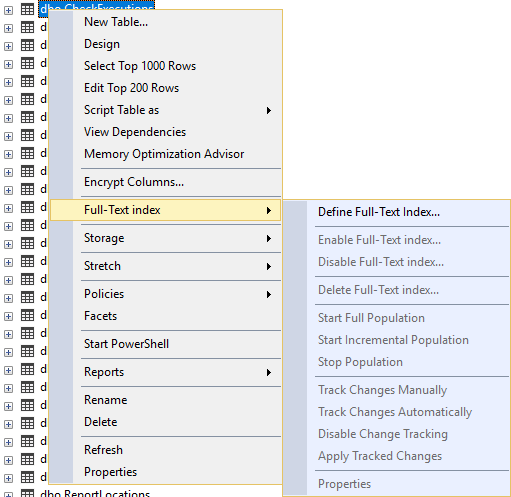
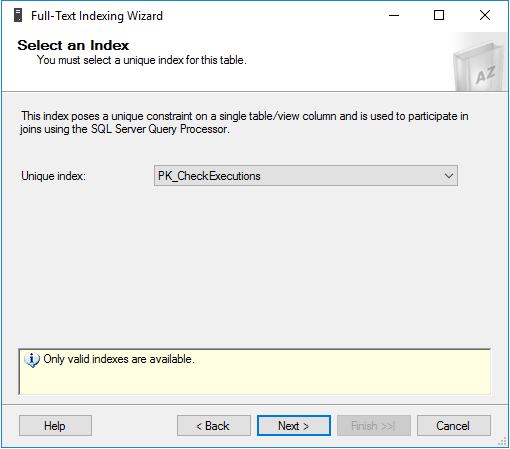
- The Unique index can be selected from a drop-down list, whereby the offered standard should always be usable.
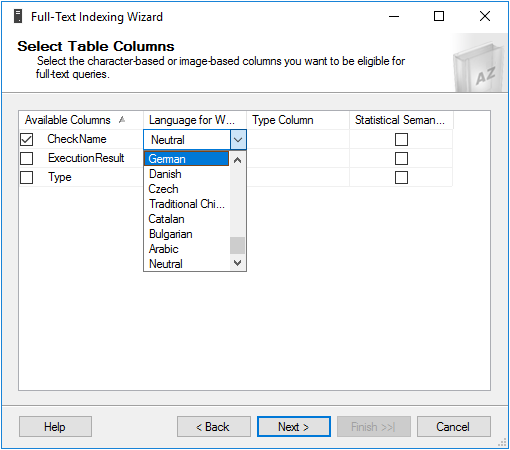
- In the next step, the desired column is selected. Please note that the language for the word wrap is always set to Neutral.
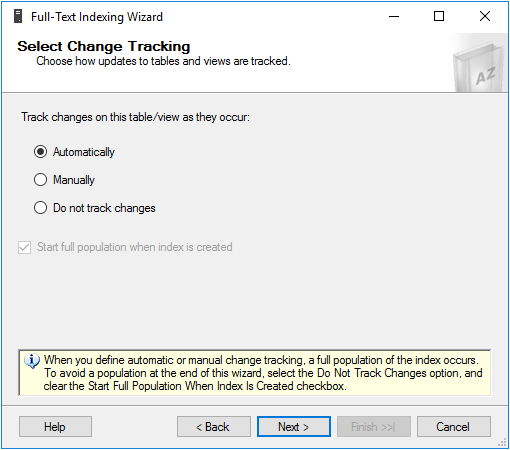
- Change Tracking is set to Automatically.
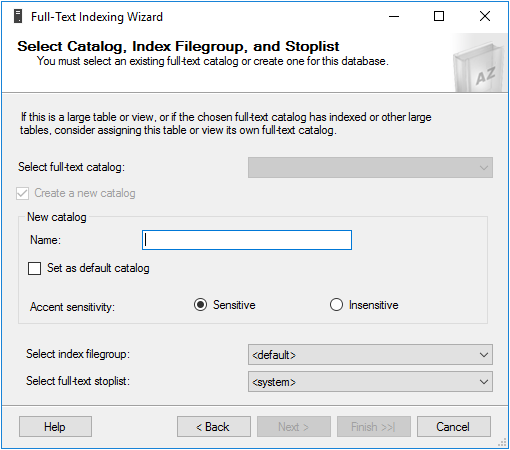
- The name of the catalog is entered in the next dialog. A unique and meaningful name should be used. The other options can remain at the default values.
- The Define Population Schedules page is optional and can be skipped without changes.
- All settings can be checked on the last page. Then Finish completes the configuration.
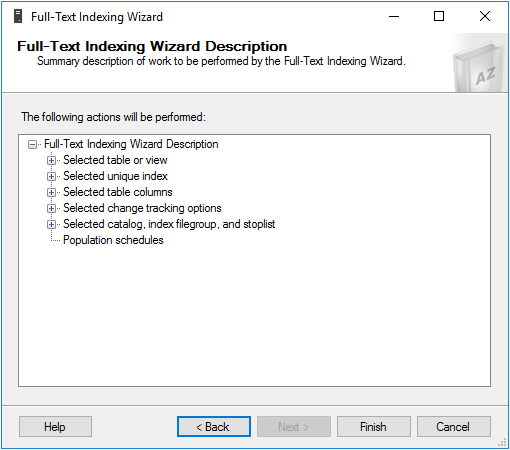
These settings must be executed analogously for all following databases.
- CMDB database
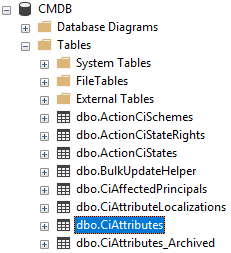
For the full-text search in the CMDB, the following settings must be made in the CMDB database under Tables:
| Table | Column | Language |
|---|---|---|
| CiAttributes | FullText | Neutral |
| Text | Neutral |
- Xpert database
For the full-text search, the following values must be changed in the Xpert database:
| Table | Column | Language |
|---|---|---|
| TicketFieldValues | Text | Neutral |
| TicketComments | Comment | Neutral |
| Tickets | ExternalSolution | Neutral |
| ExternalSummary | Neutral | |
| InternalSolution | Neutral | |
| InternalSummary | Neutral | |
| FileContent (*) | Content | Neutral |
| MessagingMails | HTMLText | Neutral |
| PlainText | Neutral | |
| Subject | Neutral | |
| ServiceCatalog |
Description | Neutral |
| Name | Neutral | |
| ServiceCategory |
Description | Neutral |
| Name | Neutral | |
| ServiceTransaction |
Description |
Neutral |
| Name | Neutral |
- Knowledge Base database
The following settings must be made in the Knowledge Base database:
| Table | Column | Datetypecolumn | Language |
|---|---|---|---|
| AttachmentLanguage | Caption | Neutral | |
| FileContent | Content | Extension | Neutral |
| KnowledgebaseItem |
Caption | Neutral | |
| Content | Neutral | ||
| Description | Neutral | ||
| Keywords | Neutral |
Note:
So that stopwords such as for or it are not filtered out by the system and a full-text search is hindered, the following full-text property must also be changed:
Right-click on the respective table Full-Text index > Properties. Here the entry Full-Text Index Stoplist must be set to <Off>. Then the action Repopulate index must be started.
- Expense Management database (LVER)
The following settings must be made in the database for LVER:
| Table | Column | Language |
|---|---|---|
| Expense | Name | Neutral |
- Security Manager database
The following values must be adjusted in the Security Manager database:
| Table | Column | Language |
|---|---|---|
| CustomAttributes | AttributeValue | Neutral |
| Principals | FullName | Neutral |
| Name | Neutral |
Note:
So that stopwords such as for or it are not filtered out by the system and a full-text search is hindered, the following full-text property must also be changed:
Right-click on the respective table Full-Text index > Properties. Here the entry Full-Text Index Stoplist must be set to <Off>. Then the action Repopulate index must be started.
- Task Management database
The following values must be configured in the Task Management database:
| Table | Column | Language |
|---|---|---|
| TaskComments | Text | Neutral |
| TaskFieldValues | Text | Neutral |
| Tasks | Title | Neutral |
| Description | Neutral |
Note:
The full text catalogs are provided by the imported databases. If columns are missing or too many, this is analyzed by the system test (see CheckFulltextColumnLanguages and CheckFulltextIndices).
- Creating an environment variable for the database access
In Windows Explorer, open the directory C:\Program Files\Isonet\_Tools\Spline and start the application Spline.exe by double clicking on it. As of Windows Server 2008, the file must be executed as administrator.
In the opened application, click TXPE System Environment Variable. The following dialog appears:
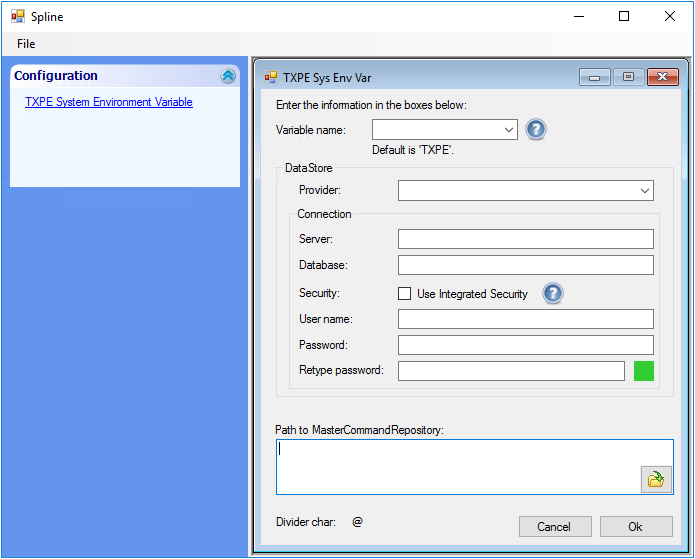
Variable name: Enter TXPE (or leave the field empty). TXPE is the default value and is set automatically if the field is empty.
Bereich DataStore:
Provider: Select SqlClient
Server: The server name (including an existing instance) of the SQL Server is specified here.
Database: Enter the name of the TXP master database created in SQL Management Studio (in the example: XpertMaster).
Security: The option Use Integrated Security is selectable.
User name: Enter the user name
Password: Enter your password
Retype password: To check this, repeat the password entry.
Path to MasterCommandRepository: Click on the button located at the bottom right of the text field. A Windows folder browser will open. Find the folder MasterCommandFiles which is located below the folder CommandFiles in the installation (Example - input: C:\Program Files\Isonet\CommandFiles).
The entries should look similar to the following figure. The dialog is confirmed with OK.
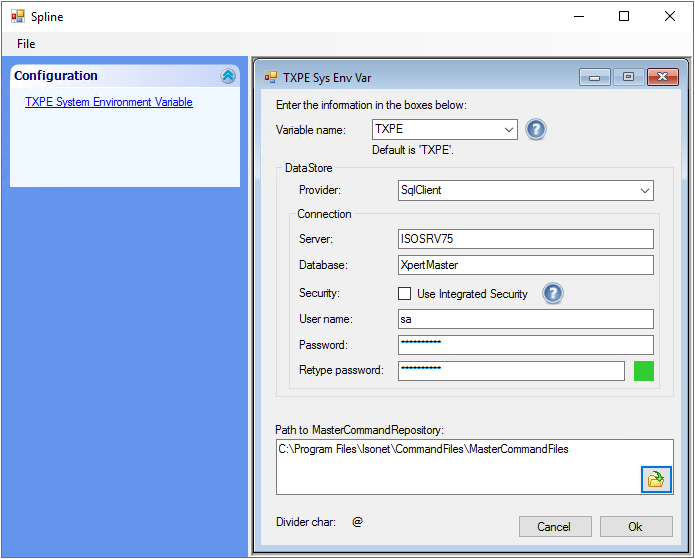
The environment variable is created and the dialog is automatically closed if the configuration is error-free.
- Installing the registry file
When using Windows Server 2008 or later, a registry file for time zone information must be installed. The file can be found in the installation package under the path <Installation package>\ChangeTimeZoneIndex.reg. Right-click on the file and select Merge from the context menu.
- Installing reference configuration files
The configuration files are located in separate folders (standard folder structure: C:\Program Files\Isonet\_ConfigFile-Reference) so that they are not overwritten during an update.
It is possible to customize the files. Notepad++ or a similar editor is recommended for editing.
The configuration files in the various folders are then copied to the intended directories as shown in the table below.
| Source directory (_ConfigFile-Reference) | Target directory |
|---|---|
| Agent | Isonet\Agent |
| DefaultConfig.config | CommandFiles |
| LoggingManager | Isonet\LoggingManager |
| Mail2TicketService | Isonet\Mail2TicketService |
| MessagingManager | Isonet\MessagingManager |
| SecurityManager | Isonet\SecurityManager |
| ServiceLevelManager | Isonet\ServiceLevelManager |
| TxpEnterprise | Isonet\Web\TxpEnterpriseCompiled |
| TxpEnterprise |
Isonet\Web\TxpEnterprise |
| TxpEnterprise |
Isonet\Web\TxpEnterprise |
| TxpEnterpriseWebServices | Isonet\Web\TxpEnterprise |
| TxpExternalLoginPage | Isonet\Web\ |
| WorkflowManager | Isonet\Workflowmanager |
| XPertWebAPI | Isonet\Web\XPertWebAPI |
| XPertWebAPI\ |
Isonet\Web\ |
- Basic configuration
After installing the Microsoft SQL Server (2014 or higher), Reporting Services are only generally installed. They still need to be configured.
To do this, open the configuration program for the Reporting Services under Start > Microsoft SQL Server 20XX > Reporting Services Configuration Manager.
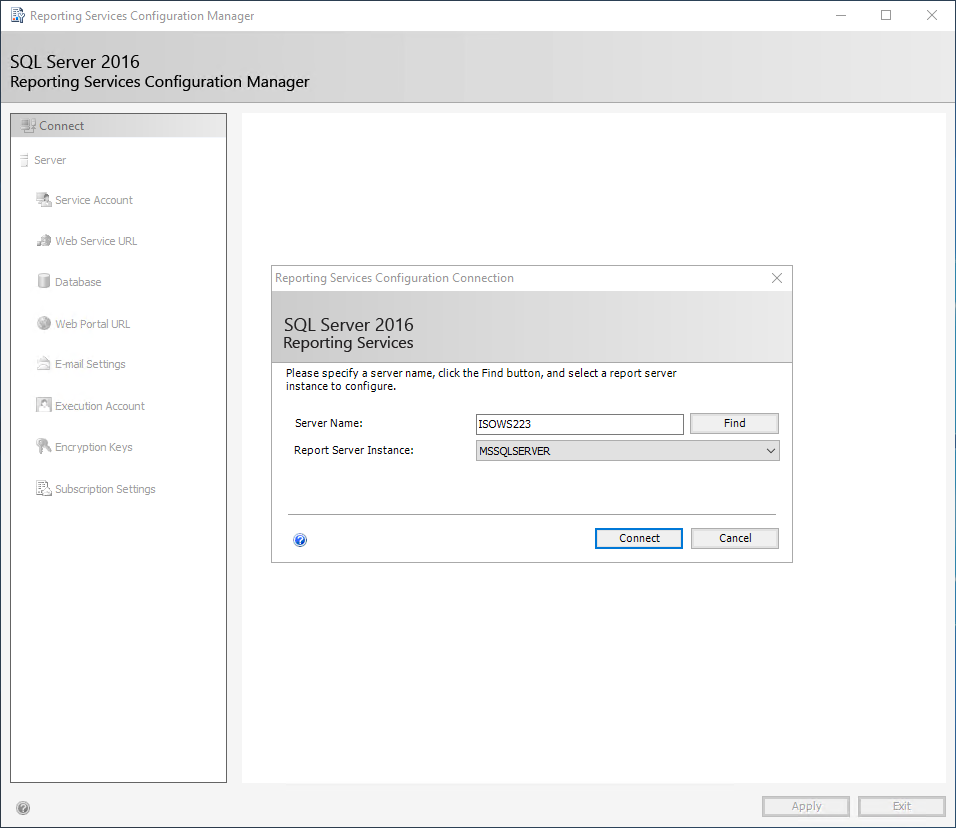
In the configuration dialog the setting for a connection to the SQL Server is made first. If all components are installed locally, the default setting can be left and the connection can be established with Connect.
If Reporting Services is installed on a different host, the SQL Server host name must be specified and the appropriate instance must be selected. Alternatively, you can use the Find button in an SQL Server browser to search for the correct server.
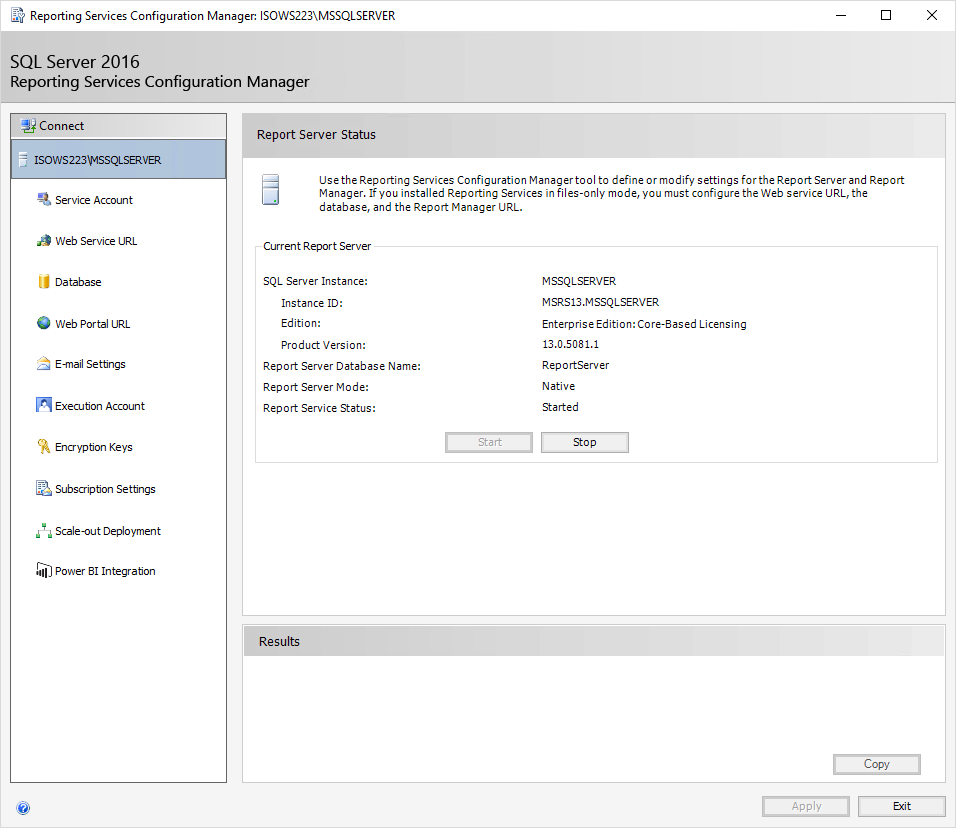
First, it checks whether the Windows service is running. If this is not the case, the service can be started with Start.
In the left part of the dialog different points of the configuration are selectable, which should be processed in the displayed order.
- Service Account
Use the Service Account page to specify the account under which the Report Server service runs. This account is initially configured during Setup. You can modify it if you want to change the account or password. The Report Server Web service, Report Manager, and the background processing application all run under the service identity you specify on this page.
The account you specify for the Report Server service requires permission to access the registry, report server program files, and the report server database. All permissions are configured for the account automatically when you use the Reporting Services Configuration Manager to set the account. If you use the service account to connect to the report server database, the Configuration Manager creates a database login for the account and configures database permissions by assigning the account to the RSExecRole on the SQL Server instance that hosts the report server database. The report server database is the only data store that a report server writes to. The service account does not require permissions to any other data stores.
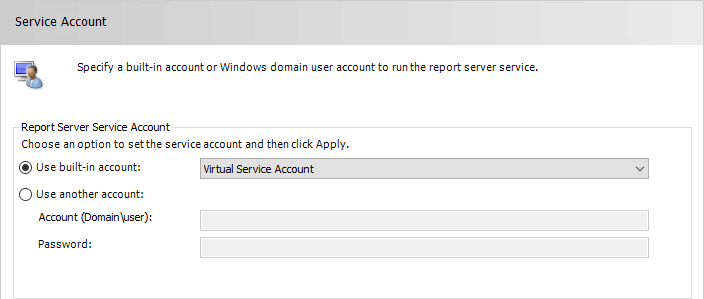
Use built-in account: Select Local System, Network Service, Virtual Service Account, or Local Service from the list. Only Network Service is recommended; however, you can configure the account to use any account that is available.
Use another account: Select this option to specify a Windows user account. You can enter a local Windows user account or domain user account. Specify a domain account in this format: <domain>\<user>. Specify a local Windows user account in this format: <computer name>\<user>. You can only select an existing account; you cannot create new accounts in Reporting Services Configuration.
The maximum character limit on the account is 20 characters.
- Web Service URL
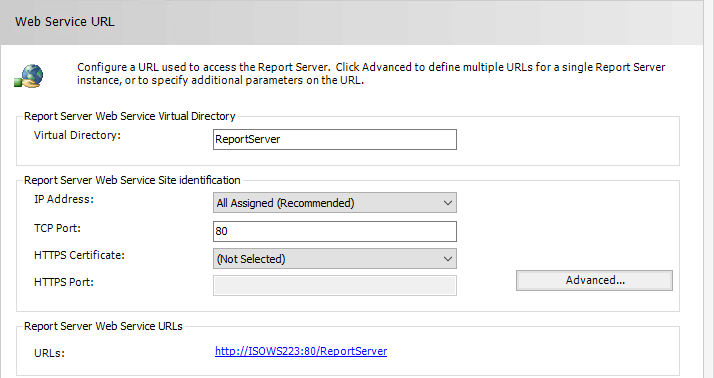
In Reporting Services, URLs are used to access the Report Server Web service and the web portal. Before you can use either application, you must configure at least one URL each for the Web service and the web portal. Reporting Services provides default values for both application URLs that work well in most deployment scenarios, including side-by-side deployments with other Web services and applications.
When you access a report server or the web portal through its URL, the URL should include the host name and not the IP address. On a TCP/IP network, the IP address will resolve to a host name (or the network name of the computer). If you used the default values to configure URLs, you should be able to access the Report Server Web service using URLs that specify the computer name or localhost as the host name:
https://<computername>/reportserver
https://localhost/reportserver
Virtual directory: Notice that both of the example URLs includes the virtual directory name. Unless you customize the URL definition, you must always specify the application's virtual directory name on the URL. Value: ReportServer
IP address: The domain name service on your network resolves the host name on the URL to the computer's IP address. As long as the IP address is specified in the URL that you define, a request that is sent to a specific host will reach its intended target. Value: All Assigned
TCP Port: Port 80 is the default port for TCP/IP connections on a computer. Because the report server is listening on port 80, you can omit the port number from the URL. If you specify another port, you must specify it in the URL. Value: 80
SSL settings: URLs in Reporting Services can be configured to use an existing SSL certificate that you previously installed on the computer.
- Database
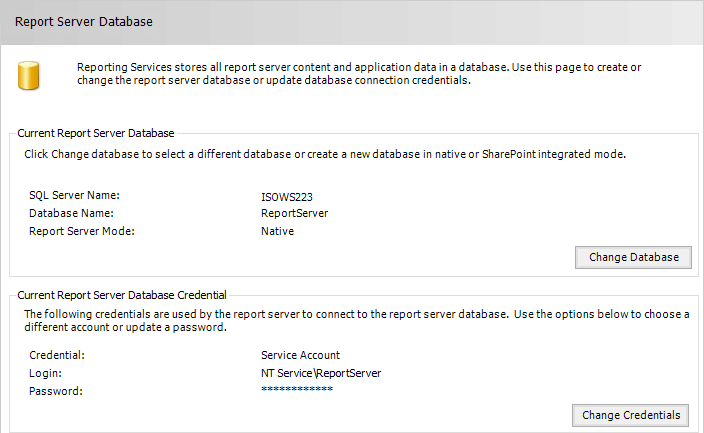
Use the Database page to create and configure the report server databases that provide internal storage for one or more report server instances.
SQL Server Name: In Current Report Server Database, SQL Server Name specifies the name of the SQL Server 20XX Database Engine that runs the report server database. You can use a default or named instance on a local or remote computer.
Database Name: Specifies the name of the report server database that stores server data.
Report Server Mode: Indicates whether the report server database supports native mode or SharePoint integrated mode.
Change Database: Start a wizard that guides you through all of the steps required for creating or selecting a report server database.
Credential: Specifies credentials that the report server uses to connect to the report server database. Credential types you can specify include the service account, a Windows domain user, Windows local user, or SQL Server database login.
Login: Specifies a domain user account if you are using Windows credentials, or a SQL Server login if you are using SQL Server credentials. If you are using Windows credentials, specify them in this format: <domain>\<account>.
Password: Specifies the password for the account.
Change Credentials: Start a wizard that guides you through all of the steps required for selecting a different account or updating the password on the account that is used to connect to the report server database.
- Web Portal URL
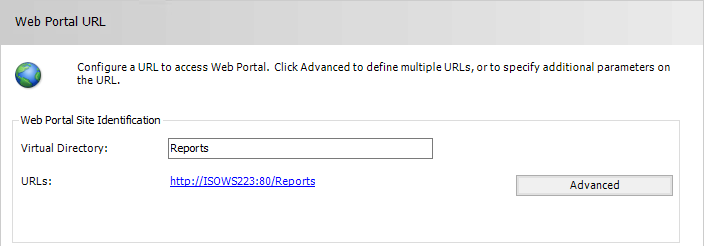
Use the Report Manager Web Portal URL page to configure or modify the URL used to access Report Manager. By default, the Report Manager URL inherits the prefix, IP address, and port of the Report Server Web service URL. This is because Report Manager provides front-end access to the Web service that runs within the same Report Server service. If you are isolating the service applications and using Report Manager to access a Report Server Web service on a different computer, you must edit RSReportServer.config file to point Report Manager to a different instance.
Virtual Directory: Specifies the virtual directory name for Report Manager. You can only have one virtual directory name for each Report Manager instance on the same computer.
URLs: Displays the URL defined for the current Report Manager instance.
Advanced: Add an additional URL for the current Report Manager instance.
- E-mail Settings
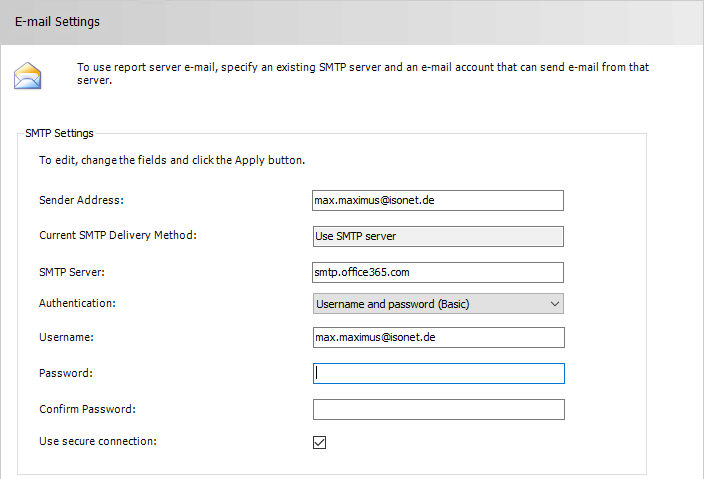
Reporting Services includes an e-mail delivery extension so that you can distribute reports through e-mail. Depending on how you define the e-mail subscription, a delivery might consist of a notification, link, attachment, or embedded report. The e-mail delivery extension works with your existing mail server technology. The mail server must be an SMTP server or forwarder. The report server connects to an SMTP server through Collaboration Data Objects (CDO) libraries (cdosys.dll) that are provided by the operating system.
Sender Address: In Sender Address, enter the e-mail address to use in the From: field of a generated e-mail.
SMTTP Server: Specify the SMTP server or gateway to use. This value can be an IP address, a NetBIOS name of a computer on your corporate intranet, or a fully qualified domain name. The value you type for the SMTP Server is saved in the <SMTPServer> field in the rsreportserver.config file.
Authentication: Use the Authentication drop down to specify how to authentication to the SMTP server.
No authentication: You will connect anonymously to the mail server that was specified.
Selecting this option will set <SendUsing> to a value of 2 and <SMTPAuthenticate> to a value of 0 in the rsreportserver.config.
Username and password (Basic): Allows you to specify a username and password to connect to the mail server.
You can also select Use secure connection to have this go over an encrypted connection to your mail server.
Selecting this option will set <SendUsing> to a value of 2 and <SMTPAuthenticate> to a value of 1 in the rsreportserver.config. Selecting Use secure connection will set SMTPUseSSL to True. Username will be set in <SendUserName> as an encrypted value. Password will be set in <SendPassword> as an encrypted value.
Report server service account (NTLM): The service account you specified for the report server is used. If using the report server service account for authentication, verify that the service account has Send As permissions on the SMTP server.
Selecting this option will set <SendUsing> to a value of 2 and <SMTPAuthenticate> to a value of 2 in the rsreportserver.config.
- Executing Account
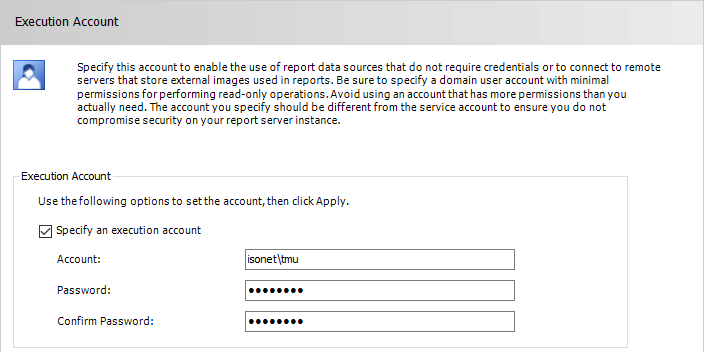
Use this page to configure an account to use for unattended processing. This account is used under special circumstances when other sources of credentials are not available:
- When the report server connects to a data source that does not require credentials. Examples of data sources that might not require credentials include XML documents and some client-side database applications.
- When the report server connects to another server to retrieve external image files or other resources that are referenced in a report.
Specify an execution account: Select to specify an account.
Account: Enter a Windows domain user account. Use this format: <domain>\<user account>.
Password: Type the password.
Confirm password: Retype the password.
- Encryption Keys
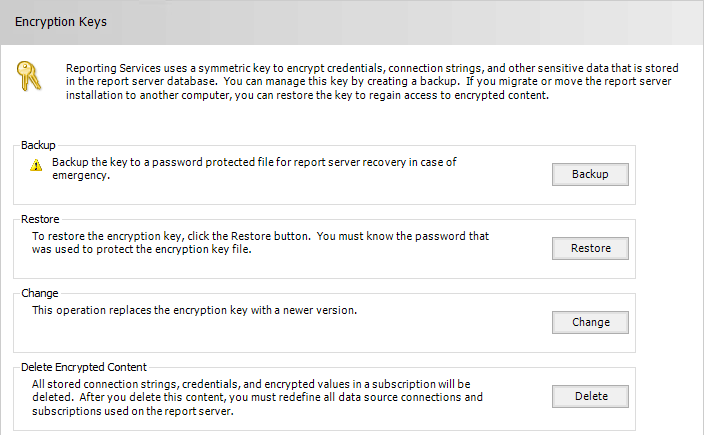
Reporting Services uses encryption keys to secure credentials and connection information that is stored in a report server database. In Reporting Services, encryption is supported through a combination of public, private, and symmetric keys that are used to protect sensitive data.
Managing the encryption keys consists of creating a backup copy of the symmetric key, and knowing when and how to restore, delete, or change the keys. If you migrate a report server installation or configure a scale-out deployment, you must have a backup copy of the symmetric key so that you can apply it to the new installation.
To manage symmetric keys, you can use the Reporting Services Configuration tool or the rskeymgmt utility. The tools included in Reporting Services are used to manage the symmetric key only (the public and private keys are managed by the operating system). Both the Reporting Services Configuration tool and the rskeymgmt utility support the following tasks:
Backup: Back up a copy of the symmetric key so that you can use it to recover a report server installation or as part of a planned migration.
Restore: Restore a previously saved symmetric key to a report server database, allowing a new report server instance to access existing data that it did not originally encrypt.
Change: Re-create symmetric keys and re-encrypt data in the unlikely event that the symmetric key is compromised or obsolete.
Delete Encrypted Content: Delete the encrypted data in a report server database in the unlikely event that you can no longer access encrypted data.
- Subscription Settings
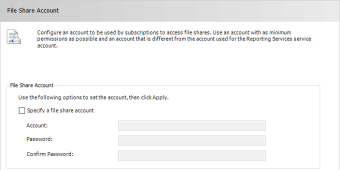
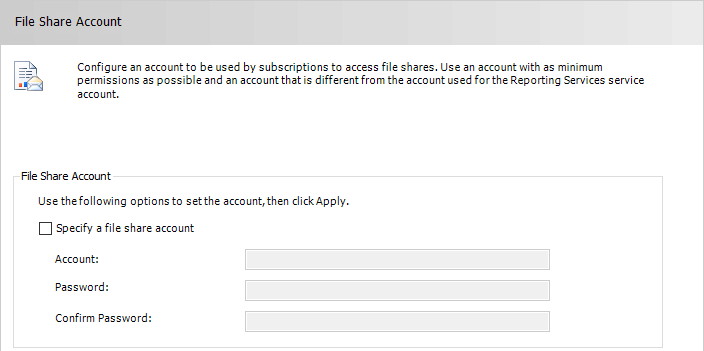
Use the Subscription Settings page of the Reporting Services Configuration Manager to configure a file share account for Native mode report servers and file share subscriptions. The file share account allows you to use a single set of credentials in multiple subscriptions that deliver reports to a file share. When it is time to change the credentials, you configure the change for the file share account and you do not need to update each individual subscription.
- Scale-out Deployment
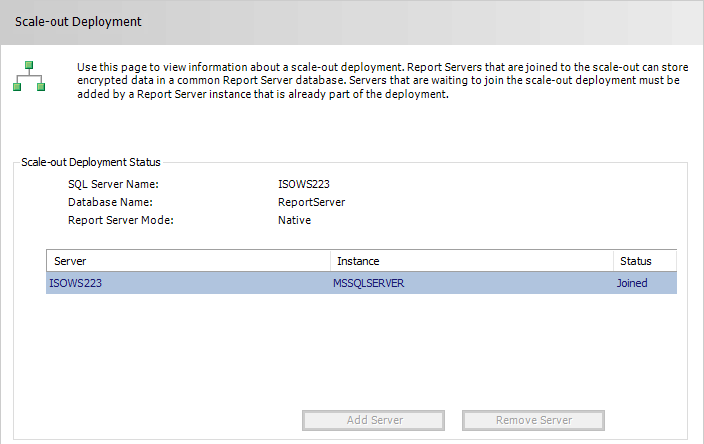
Use the Scale-out Deployment page in Reporting Services Configuration Manager to view the initialization status for a scale-out deployment or to join a report server to a scale-out deployment. A scale-out deployment refers to two or more report server instances that share a single report server database.
To configure a scale-out deployment, start with two or more report server instances that are all connected to the same report server database. After all of the instances are installed, you connect to the first report server and then use the Scale-out Deployment page to join each additional instance. Only a report server that is already initialized to use a database can initialize additional nodes.
Note:
Scale-out Deployment is only available in Reporting Services Enterprise Edition.
- Power BI Integration
The Power BI Integration page in Reporting Services Configuration Manager is used to register the report server with the desired Azure Active Directory (AD) managed tenant to allow users of the report server to pin supported report items to Power BI dashboards.
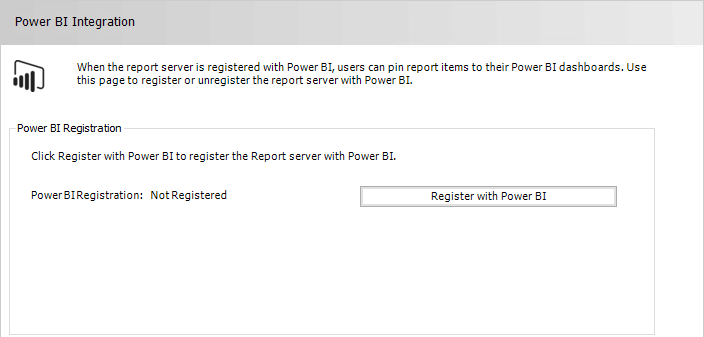
[Source: docs.microsoft.com]
- Reporting Services for the 446 Plattform®
The following configuration steps are required to make Reporting Services available:
- Copy additional files
The ZIP package unpacked into the folder ..\Program Files\Isonet contains a directory called _TxpReporting\_bin. There are two files in it:
- Isonet.ReportingServices.
TxpeDataExtension.dll - Isonet.TxpEnterprise.ReportingHelpers.dll
The two files must be copied into the directory \Microsoft SQL Server Reporting Services\SSRS\ReportServer\bin. Make sure that the rights of these files are transferred from the parent directory. The X in MSSQL.X stands for an installation number that is created during the installation of Reporting Services.
In addition, the file _TxpReporting\_ChilkatDotNet\64Bit\
ChilkatDotNet2.dll must be copied into the specified directory (..\ReportServer\bin). The contents of the _TextResources directory are copied to the \Microsoft SQL Server\MSSQL.X\Reporting Services\ReportServer directory. Also here you have to pay attention to the rights transfer.
For the configuration there are templates in the _ConfigFile-Reference\Reporting\ReportServer which have to be worked into the corresponding configuration files:
- web.config and reportingservices.exe.config in the sub folder bin
Open the web.config file with a text editor (Notepad++ recommended). The file contains some configurations that are located between the two XML nodes <configuration> and </configuration>. Go to the end of the file and insert the following lines before the </configuration> line:
The value of the Key RescourceFolderPath must be changed so that it points to the TextResources directory.
Warning:
RescourceFolderPath has a spelling error that must not be corrected.
The URL http://localhost/TxpEnterpriseWebServices denotes the host header assigned for the 446 Plattform® web services.
The folder ../ticketxpert denotes an arbitrary folder name that has to be configured in the Master database and in the Reporting Manager.
Copy the adjusted section <appSettings> and insert it into the reportingservices.exe.config file that is available in the subfolder bin of the Reporting Server folder.
If the web services are installed on a server other than the Reporting Services and there is no DNS entry for the web services, make sure that a reference to the server on which the web services are installed has been entered in the hosts file.
- rssrvpolicy.config
The following change is made in the rssrvpolicy.config file:
In the rssrvpolicy.config file, the following change is made to the first <CodeGroup> of the FirstMatchCodeGroup class:
PermissionSetName="Nothing" change to PermissionSetName="FullTrust"
The CodeGroup blocks are appended to the end of the existing CodeGroup blocks and the respective path to the DLL is adapted.
- rsreportserver.config
In the file rsreportserver.config the following change is made within the <Data> tag:
<Extension Name="TXPE"
Type="Isonet.ReportingServices.
TxpeDataExtension.Connection, Isonet.ReportingServices. TxpeDataExtension"/> (Type in one line)
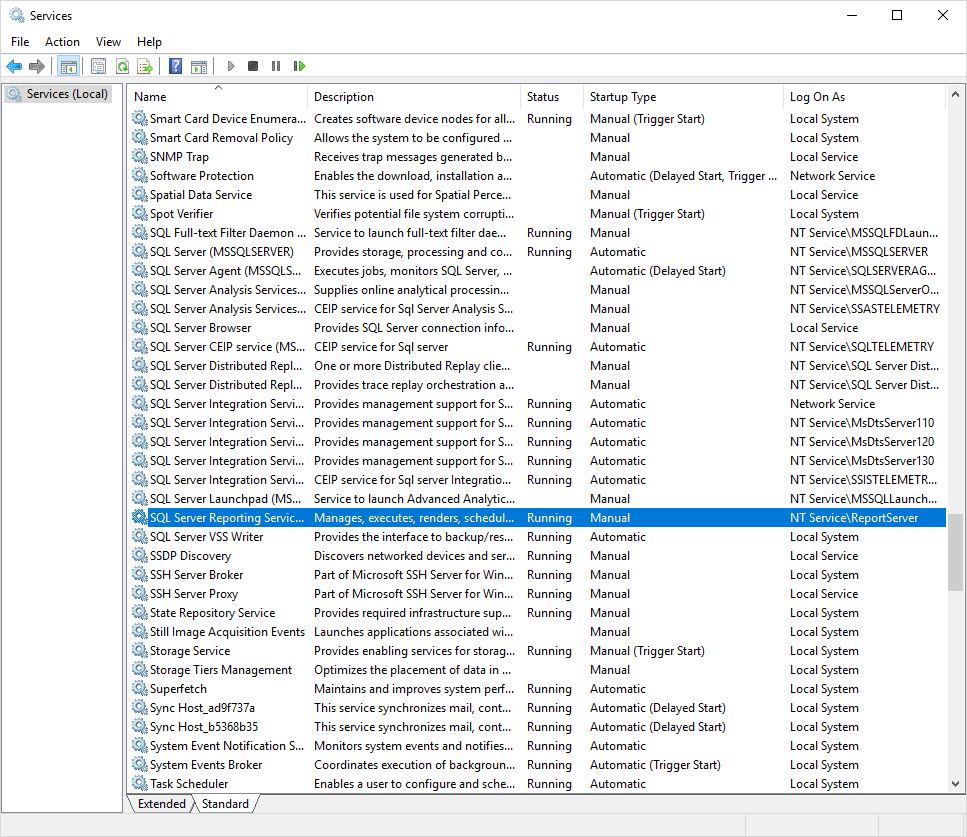
When all three configuration files are adjusted, the Reporting Services service must be restarted. To do this, open the Service Manager via Control Panel > System and Security > Administrative Tools > Services.
Restart the SQL Server Reporting Services (xyz) service. The instance name under which the SQL Server and Reporting Services were installed is shown in brackets after the service name. If several instances of Reporting Services exist on the server, make sure that the correct service is restarted.
- Reporting Manager
- Configuring the user for anonymous access
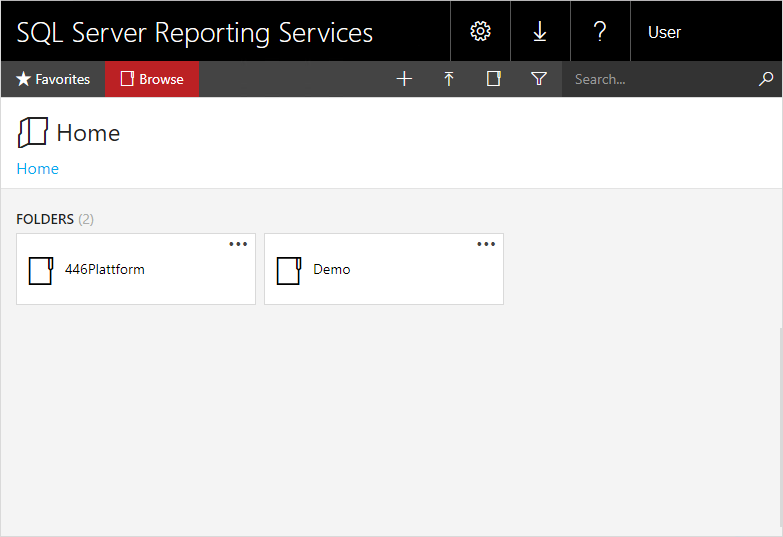
Enter http://localhost/reports/ in the address line of an internet browser. If a hostheader has been assigned for Reporting Services, this selected hostheader must be specified in the address instead of localhost (calling the website may take some time).
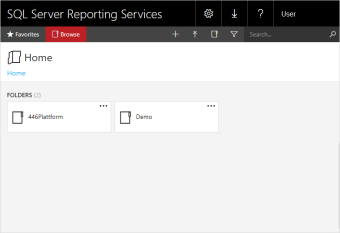
The above image should appear (the Demo folder for saving the reports has already been created here).
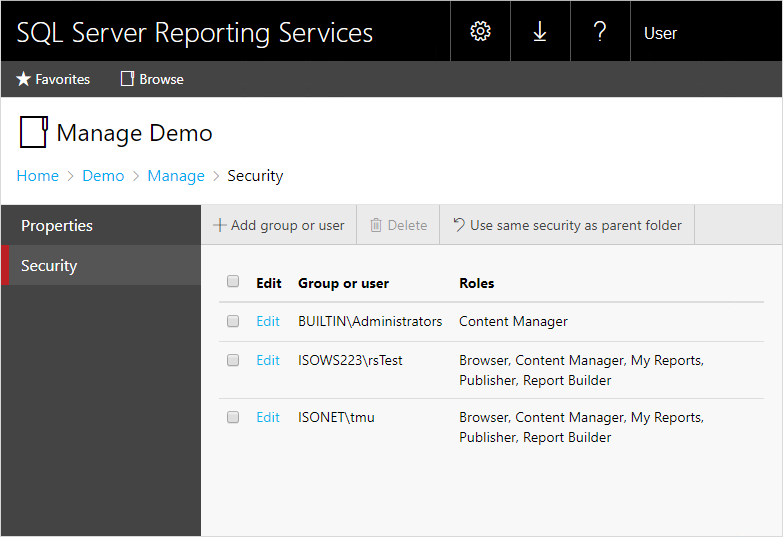
In the folder Demo right click on the three points and select Manage. Then select Security in the left tab.
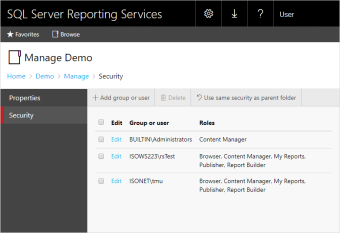
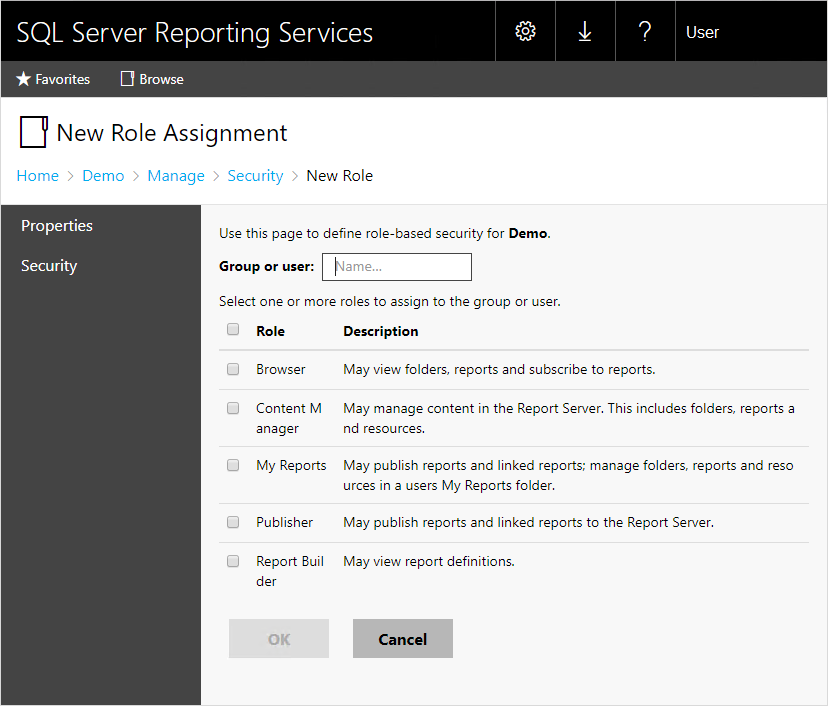
Click Add group or user here.
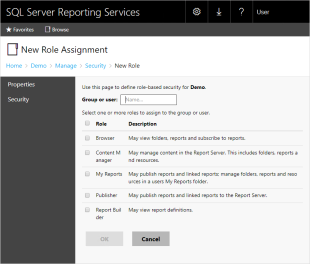
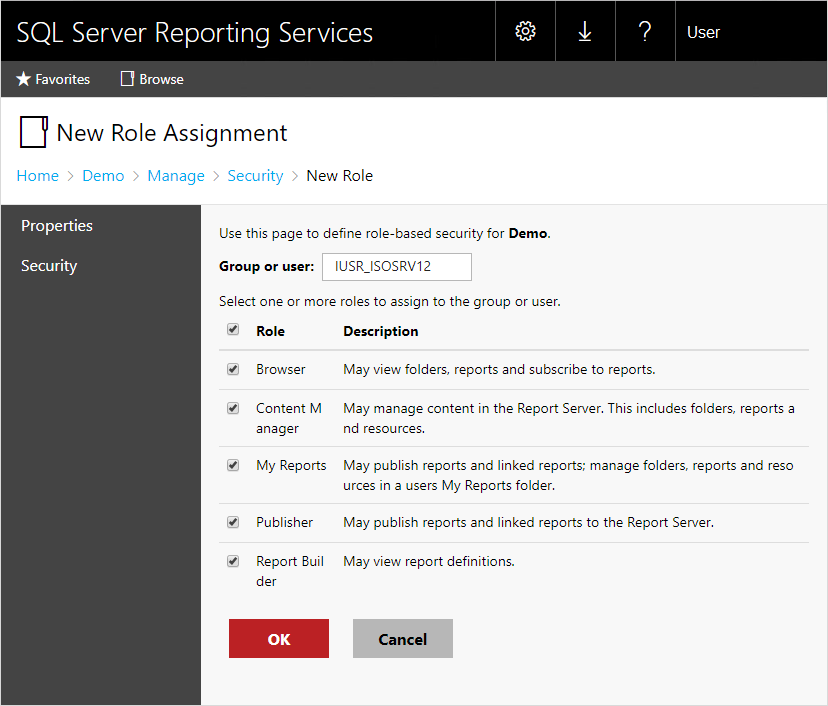
Enter the name of the anonymous Internet user in the Group or user field that applies to the computer on which Reporting Services is installed. Normally, this should always consist of IUSR_ and then the host name. Starting with Windows 10, IIS APPPOOL\[name of the IIS app pool] stands for this.
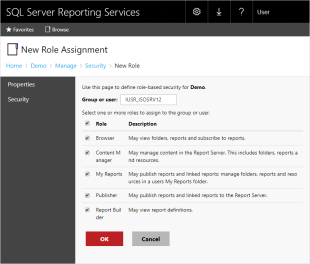
Finally, all roles for the user are selected and confirmed with OK.
- Creating a reporting folder
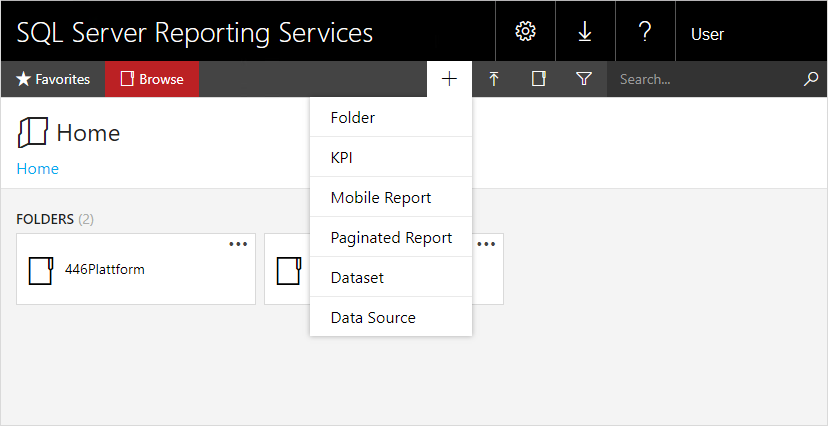
Click on the + under Home and select Folder.
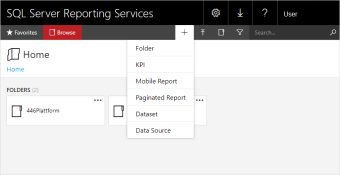
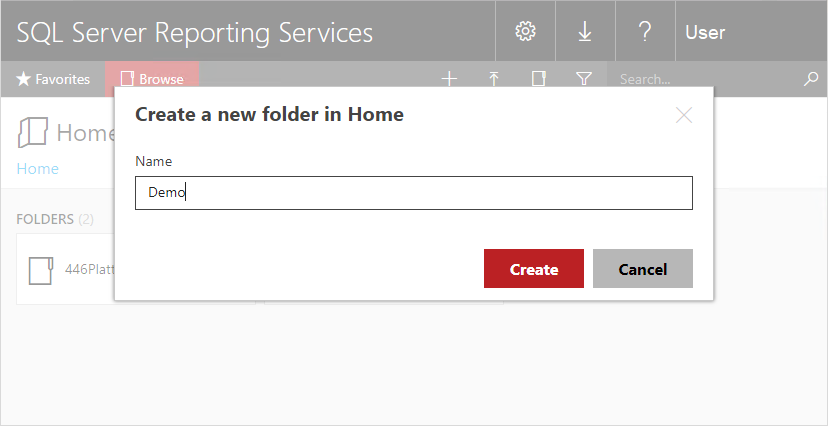
Enter the name of the folder stored in the database and in the configuration files.
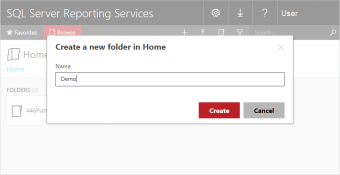
Confirm the dialog with Create.
- Creating the data source TxpeDataExtension
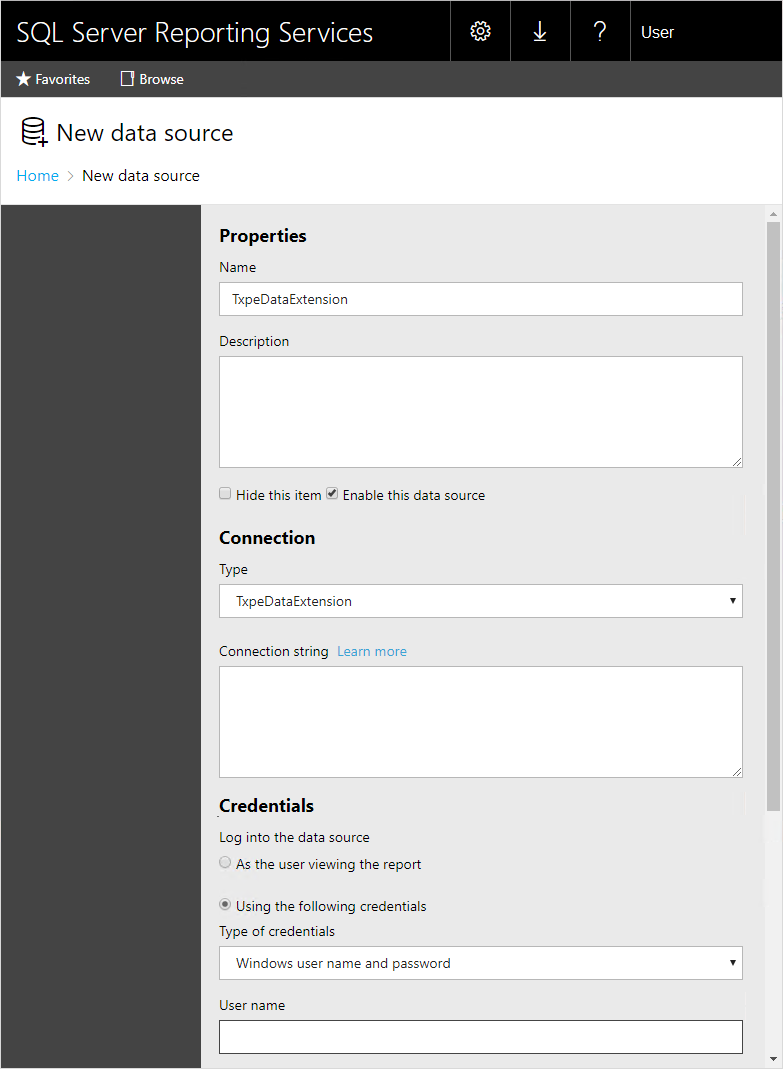
Click on the + under Home and select New data source.
Enter a name for the data source (recommended: TxpeDataExtension) and select TxpeDataExtension as connection type. If this connection type is not found in the list, the configuration steps for Customize configuration files must be checked.
The logon option Using the following credentials is recommended. The username and password that correspond to the login for the Xpert database are entered. The dialog is closed with Create.
- Creating further required data sources
In order to execute all reports, further data sources are required (in addition to the TxpeDataExtension). The corresponding module is always indicated in brackets after the name of the data source.
- KB0 (Knowledge Base)
- LVER0 (Expenses)
- TXPE0 (TicketXpert.NET)
- CMDB0 (Configuration Management)
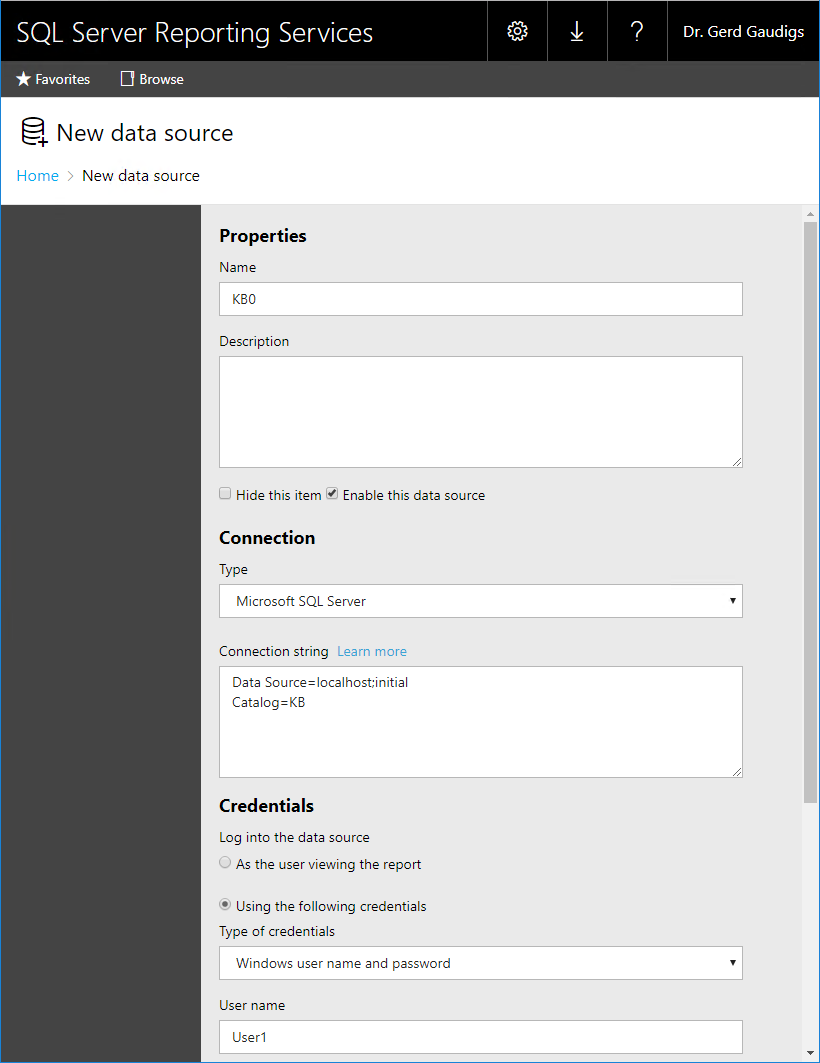
Analogous to the configuration described above, the corresponding values are entered one after the other for all listed data sources:
The Name field contains the name of the data source (the last character is always zero).
Microsoft SQL Server must be set as the Type. The connection string for the SQL Server that manages the databases is then specified. At least the following specification must be inserted in Connection string:
Data Source=<SQL server name>;Initial Catalog=<database name>
Example:
Data Source="isosvr123";Initial Catalog="KB"
For <SQL server name> the name (FQDN, hostname or IP address) of the SQL server is used. Note that you must also specify any existing instance name (e.g. <SQL server name>\<instance name>).
For the placeholder <Database name>, the name of the database used for the respective module in the SQL server must be used (e.g. the database name for the Knowledge Base is KB).
Finally, the Credentials (login information: user name and password) stored on the report server are entered. The configurations have to be accepted with Create and the new data source is created in the system.
- Reporting folder in the Master database
In Microsoft SQL Management Studio, the Databases > Database (the node that corresponds to the master database) > Tables node is expanded to the left.
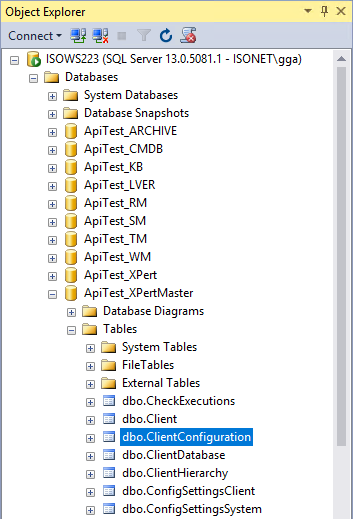
Right-click on the dbo.ClientConfiguration table and select Edit Top 200 Rows from the context menu.
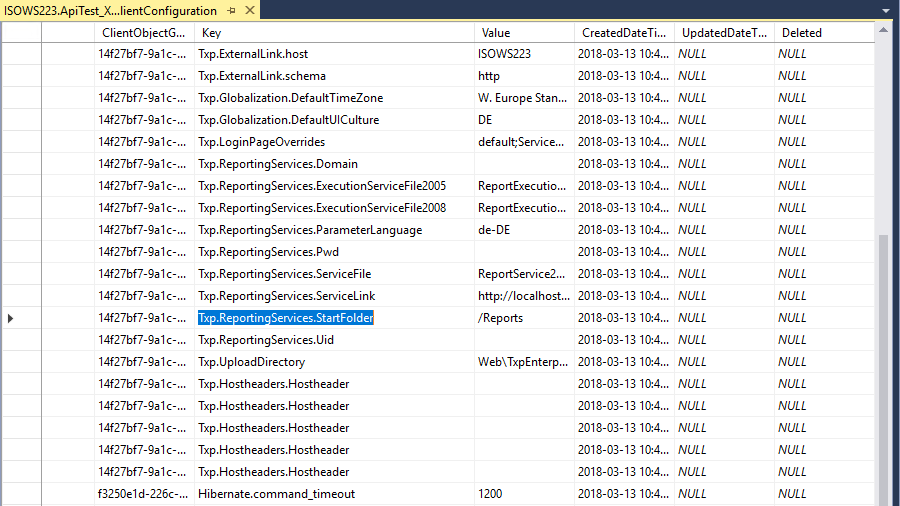
The Key column shows the value Txp.ReportingServices.StartFolder. This value must be adjusted in the Value column to the folder name specified when configuring the configuration files and the report manager (always preceded by a slash).
This adjustment must also be made for the value of the Txp.ReportingServices.ServiceFile key according to the SQL Server installation used (SQL Server 2008: ReportService2005.asmx).
| SQL Server | Value |
|---|---|
| SQL Server 2008 | ReportService2005.asmx |
| SQL Server 20XX | ReportService2005.asmx |
- Expansions for a further client
If you want to create a new client in the system, you do not have to repeat all steps. Only the report folder must be registered in the configuration file and in the database.
The dbo.Client table is opened in Microsoft SQL Management Studio for this purpose. All clients are listed in this table. The FriendlyName column contains the name of the client and the ObjectGuid column contains its unique ID. The ObjectGuid of the desired client is copied to the clipboard.
The SQL query for the dbo.ClientConfiguration table is adjusted as follows:
SELECT [Key], Value FROM ClientConfiguration WHERE ([Key] LIKE '%Report%') AND (ClientObjectGuid = '{ID}')
The placeholder {ID} must be replaced by the ObjectGuid that was previously copied to the clipboard. The SQL statement is now executed via the Execute button in the toolbar. The following list appears:
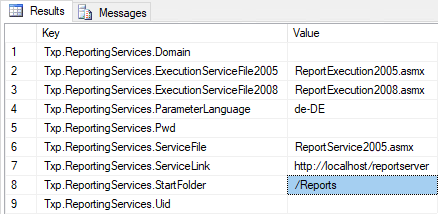
The entry in the Value column for the key Txp.ReportingServices.StartFolder must now be changed. Note that the value specified here is the same as the value specified in the configuration file web.config (always preceded by a slash).
- Copy web service entries
The web.config file is contained in the Reporting Services directory (e.g. C:\Program Files\Microsoft SQL Server\MSRS13.MSSQLSERVER\Reporting Services\ReportServer - depending on the version). This XML file contains the appSettings node. Five web service references per client and one cross-client reference are stored here. These entries can be copied and the folder name (name corresponds to the folder name) changed.
- Uploading the Lizenz
When installing the 446 Plattform® a valid license is included in the database. This license must be updated according to the modules purchased. See SETTINGS > Administration > Maintenance.
- Executing the Checks for the System
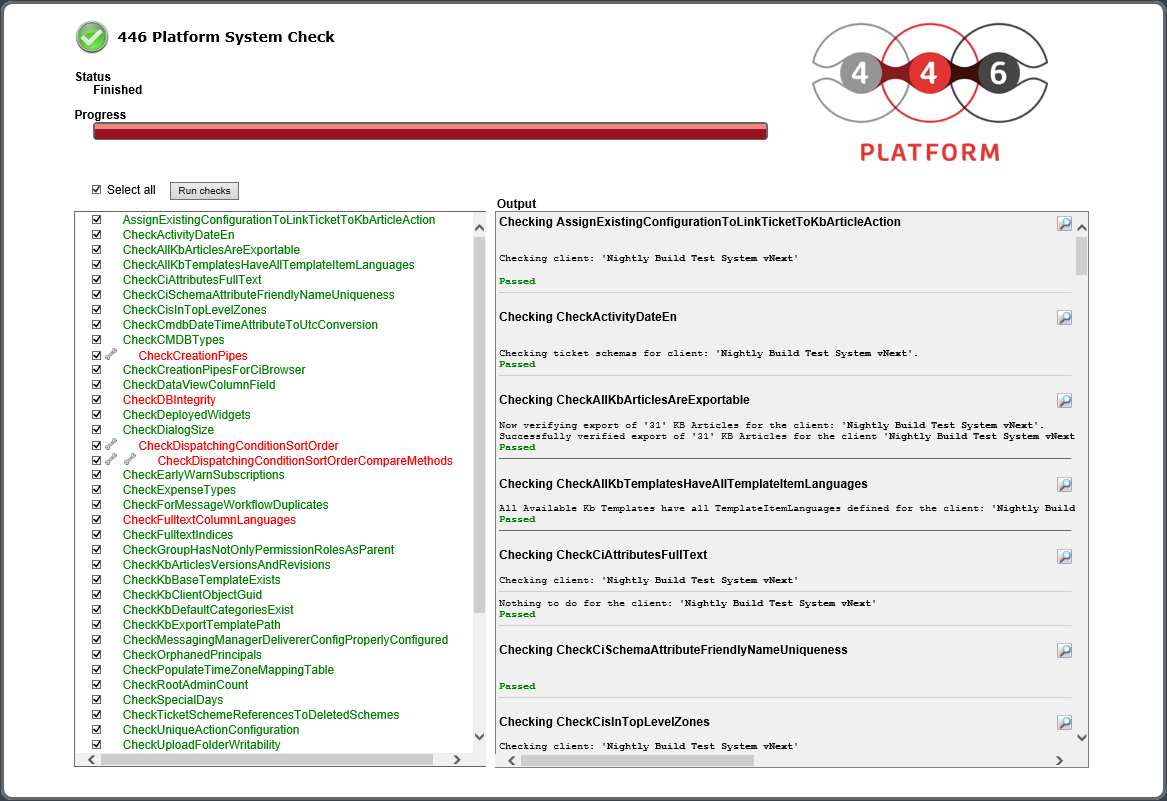
To ensure that a system is configured correctly, there is a test page. To access this page, enter the following URL (preferably in a new browser tab page) after logging on to the system:
http(s)://<URL-to-446 Plattform®>/Tools/Check/Default.html
The <URL-to-446 Plattform®> is replaced here with the address valid for the system. The check is started with the Run checks button.
The progress bar should be green at the end.
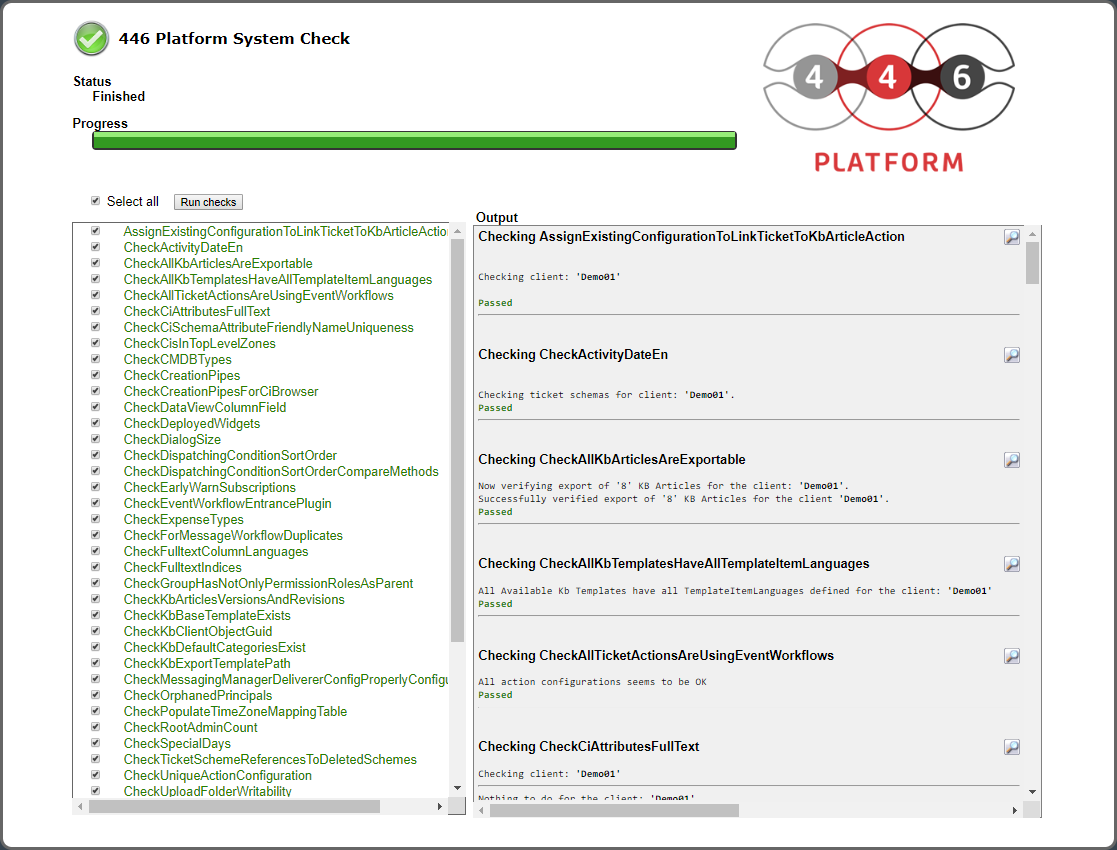
Incorrect checks are marked in red. In this case, the project manager must be informed in order to adjust the configuration.


 Copyright (c) 2000-2026 Isonet AG