Managing groups and users
Chapters:
In order to create a new group, the desired main group for this group has to be selected in the hierarchical view with a click. Via the button New group in the task window on the left, the properties dialog of a new group can be opened.
This dialog allows for specifying the Group name, the Authentication type, and a Description for the new group.
Note:
Please make sure that the checkbox Is permission role is not activated.
After all necessary data has been entered, the group can be created via a click on the Save button.
Note:
The creation of groups is not possible in the User view.
If the information on a group has changed, it can be adjusted in the User Management accordingly. The respective group is to be selected in the hierarchy or group view. A subsequent click on the Edit button will open it. Alternatively, a double click on the respective group will open it as well.
In the now opening overview window, changes can be made to the group, affiliations of users and groups to this group can be changed, and import options set.
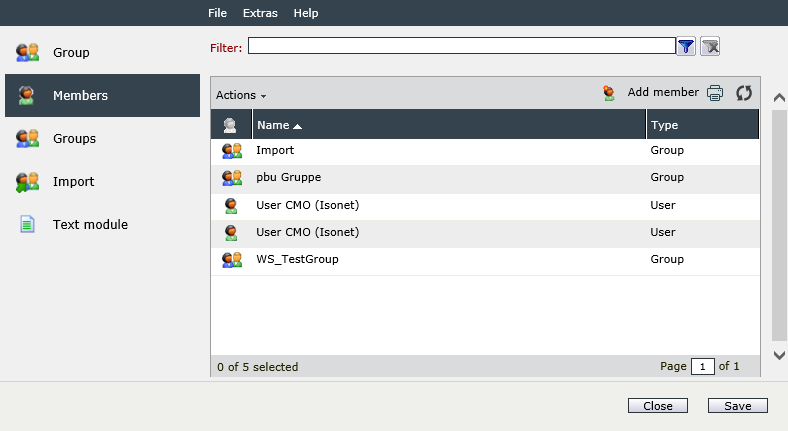
It is also possible to create users directly in a group. This option can be found under Extras > New User.
The group detail dialog is subdivided into the following tabs: Group, Members, Groups, Import, Text module, and Notifications.
Group
On the Group tab, the following general properties of the selected group can be edited:
Details
Name: A meaningful name for the group is to be entered here.
Is permission role: If this checkbox is activated, a permission role is created instead of a normal group. Permission roles cannot contain users.
Note:
The ensuing options are only available if this checkbox is disabled!
Is interface user: Logon is only possible via the WebAPI. Authorization on an app is required to log in to the WebAPI.
Note:
If this checkbox is active, then the following option Login allowed is not available!
Login allowed: This option defines whether members of this group will be allowed to login to the system. The selection options are Yes, No, and Inherited. The option Inherited is preselected and makes the question whether the login is allowed or not dependent on the choice in the hierarchically higher group. If the login has been allowed (Yes), then you can additionally decide, if the login for local user accounts of the group is permitted or - for instance - if it is just limited to SAML authentication only.
Local authentication: The login at the 446 Plattform will be made with a user name and a password.
SAML authentication: The login at the 446 Plattform will be made with an external authorization provider via SAML.
Note:
The option 446 Plattform Mobil UI for the two authentication types Local and SAML is only available with the license key Enable446PlattformMobil activated and enables the sign in via the mobile web interface. More information regarding the features of the 446 Plattform can be found in Table: Features.
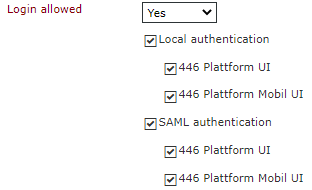
The Inherited option is not available in the root group.
Authentication type: This option lists various authentication types provided by the server. An exact description for the various authentication types can be found via the following link:
Notifications
Media of delivery: Select the prefered media for the delivery of messages to the group.
Use default setting (Enable notifications)
Disable notifications
Enable notifications
Email: This media of delivery is unavailable if notifications have been disabled. When the setting 'Enable notifcations' has been selected, then you are capable of disabling this checkbox optionally.
Workflows
Create user: The workflow is triggered when a user is created via the user interface, by the plug-in Create user or by an XML import.
Edit user: The workflow is triggered via the user interface when saving after processing.
Fields
Below, freely definable fields (custom attributes) can be found, e.g. the customer code or the dial-in number. Such freely definable attribute fields are specified via an additional tool in the database and can be accessed using expressions, for example.
Description: A short description of the group can be entered into this field.
Customer code: An abbreviation to identify customers.
E-mail: If a group mail account exists, and messages are to be sent to it, the respective e-mail address is to be entered in this field.
Members
On the Members tab, groups and users can be added as members to the current group or be removed from membership.
Note:
If a user or a group is only a member of this one group, he/she will be removed from the system by being removed from the group.
If multiple groups or users are members of one group, specific members can be searched by entering the name or parts of it into the filter top right. This filter works just like every other filter.
Groups
The Groups tab lists all groups the current group is a member of. Via a click on the Add group button, the currently selected group can be added as a member to other groups. The superordinate group (main group) the group has been created in is marked with a house icon. Within the Actions menu, the attribute Main group can be also transferred to another selected group. If a group is not to be a sub-group of another group any longer, it can be removed via this menu as well.
Import
Via the Import tab, members or entire member groups can be imported. The 446 Plattform® offers the option to add user groups via a LDAP or XML import (see also Import).
Text Module
On the Text module tab, it is possible to create individual text modules for a group. Via a click on the New text module button, a new text module is created, for which a Title and the designated text can be entered via the editor. The text modules can be embedded in e-mail messages by using expressions, for example (see also Related Topics). They can also be inserted in the HTML editor by selecting them.
Notifications
On this tab, the preferred medium (deliverer) for this group can be defined. Whenever mails are sent to this group, the system will use the medium specified here automatically. These settings do not apply to e-mails and messages sent to individual users of this group.
Permission roles are not groups as such. The allow for passing on permissions assigned to them to groups they contain. They are, however, not visible during the selection in the user browser.
Permissions for these roles can be assigned similarly to those for ordinary groups.
In order to delete a group, it is to be selected in the Hierarchy view first. Clicking on Remove membership in the Tasks menu on the left deletes the group.
Note:
If further groups or users are members of the group to be deleted, they will be deleted as well, unless they are also members of other groups.
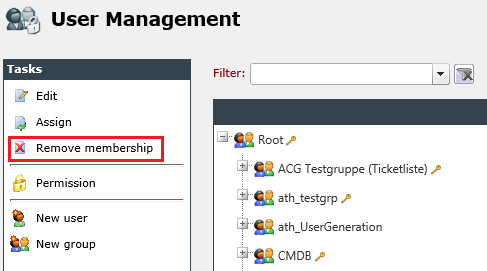
In order create a user, a group to become the main group of the new user has to be selected.
In the Tasks menu the left, the button New user directly above the New group button will now be available.
After a click on this button, the properties dialogue for the new user will open. Further information on the individual options can be found in the next section. With a click on the Save button, a new user will be generated.
Warning:
The creation of new users is not available in the User view, as they have to be assigned to a group immediately upon creation.
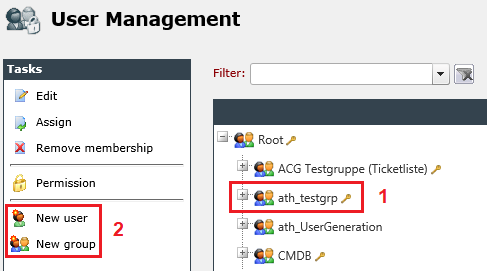
First, select the group, in which the new group is to be created [1]. Subsequently, the buttons for New user and New group will be activated [2].
If the information regarding the user has changed, it can be edited quickly. For this purpose, the user has to be selected in the hierarchy or the user view. Via a click on Edit in the task window or a double click on the user, the user detail dialog is opened.
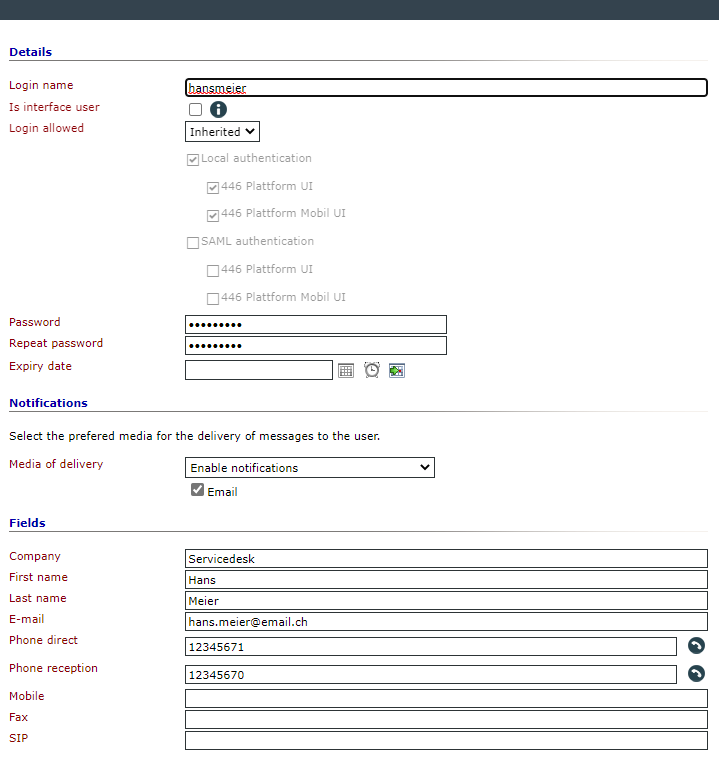
The user overview window offers several editing options. It is subdivided into the tabs User, Groups, Text module and CIs.
User
On the User tab, the following attributes of a user can be customized:
Details
Login name: This is the login of the user, which can be used for logging onto the system later on.
Login allowed: This option defines whether a user can login to the system. The selection options include Yes, No and Inherited. The option Inherited is set by default, resulting in the login being permitted or denied depending on the choice made in the hierarchically superordinate group. Deactivating this option is advisable for users that are only used for sending e-mails automatically via the Mail2Ticket system, for example.
Password and Repeat password: The password the user will need for logging on later.
Expiry date: Here you can set if a user account is still active or not. There is no distinction between imported and regular users.
If an expiry date has been set, the user receives the following message while trying to login:

Expired users are being displayed in a gray inking:
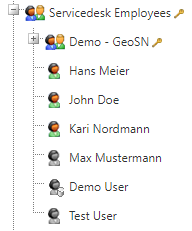
Notifications
Media of delivery: Select the prefered media for the delivery of messages to the group.
Use default setting (Enable notifications)
Disable notifications
Enable notifications
Email: This media of delivery is unavailable if notifications have been disabled. When the setting 'Enable notifcations' has been selected, then you are capable of disabling this checkbox optionally.
Fields
Below, freely definable fields (custom attributes) can be found. Such freely definable at- tribute fields are specified via an additional tool in the database and can be accessed using expressions, for example.
Company: The name of the company related to the user.
First and Last name: The name of the user.
E-mail: In this field, the user’s e-mail address can be entered. This e-mail address is used for receiving messages sent to users via the system.
Phone direct/Reception/Mobile: Phone numbers related to the user can be entered here.
FAX: A FAX number can be entered here if any.
Groups
On the Groups tab, the various groups the user is to be a member of can be configured. The first group a user belongs to and has been created in will always be the main group and is marked with a house icon.
Deputy
On the Deputy tab, you can define deputies for the selected user. To do this, you need the Edit Deputies permission (see Permissions - General).
Text Module
On this tab, individual text modules can be defined for the respective user. Via a click on the New text module button, a new text module is created, for which a Title and the designated text can be entered via the editor. The text modules can be embedded in e-mail messages by using expressions, for example (see also Related Topics). They can also be inserted in the HTML editor by selecting them.
CIs
On the CIs tab, CIs assigned to the user (in the Configuration Management Database (CMDB)) are displayed. For a better overview, a filter can be used in order to display the various links to the CIs (e.g. creator, supplier).
CIs with either a connection to the user or to one of his groups are displayed here.
A user can be deleted by selecting him in the hierarchical view in a group and then clicking on Remove membership. With this option, the user will be removed from this group. However, if the user is not member of any other group, a click on Remove membership will delete him from the system.
After selecting a group (1), two new options for removing or transferring permissions will appear in the taskbar (2).
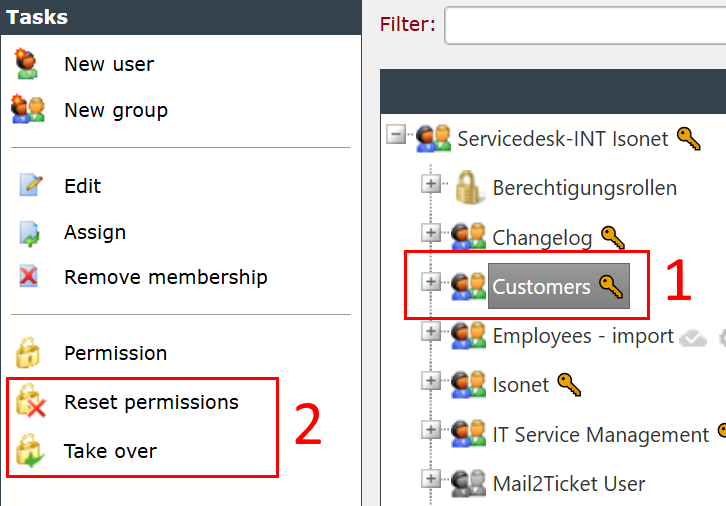
Reset permissions: All permissions set directly on the selected group will be reset to the default.
Take over: In a dialog box, you can select one or more groups, and the permissions set directly for them will be applied to the selected group.
If a permission has already been explicitly set for the target group, it will not be overwritten. If multiple groups are selected as sources and have different permission values set, the Not allowed permission takes precedence over the Allowed permission.


 Copyright (c) 2000-2026 Isonet AG