Ticket
A ticket is merely a brief outline of a freely defined ticket workflow:
- Request
- Problem
- Order
- Reclamation
- Competition
- Change of address etc.
These tickets are managed in a database respectively.
Short instruction
Chapters:
There are various ticket roles for every ticket. These roles are defined in data fields for each ticket and can be set and modified subsequently via different ticket actions or workflow plug-ins. They can be used for delimiting ticket and workflow actions to certain roles or for sending messages to only certain groups of people.
The following roles are available for each ticket:
Affected user: The affected user is a person affected by the results of the recorded error, change of configuration, etc. in the ticket.
Affected group: The affected group generally is the main group of the affected user.
Owner: The owner is the user the ticket is currently assigned to.
Owner group: The main group of the owner.
Creator: The creator of the ticket.
Responsible: The responsible for the ticket is a person responsible for a smooth process. In a ticket, this might be the person responsible for processes in and around a ticket schema or the SDU Manager of the respective transaction as soon as the Service Portfolio is used.
Ticket follower: This role allows for following the progress of a ticket. Thus, there is a button at the top right corner of each ticket that activates or deactivates the ticket follower option.
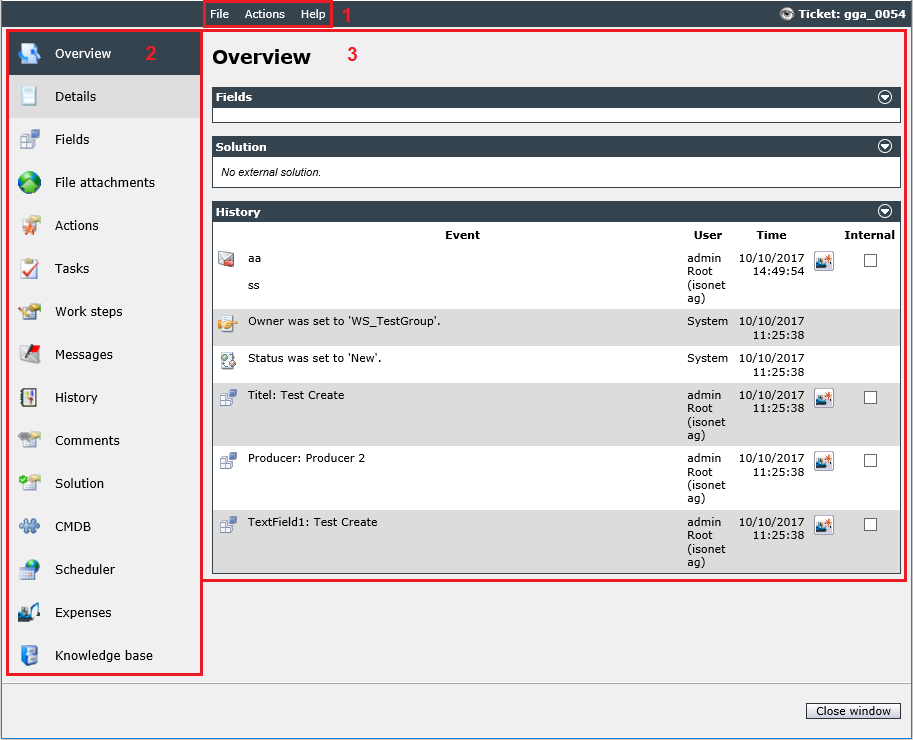
Every ticket is displayed as follows:
Note:
The 446 Plattform® and tickets in general do not support the zoom function of the various browsers.
- Top menu
File: An overview of the ticket, printing it with or without the history (with external or external and internal information), closing the ticket view.
Actions: Various actions currently available for the ticket, like Accept ticket or Delete ticket, will be listed.
Help: The system help and information on the system version can be found.
- Features bar
Several tabs for viewing or adding new information on the ticket are available. Depending on the licensed version and the user permissions, up to 15 tabs can be found here.
- Main window
The main window displays all of the information regarding the currently active tab.
Overview: Displays various overviews of the ticket.
The short history on this tab displays several items from the complete history (e.g. booked expenses, added or deleted files, etc.). Via the icons in this history, the corresponding objects can be opened directly by a click.
Clicking on any user opens the user details dialog for that user (or the performing deputy). 
Moreover, it can be determined here, which of these entries and the corresponding objects will be displayed as internal or external.
Details: Displays detailed information on header data, Service Level Agreement, and affected user.
The responsible user of a ticket will always be filled in automatically during ticket creation. If the ticket is created on the basis of a ticket schema, the creator will become the responsible. If the ticket is created via a service transaction, the owner of the service transaction will become the responsible of the ticket. If there is no owner, the creator of the ticket will be set as the responsible.
Fields: Displays the fields configured for the current ticket schema either as an overview or in the wizard view. If ticket IDs are specified, they will automatically be transformed into a click able link.
Files and folders will be automatically transformed into click able links as well, when entered in the following format:
file://\\HOST\FOLDER\\ or
file://\\HOST\FOLDER\FILE.END\\
File attachments: Shows existing file attachments and allows managing them, e.g. deactivating obsolete files. This tab can also be used to upload, delete or move further files to another ticket, if the respective action has been activated (see also General Information).
Actions: Depicts the current pending direct as well as workflow actions.
Tasks: Displays a list of the tasks linked to the current ticket.
Work steps: Single work steps can be entered similarly to comments here.
Messages: Depicts the e-mail communication. For example, if the action Reply mail has been activated, messages can be sent via this tab as well. The red pennant is displayed whenever messages have been attached to the ticket (except for system messages).
History: All actions performed either by users or automatically by the system are listed here chronologically. With the proper configuration key activated, system administrators are also able to remove history entries (see also General Information).
Comments: Displays the comments. Depending on the position in the workflow, users can add comments via the button New comment here as well. With the proper Action configured or configuration key enabled, comments can be deleted or wiped permanently from the system (see also General Information).
Solution: The solution to the ticket can be entered here. A field, into which a short summary can be entered, and also a text box with an editor, in which a more detailed description of the solution can be saved, can be found here. Below, there is a further section with file attachments from linked KB articles or file attachments marked as corresponding to the solution. If a ticket has been linked to a Knowledge Base article, which contains file attachments, these will be displayed in the solution automatically as well.
CMDB: Depicts all of the CIs linked to the current ticket.
Scheduler: Tasks and schedules assigned to certain users can be created for a ticket. This action cannot be found in the ticket actions, but on the left in the menu of the ticket detail dialog under Scheduler.
Expenses: Expenses for the ticket are displayed here. The expenses for a ticket can be entered here, e.g. expenses accumulated during the solution the ticket.
Knowledge Base: Displays linked KB articles and allows for linking further articles to the ticket.
Note:
The number of the displayed and usable tabs in the function bar depends on the number of licensed modules as well as the permissions.
A container’s function is to pool several similar tickets. Via a container, actions on a container can be executed for all contained tickets at the same time. When a container is created, a new ticket will be generated for all selected tickets and the original tickets will not be displayed in the activity list of a user anymore. In the ticket list, however, they will still be visible along with the container ticket.
Similar tickets means that only tickets generated with the same ticket schema can be pooled in a container. This restraint arises, because every ticket schema can be possibly derived from a different workflow and thus the tickets will go through different processes respectively.
A container includes a title, a description, its own escalation time, and also a solution compulsory for all container tickets.
The escalation time of the container will be derived from the ticket in the container that escalates next. This makes sure that the Service Level Management Agreements will be observed within the container as well.
Several actions, like adding comments and deadlines, booking expenses, and attaching files, can be executed for a container just like for the tickets within. Comments generated in the container can be included in every ticket via the option Create for all tickets in container.
Tip:
The action Create container has to be configured in the original schema under Settings > Ticket Management > Ticket Schemas for the respective user(s).


 Copyright (c) 2000-2026 Isonet AG