Ticket Schemas
Tabs:
Every ticket is based on a ticket schema, which determines its whole structure and logic as well as its life cycle.
The configuration of the schemas can be accessed via Settings > Ticket Management > Ticket Schemas.
Short instruction
General Information
New schemas can be created by using the button New ticket schema here. Existing schemas’ properties can be edited via a double click or the button Edit schema. Using the Actions menu, schemas can be copied or deleted, if not needed any more.
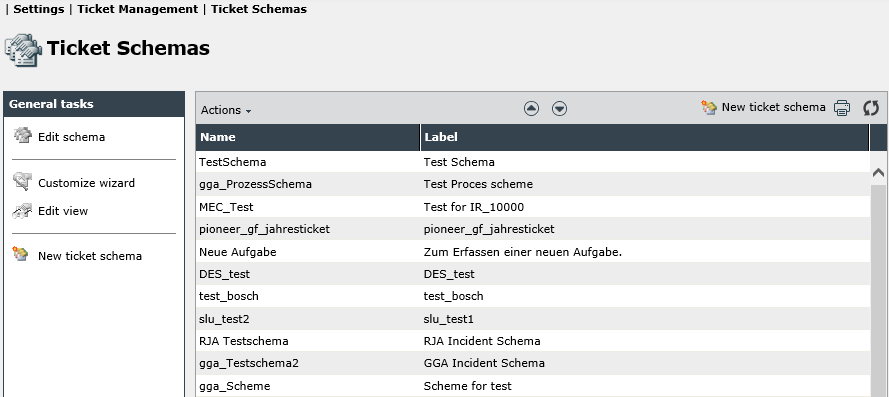
Under General Tasks in the side menu, the following buttons are available:
Edit schema: Equals a double click on the respective schema and opens the properties of a schema.
Customize wizard: With this option, the configuration of the ticket wizard can be opened. The ticket wizard will guide the user through the ticket creation later on, whenever the button New ticket in the side menu is used, for example.
Edit view: The field view displayed in the ticket later on can be configured here.
New ticket schema: With this option, a new schema can be created.
Configuring a Ticket Schema
The configuration dialog will open after a click on the respective schema or after a certain schema has been selected and the button Edit schema used. When creating a new schema, the only tab available until the first saving will be Ticket schema.
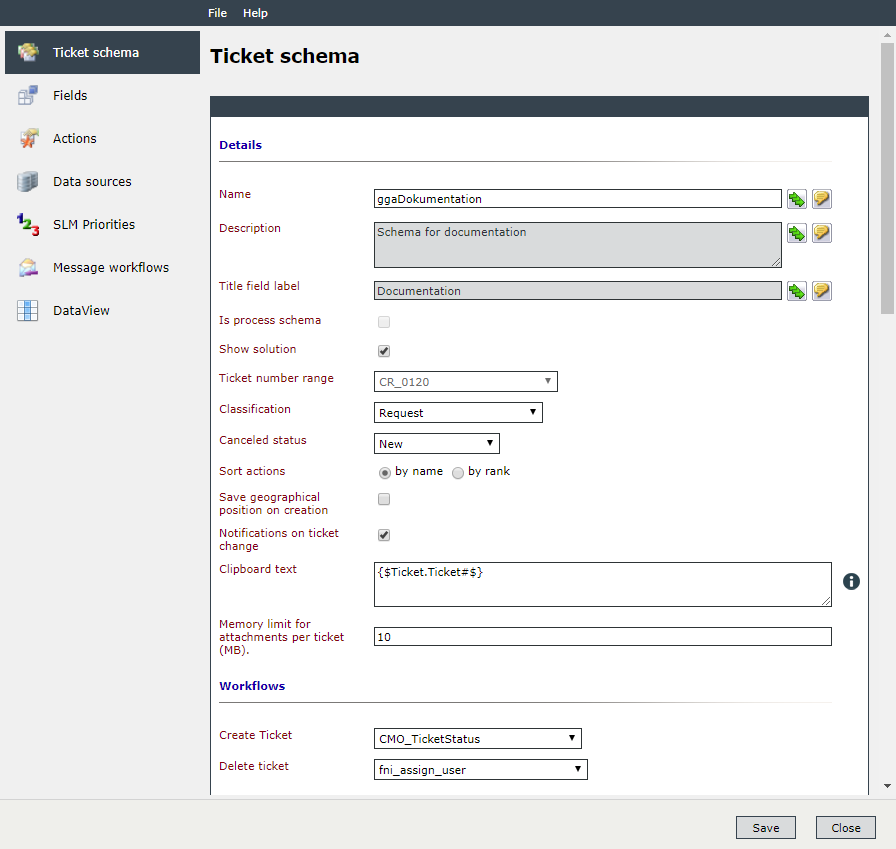
In already created ticket schemas, all tabs will be displayed as active on the left.
The tab Ticket schema in the detailed view of a schema contains its overall configuration.
Details
Under Details, the following fields are available:
Title: Defines the name for the ticket schema. It will be displayed later on, e.g. in the selection dialog of the ticket wizard, and enables the user to select the right ticket schema. The localization buttons are only visible on multiple language systems. The name of a schema is localized and displayed as a FriendlyName there.
Description: It can be displayed below the schema name in the ticket wizard, e.g. if the name of the schema does not imply its use.
Title field label: This label will be used later on for displaying a label for the title field defined at a later date, below the ticket number on the header data tab in the details dialog of a ticket.
Is process schema: Via this checkbox, a process schema for the service portfolio can be created (see also Related Topics).
Note:
This option will be activated automatically, as soon as the service portfolio is be available on your system and has to be deactivated manually, whenever normal ticket schemas are to be created.
Show solution: If this box is checked, the entered solution is displayed in the ticket overview.
Ticket number ranges: Every usable ticket schema has to be linked to a ticket number range. It is used for the serial numbering in every ticket schema. Thus, every created ticket is assigned with the next available ticket number (out of the number range linked to the ticket schema). However, one ticket number range can be assigned to multiple ticket schemas as well.
Note:
As soon as a ticket has been created via a ticket schema, it is no longer possible to change the ticket number range.
Classification: The classification of the ticket schema can be made here, e.g. Problem or Known Error. Classifications can be created and managed under Settings > Ticket Management > Classifications.
Canceled status: The status for canceled tickets is defined here. It is needed for the ticket action Cancel successor tickets and tasks. A ticket status with the type Closed should be selected here.
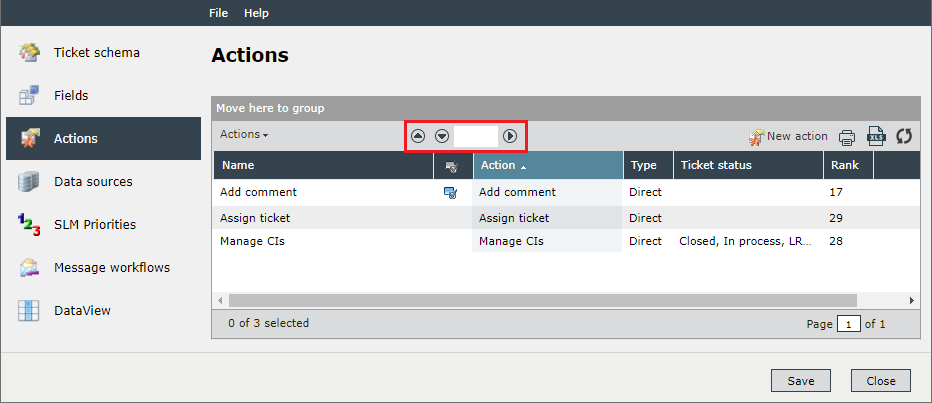
Sort actions: Defines the display of the actions on the schema Actions tab.
By name: Arranges the ticket action alphabetically
By rank: Allows for defining a ranking order for actions
If this option is selected, a rank column is added under Actions and an input field allows the specification of a rank. If an action is set to an already assigned rank, the ranks of all subsequent actions, including the previous action of this rank, are increased by one. This also applies if the action is set to an empty rank and there are subsequent ranks.
Save geographical position on creation: When activated, the coordinate field of the geographical position is saved.
Notifications on ticket change: If this option is activated, push notifications are displayed for ticket changes.
Clipboard text: A text (or expression) can be entered here, which is then displayed as a pop-up in the ticket by clicking on the ticket number in the upper right corner (default: ticket number).
Expression for the ticket summary: You can enter text or an expression here that will be used as the ticket summary when displayed on mobile devices. To use this summary, the TicketSummaryUpdater worker must be configured and enabled in the Isonet Agent.
Memory limit for attachments per ticket (MB): With a value greater than zero, the limit of all files to be uploaded is specified in MB. If the value is zero, the upload is unlimited.
From
: If the field remains empty, the limit is set to unlimited. Previously configured schemas are updated to empty to remain unlimited. Using a 0 is still a valid input, but it is treated like other numbers and limits the file to be uploaded to 0 MB.
Workflows
Create Ticket: Every ticket created via this ticket schema has to run through the workflow defined here. It determines the general progress, the status changes, the messages sent, and other components.
Delete Ticket: Whenever a ticket is deleted (e.g. via the Actions menu in the ticket list), it runs through the workflow defined here first.
Notifications
The following fields are available in the Notifications section:
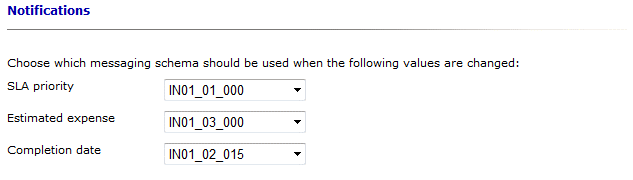
SLA priority: Defines the messaging schema to be used for sending a notification when the SLA priority of a ticket changes.
Estimated expense: Defines the messaging schema to be used for sending a notification when the estimated expense of a ticket changes.
Completion date: Defines the messaging schema to be used for sending a notification when the completion date of a ticket changes.
If no notifications are to be sent, you can ignore these options and keep the default settings.
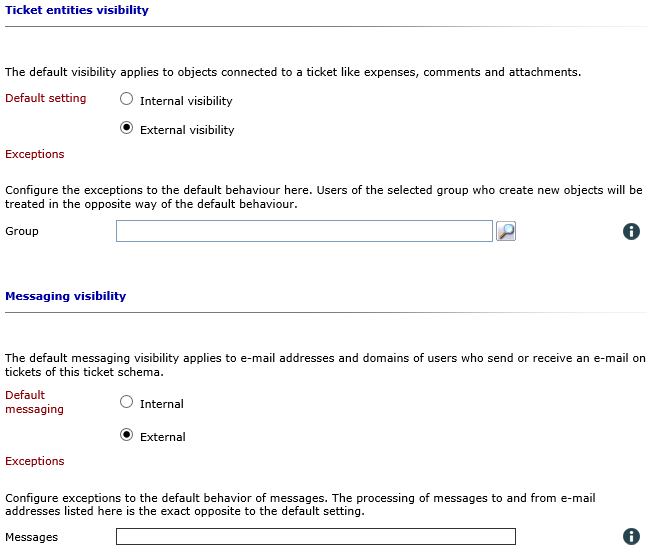
Ticket Entities Visibility
Here, settings regarding the Overview tab in the ticket dialog can be made. On this tab, a limited display of the history (not all history entries displayed on the History tab can be found here) is available. You can determine which entries or objects are to be visible on the Overview tab here. For this purpose, an additional rights setting is available (see also Related Topics).
Tip:
If a user has not the right to view internal entries, he does not see them on the corresponding tab as well. If the default setting is configured as internal and a user generates an entry although he does not have the right to see internal entries, this entry will be marked as external.
For objects like expenses, comments or file attachments (all objects available in the ticket except for messages) you can determine the behavior of a new entry here. If Internal is selected as a default setting, all new entries of these objects will be marked as internal in the history in the overview and will only be visible for users with the respective rights. If External is selected, the entry will be marked as external and visible for all users.
Underneath, a group can be specified as an exception and the above setting will not apply to it. For the group specified here, the opposite of the settings above will apply. If a user of this group generates such an entry (e.g. by adding a new comment), it will be handled exactly contrary to an entry generated by a user not being in this group.
Messaging Visibility
The visibility of the sent or received messages can be seen analogously to the ticket entities visibility. However, in the box of the Exceptions option, you can specify, which domains are not to be subject to the default settings. For example, you can configure the default setting as internal and specify @isonet.ch as an exception. This means that all mails sent or received via the domain isonet.ch will not be marked as internal but as external and thus will be visible for all users.
Visibility of ticket overview history entries
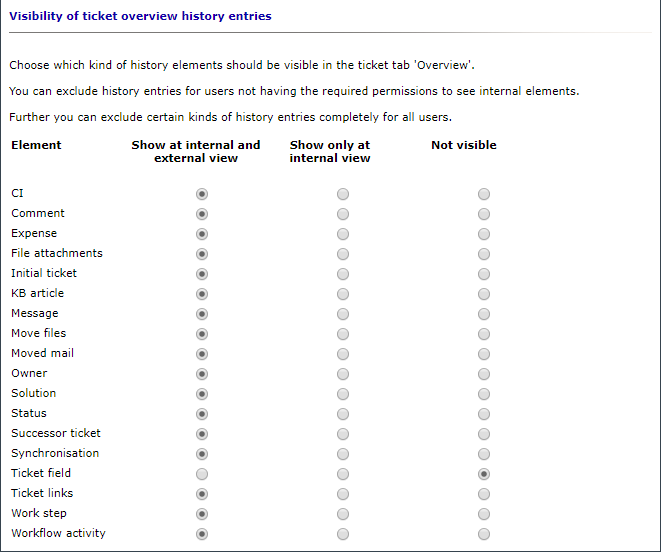
Choose which kind of history elements should be visible in the ticket tab Overview. You can exclude history entries for users not having the required permissions to see internal elements. Further you can exclude certain kinds of history entries completely for all users.
Via the Fields tab, a ticket’s data fields available in a ticket schema can be configured.
Tip:
Data fields can be created manually in this tab. However, this is not mandatory, as the ticket wizard designer automatically creates and links a data field to the corresponding input field.
A data field is used, so to speak, as a saving location for information entered by the user. A displayed field in the ticket wizard is usually linked to a data field in the ticket schema. Therefore, information entered into the displayed field will be saved in the data field linked to it.
In the ticket view, a display field will be similarly linked to a data field of the ticket schema. Thus, information contained in the data field will be displayed at the respective position in the ticket view.
Data fields can also be created independently from the ticket wizard. In doing so, it is possible to configure a data field and to display it in the ticket but not to display it during the ticket creation, for example. The field can be filled with data later on, e.g. by users or by workflow plug-ins.
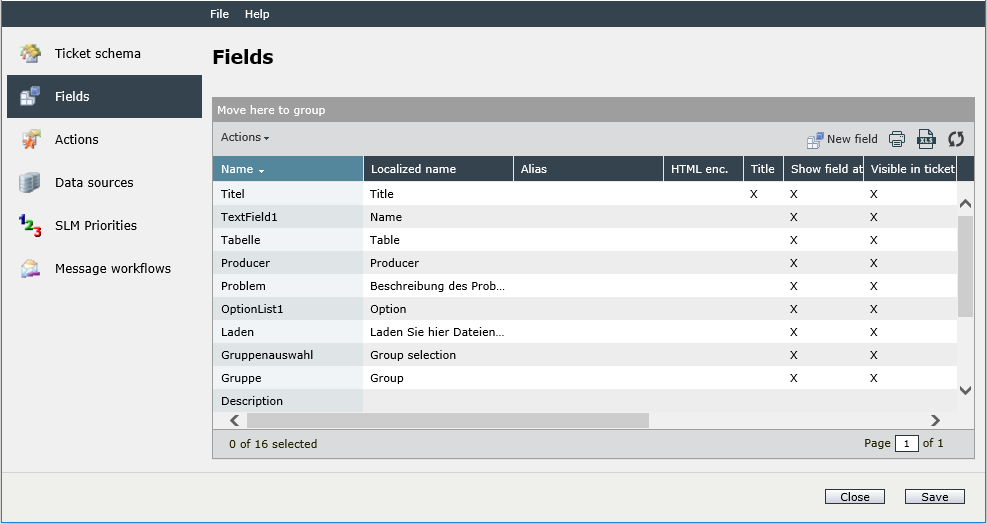
Creating and Managing Fields
Via the New field button, new fields can be created here. The properties of existing fields can be edited with a double click. Using the Actions menu, fields can be deleted as well.
Note:
Only one field can be tagged as a title field. Thus, the data contained in the data field tagged as the title will be displayed in the header data of the ticket view as a label (title of the ticket) behind the ticket field label. When deleting a data field, the system checks if the respective data field is used in any ticket wizard. If it is still in use, the field cannot be deleted and a related note will be displayed. Hence, every link to this data field has to be deleted in the ticket wizard first.
Tip:
By selecting all fields (using the [CTRL] or [SHIFT] buttons) and subsequently using the Delete button, any field not needed any more can be deleted from the system within seconds. Fields still used in the ticket or wizard in any way will not be affected by this.
Warning:
If a data field is generated manually, it has to be configured in the wizard or the view as well. Otherwise, it will not be visible when generating or displaying a ticket later on.
When configuring and creating ticket data fields, it should be noted that no mathematical operators (e.g. – and +) or special characters as an umlaut or blank space apart from the underscore character (_) are to be used in the naming. When such elements as – or + are used, these tickets may not be addressed correctly via the expression, because they will be interpreted as mathematical operators by the system.
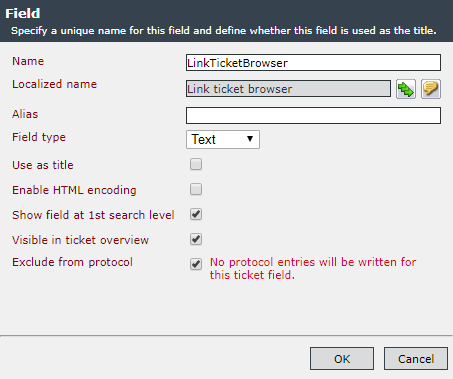
Name: This is the field’s name. By using that name, it can be identified distinctively, for example when configuring the ticket wizard. However, a field can be addressed via expressions in this way as well.
Example:
The content of this field could be accessed via the expression:
{$ Ticket.Fields!cr01_contact_
company.Text $}
Localized name: The localized name will be used in the ticket view. Depending on the system language used by a user, the respective localized name will be displayed.
Alias: For every ticket field, an alias can be defined. That alias allows for searching it via the direct access.
Example:
Thus the alias title can be defined for a ticket field Title across schemas. If now the expression title=notification of problems is entered into the direct access instead of a ticket number, every ticket with a title field with the designation title in its schema containing only the value Notification of problems will be displayed in the new search dialog. You can also work with placeholders at the beginning and end of the search term (e.g., title = *problem*) and logic operators such as AND and OR (e.g., Customer = Customer1 AND Title = *Workflow*).
Field types: There are three field types that can be used to create a ticket data field:
- Text: This is the default field type. Any text can be entered here.
- Date: This field type is used for entering date values.
- Numeric: This field type is used for entering numeric values. The number of decimal places in numeric values can be specified as well. If, for example, four decimal places are allowed, you can enter numbers in the following formats:
- Html: If this option is selected, potentially harmful content (e.g., JavaScript) will be automatically removed when the content is saved.
xx; xx.x; xx.xx; xx.xxx; xx.xxxx
In the ticket wizard or later on in the ticket, only numerical values will be accepted.
Use as title: Allows for using the information in a ticket field as title. Only one field can be set as title for each ticket schema. This title will be displayed subsequently on the Details tab below the header data behind the title field name.
Enable HTML encoding: After activating the HTML encoding, HTML tags will be excluded from the interpretation by the browser within the respective ticket field. That means that HTML tags will be displayed exactly as they have been entered. With this function deactivated, entered HTML will be interpreted. Thus, HTML tags can be used in the ticket field or solution, which allows for displaying texts bold or in italics or for creating lists, for example. There is a special tag which can be used in order to type HTML, JavaScript or similar code elements into a ticket field without them being interpreted. Text written between the two tags <code> and </code> will be displayed using the Courier font in order to be set apart from the other text.
The following options are available:
-
None (no encoding)
-
Only in the wizard/ticket view (default)
-
Everywhere (wizard/ticket view/expressions,...)
You can also retrieve the field's content in plain text. To do this, use the expression {#Ticket.GetFieldText(“Text field name”)#}.
Show field at 1st search level: In the advanced search, the field is displayed on the 1st level.
Visible in ticket overview: When activated, the field is displayed in the Overview tab of the ticket.
Exclude from protocol: If this option is enabled, a warning is displayed that no history entries are written when the ticket field is changed.
Copying and Deleting a Ticket Schema
In the list view, a ticket schema can be copied or deleted. For this purpose, the Actions menu above the list is available.
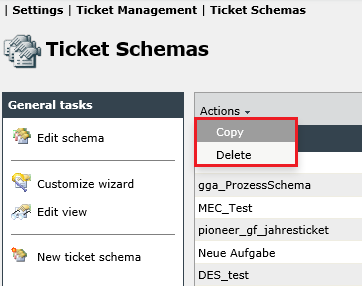
In order to copy a schema or to delete it, it has to be selected with a single mouse click. Subsequently, the respective action can be used in the Actions menu.
Note:
When copying a ticket schema, the entire ticket wizard will be copied as well. During this, the IDs of the individual wizard controls and the possibly existing selection options will not be changed. Ticket actions will be duplicated together with their configuration and rank as well.
The actions for the ticket schema can be configured here. They have to be defined for every ticket schema separately. Moreover, ticket actions depend on ticket status and the current user. Actions manipulating the ticket by changing its status (Ticket assignment, Solve ticket, Reject ticket, etc.), have to be synchronized with the workflow.
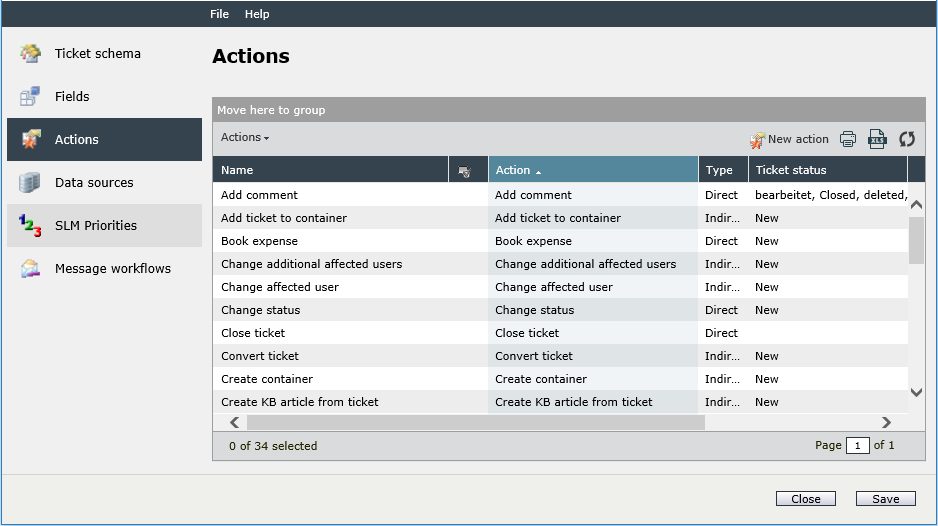
There is a predefined pool of actions, which can be expanded via plug-ins, if needed.
Furthermore, there is a difference between direct and indirect actions. Direct actions can be found in the respective ticket view on the Actions tab as tabs with their respective assigned names. Indirect actions cannot be accessed via the Actions tab in the ticket view; they appear at various locations in the ticket. An indirect action is Save solution, for example.
After an action has been added by using the New action button, a new dialog will open, in which the ticket status/statuses can be configured and possible further configurations made.
If more than one action of a certain type is configured, these actions are displayed in a sub menu. This affects the following actions:
-
Change additional affected users
The first step in the new dialogue action window is to set a Ticket status and add users respectively groups accordingly.
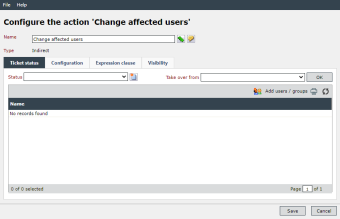
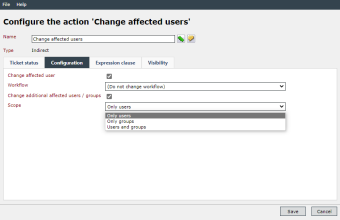
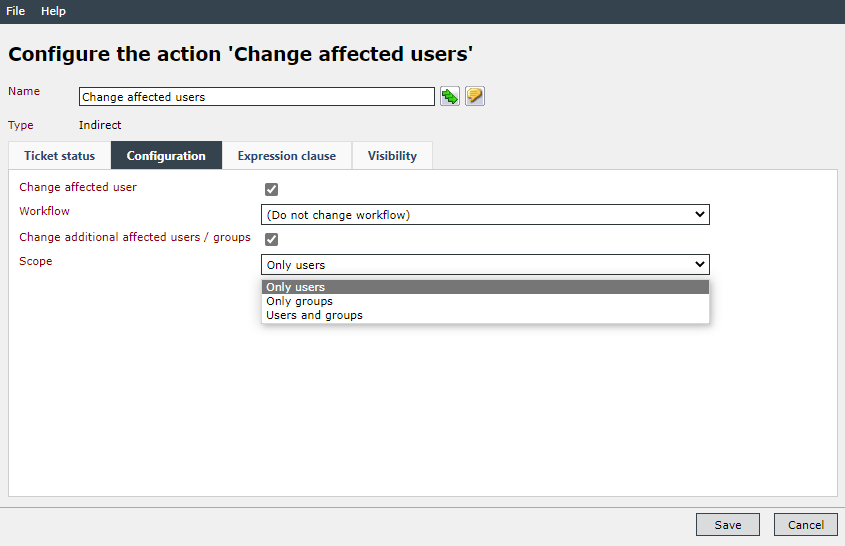
The Configuration tab's purpose is to provide possibilities to change the workflow itself and to change additional affected users and groups.
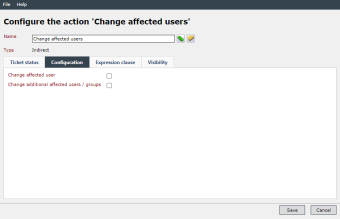
Within the Scope you define additional restrictions regarding the allowed domain for users and groups.
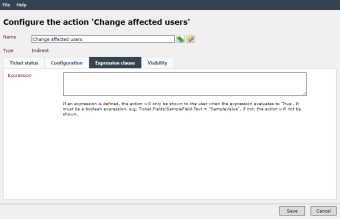
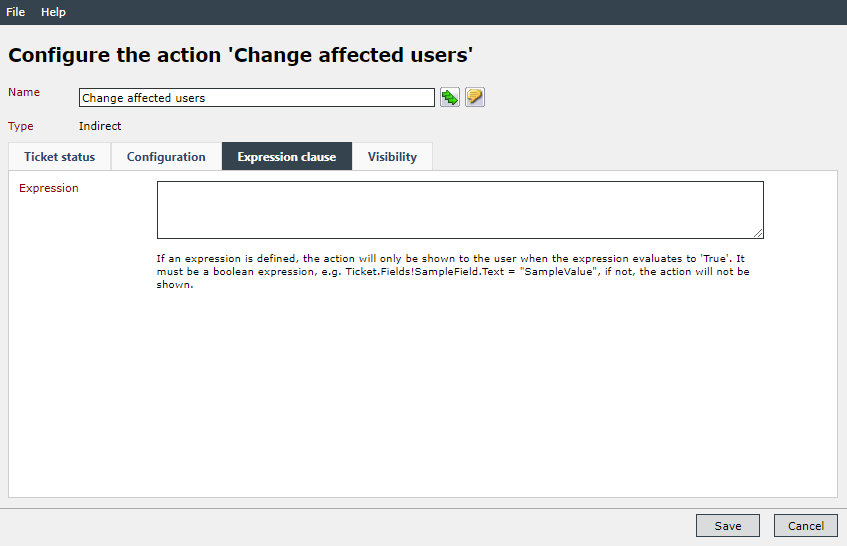
Via Expression clause you are able to insert custom expressions that ensure the visibility of the action. An introduction to expressions can be found at Sharp-Expressions
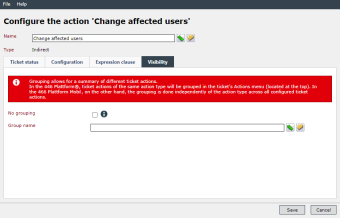
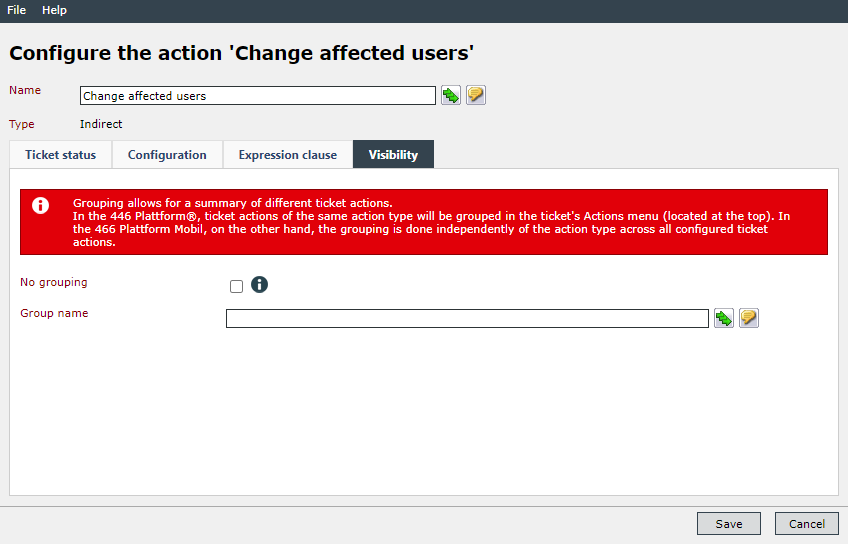
With the last category named Visibility you are able to rename a ticket group with the same action type in different languages or change the grouping of ticket actions itself to no grouping at all.
Tip:
No grouping: If activated, the action will be shown on the first layer inside the action menu

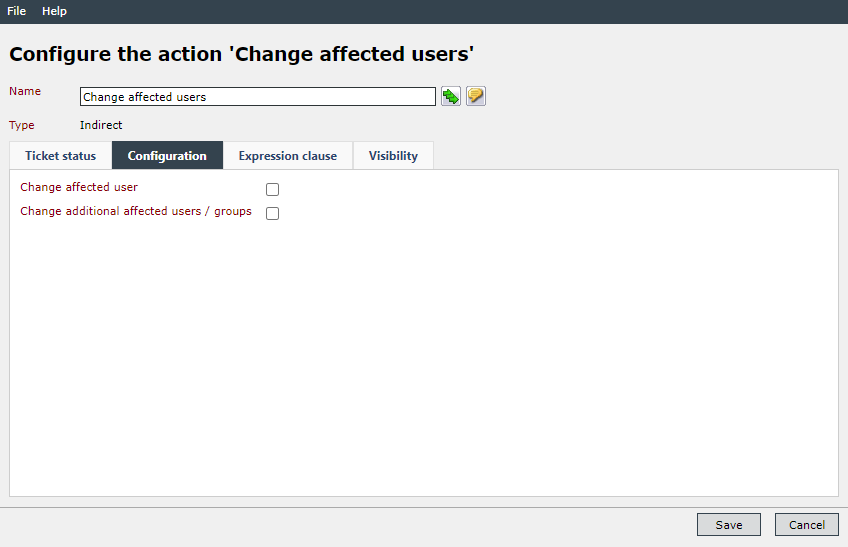
- Change additional affected users
- Change affected user
- Change geographical position
- Convert ticket
- Create KB article from ticket
- Duplicate ticket
- Link ticket with KB article
- Take over ticket
The order of the actions can be set in the Ticket schema tab by name or by ranking.
This tab allows for configuring data sources containing information on and for a ticket schema. These data sources can be accessed via the input field type Data source query in the ticket wizard. The data sources can be managed in this tab via the Actions menu and the New button.
Configuration:
The configuration of data sources is performed analogously to the input field type Database query of the ticket wizard designer. Further information can be found in Controls at Data source query and in the article Data source configuration.
Tab SLM Priorities/Process roles
Here, a list of preferred SLM priorities can be compiled from different contracts and expenses. They which will be taken into account during the automatic assignment of a priority for all tickets created with the respective schema.
This list will be used if no distinct automatic assignment is possible.
If Use strong binding is activated, tickets of the schema are limited to exactly this priority of the list and no automatic assignment is made. The strong binding can only be selected if the list consists of exactly one element.
Note:
In order to add a new priority, its configuration under Settings > Service Level Management > Service Level Management has to be already completed.
Note:
If the schema has been configured as a process schema, the tab Process roles appears. These roles can be managed here.
Certain actions can be configured here (ticket status, event workflows, behavior) that are triggered when messages arrive for existing tickets.
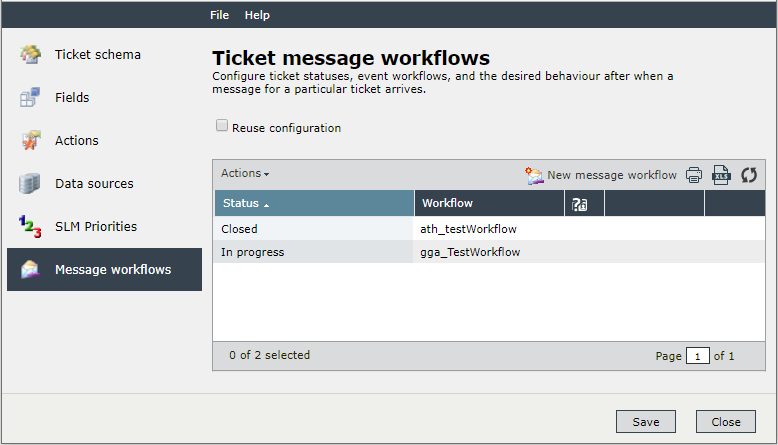
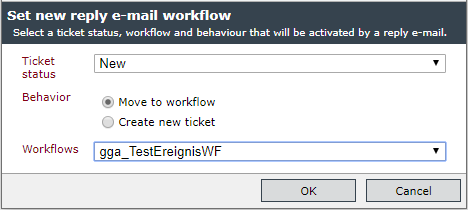
You can use the New message workflow function to create a workflow for the reply e-mail. For the corresponding ticket status you have to set whether the ticket should be moved into the specified workflow or whether a new ticket should be created. Workflows of the Primary and Event categories can be selected.
The Reuse configuration option allows you to select a different schema in order to use the message workflows configuration more than once. For many ticket schemes, this can simplify setup. If this option is enabled, the message workflows displayed can only be edited in the source ticket scheme.
When an incoming email triggers a message workflow, the workflow item contains a data field named sys_messageReference_objectGuid. This data field contains the ObjectGuid of the email.
Only for 446 Plattform® Mobil
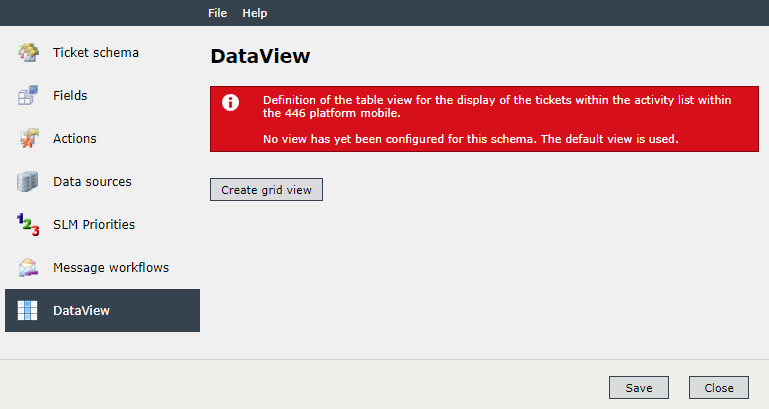
In this tab you can configure the table view for displaying the tickets in the activity list of the mobile version. If no view has been defined for the schema yet, the default view is used.


 Copyright (c) 2000-2026 Isonet AG