Configuration of reports
Depending on the licensing, the central starting point for the configuration and management of reports can be found under Settings > [Business Intelligence >] Reporting.
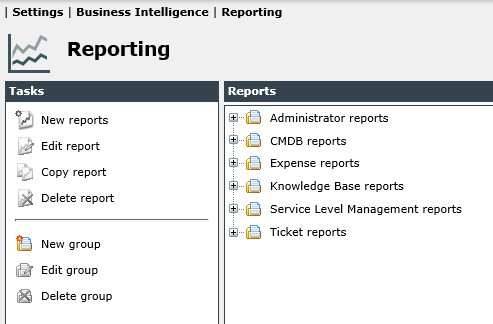
An overview of all provided preconfigured reports is displayed here.
On the left, the Tasks menu can be found. It is used for managing and creating reports and for sorting them into groups.
Creating a Group Structure
Generally, the report groups can be nested arbitrarily. An individual group structure can provide a better overview. By clicking on New group, a new report group is created. Subsequently, a dialog opens, in which a name, an icon, and a description for the group can be specified.
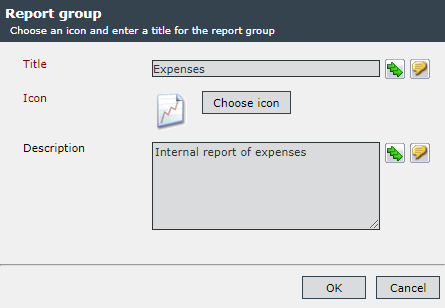
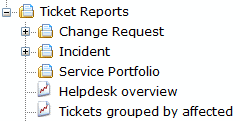
If additional groups are to be created in this group, simply click on the desired group and repeat the steps described above until the group structure meets your expectations.
Creating Reports
After the group structure has been finished, the reports can be generated and configured.
Click on the desired group, in which the report is to be created, and then click on New reports in the task menu. Subsequently, the following dialog will appear:
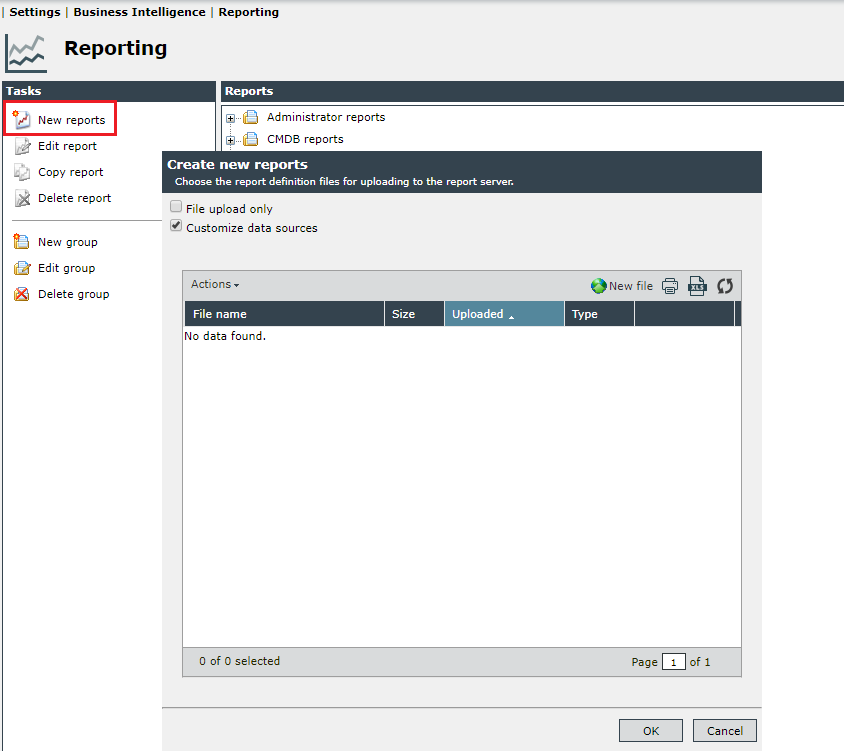
Click on New file in order to upload the prefabricated report file. For this purpose, a new dialog opens, in which the file can be selected. Multiple files can be uploaded at once, if more than one report is to be created. After uploading, simply click on Cancel in order to close the file upload dialog.
The following two options are available in the New reports dialog:
File upload only: The report(s) will be uploaded; they will, however, not be visible and cannot be edited in the group view later on. This option is not intended for normal reporting operations and should not be activated! Via this option, already existing reports can be updated easily, for example.
Customize data sources: The data sources specified in the report will be automatically linked to those from the database due to their name.
Subsequently, click on OK and the reports will be uploaded.
Edit Reports
After uploading the desired reports, they have to be edited.
Select the report to be edited and click on Edit report in the task menu on the left. This will open the configuration dialog, in which the following options can be customized:
Settings tab
Title: If the report’s title is to be edited (or expanded by a localization for additional languages), the new title can be entered here.
Description: A localized description for the report can be specified here (in every available language).
Report title: This field displays the original name of the report. The original report definition can be downloaded via the button right next to the file name.
Report file: If the report file has been modified after the upload, the modified file can be uploaded here to update the report.
Icon: The icon selected here helps in the distinction of various different reports.
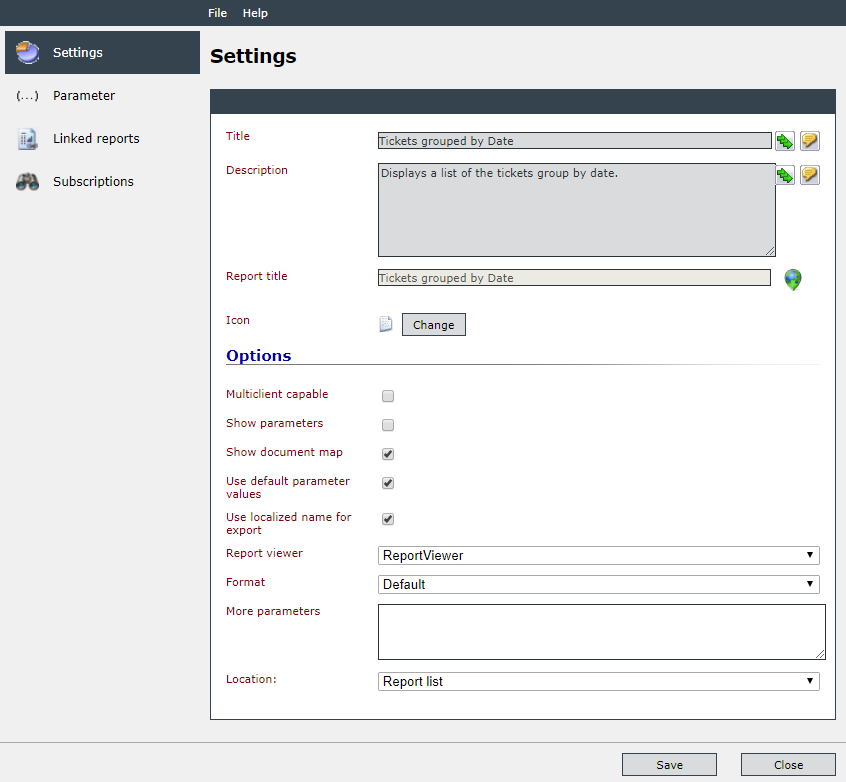
The button Show more options can be found below. After a click on it, the following options will be displayed:
Multiclient capable: If this option is activated, the report can be used by other clients with access to the reporting server as well.
Show parameters: The generated report will display an extended parameter bar, in which all parameters specified for the report can be displayed and edited subsequently. This option is only to be used for troubleshooting.
Show document map: A document map in the report is similar to the navigation in Word documents or the bookmarks in Adobe Acrobat. If a document map has been included during the creation of a report, it can be faded in and out via this option.
Use default parameter values: If this option is not activated, the last parameters of the respective user will be preset for him. If it is activated, the global parameter values will be preset.
Use localized name for export: If this box is checked, the localized names of various objects will be used as soon as the generated report is exported as a PDF file, for example.
Report viewer: Select the report viewer here. Either the ReportViewer, which is set as a default, or the ExtendedViewer can be selected here. In the ReportViewer, the report is loaded in an aspx page, while the ExtendedViewer loads the report URL directly in the window. This has, however, the disadvantage that no filter bar is available after loading a report. Therefore, the report has to be reloaded whenever other filter criteria are to be used.
Format: One of the various formats (e.g. HTML, Excel, PDF, XML), which can be used for the display of the report, can be selected here.
More parameters: If more parameters are to be defined for report generation, they can be entered here.
Location: The location the report can be executed in is to be selected here. Depending the purpose of the report, this option can specify whether it is to be executed in a ticket (ticket detail dialog) or to be used for printing a KB article (KB detail dialog), for example. For the detail dialogs, the parameter of the respective object has to be entered as well, e.g. the TicketObjectGUID for the ticket detail dialog.
Parameter tab
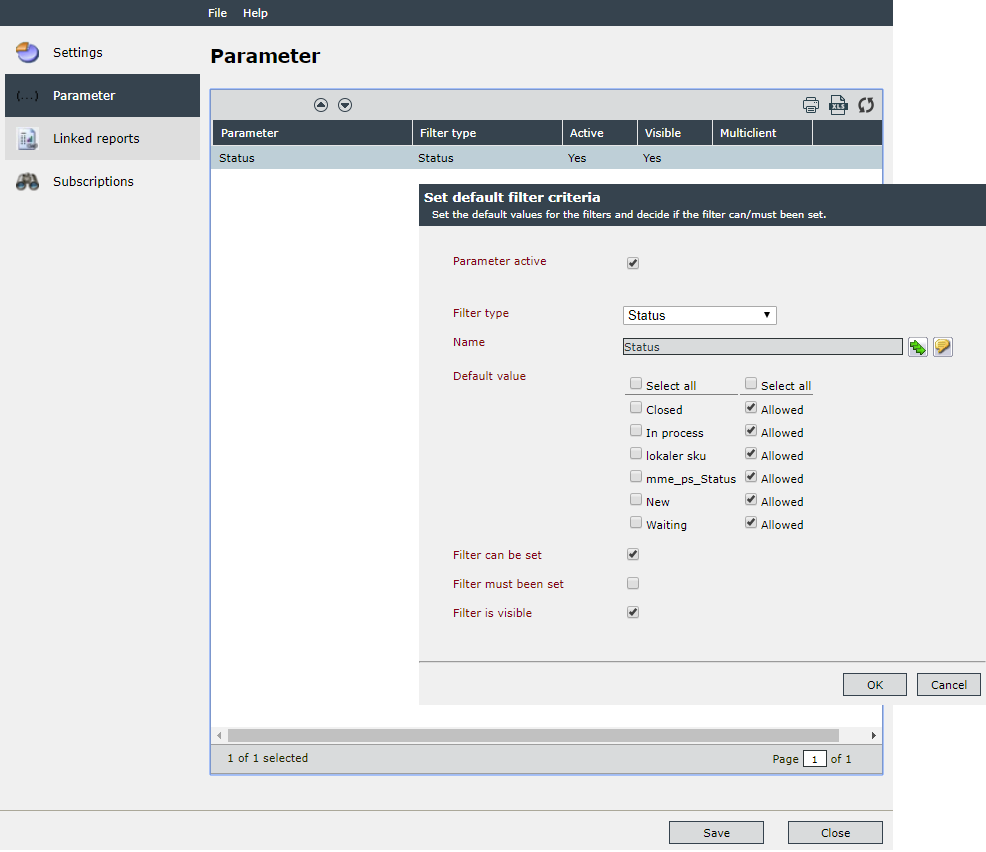
The parameters of the report can be edited in the next step. For this purpose, click on the Parameter tab on the left side of the dialog and all the available parameters of the report will be displayed. A matching filter control can be assigned to every parameter here.
By default, all of the parameters are neither set to Visible nor to Active. Double click on a parameter in order to open its settings dialog. If you want to activate a parameter, check the box Parameter active.
After the parameter has been set to Active, the following configuration options will be available:
Filter type: Select the default value to be used for filtering the parameters by assigning a matching filter control.
Name: The name depends on the uploaded report file, but can be customized here.
Default value: Select the desired default values for the filter type here. For example, if the filter type Schema has been selected, the schemas to be preselected by default can be specified here. If the option Allowed has been deactivated, the schema type will not be included in the report.
Filter can be set: If this option is deactivated, the options set under Default value will be displayed in gray in the future report and no further adjustments can be made. Otherwise, schema types to be used for the report can still be selected during report creation, for example.
Filter must be set: The report cannot be generated if no filter has been selected.
Filter is visible: If the filter is set to Visible, it will be displayed in the report later on. If this option is deactivated, a preselection can be made via the default values. However, the respective filter options will be faded out in the report itself.
Filter types
CheckBox: This option allows for filtering for checkboxes. As a default value, a box can be checked or left empty, so that either 0 or 1 will be passed to the report. This filter type can be used in order to fade in or out certain details, for example.
CiType: Via this filter type, CI types can be filtered. Select the types to be filtered as the default value. Multiple types can be selected via the Control key. Simply select the desired CI types via a mouse click while holding down the key.
Date: With this option, date values can be set as a filter type. As a default value, various filters can be set, e.g. predefined, dynamic, or later than.
DbQuery: Enter a query and a connection string here, in order to process a database query with the report to be filtered for later on.
DropDownList: With this option, values set in a drop-down list previously can be set as a filter.
FullText: With this option, search keys will be used for filtering later on.
Group: Enter a user group to be used for creating the report later on as a parameter here.
IdRange: Define a ticket numbering range to be used for creating the report later on as a parameter here.
Language: Select a language to be filtered for here. Available selection options are all languages activated on the system as well as the user’s language.
LverClearingType: Select an allocation type for expenses. Multiple allocation types can be selected here as well. For this purpose, click on Multiple choice and select multiple allocation types by holding the Control key.
LverCostCenter: Select one of the existing cost centers for expenses. Selecting multiple cost centers is possible here as well.
LverProject: Select a project from the Expense Management as a parameter for the filter here.
MultipleUser: Via a drop-down list, multiple users can be selected one after the other.
MultiSelectTicketField: The name of the report parameter must be identical to the value of the FriendlyName of a ticket field. All values configured in the wizard are then determined and made available in the filter as selection (multiselectbox). The search for available values is comprehensive, i.e. all fields with this FriendlyName are searched.
Report: With this option, multiple reports can be pooled into one report entry. These reports can then be selected individually in the parameter list of the collective report.
Schema: Select one or multiple ticket schemas to be filtered for here.
SelectList: Define a list of values, which can be selected from the list during report creation later on.
Status: Select the available ticket statuses to be filtered for later on here.
TextBox: Offers a text box for free input.
TicketField: Here the definition of a ticket field as default value is made. The report parameter of the report file (RDL file) must match the value of the FriendlyName of a ticket field. This allows all values of the ticket field to be made available in a drop-down list.
User: The user entered here previously will be used for filtering.
UserGroup: A user group can be entered for filtering here.
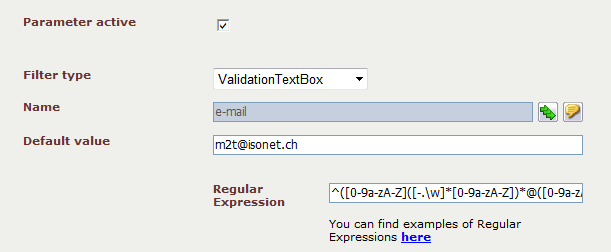
ValidationTextBox: This filter type works similarly to the t ext box, the only difference here is that the later input can be limited via a regular expression.
Linked Reports tab
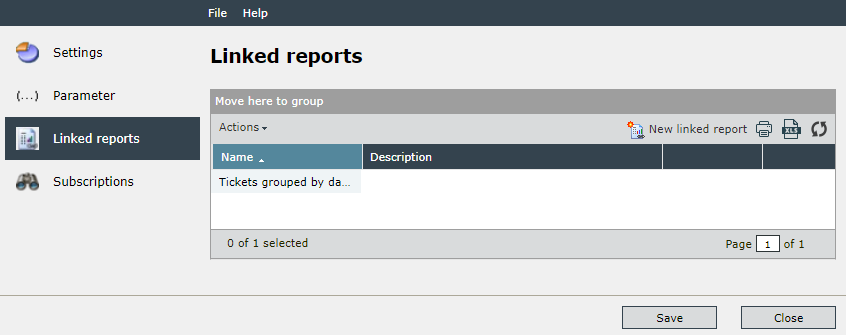
Linked reports are executed periodically as soon as a report has been configured completely. Select the desired report under Settings > [Business Intelligence] > Reporting and double-click the report to open the settings menu. Then select on the left side Linked reports and at the top right New linked report
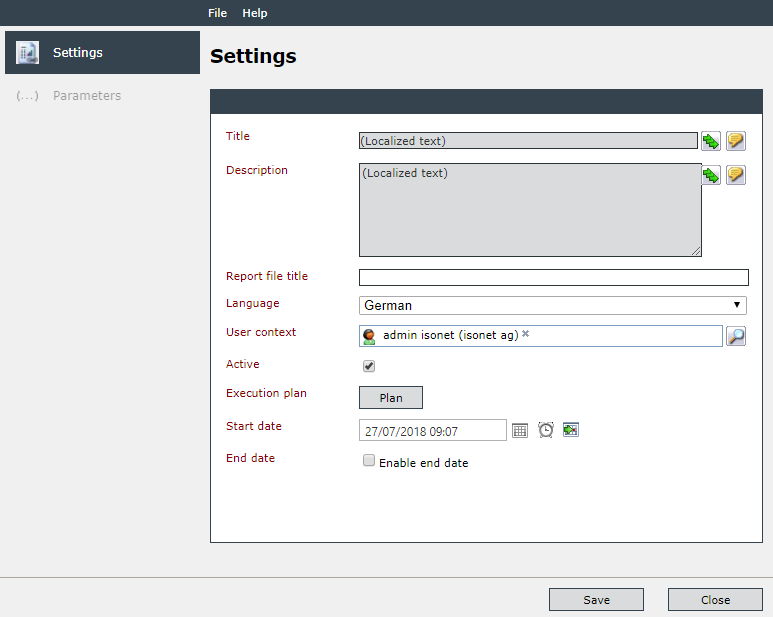
The following configuration options are available here:
Title: Enter a title for the linked report here.
Description: Enter a description for the linked report here.
Report file title: Enter the file name for the linked report here. The linked report will be filed on the reporting server under this name later on.
Language: Select the language, in which the report is to be displayed.
User context: Enter a user with the required permissions to all of the ticket statuses or ticket schemas, for example, in order to enable the report to be generated with all of the necessary data using this user’s permissions. For example, if a user that does not have the permission to display all expense types is used for a report, in which an overview of all expense types is to be created, the report will only be generated incompletely and important details may be missing.
It is advisable to create a user with all necessary permissions for the report generation, but to disable his login (see User Management).
Active: Activate this option for the linked report to be executed.
Execution plan: Enter the desired period, in which the report is to be executed.
Start date: Enter the start date here. The current date and time will be filled in by default.
End date: If the report is only to be executed for a certain amount of time, enter the end date here.
After all settings have been configured, a click on Save will make the parameter settings be available.
All parameters that have been configured for the normal, non-linked report can be customized for the linked report here. The configuration options are the same as for a normal report.
After a click on Save and Close, the linked report will be visible as a sub-report to the actual report.
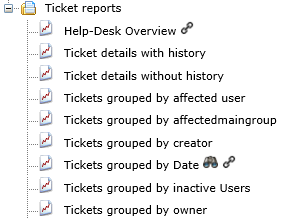
In addition, a symbol (linked reports) appears to the right of the corresponding parent report in the report list.
Note:
As soon as a linked report has been created for a report, the normal report cannot be deleted until the linked report has been deleted as well.
In this tab you can subscribe to rules for reports. They can be used to send notifications to users after a periodic execution plan. For example, if it is necessary to send a daily report on the processed tickets to a specific person, this is made possible by a subscription.
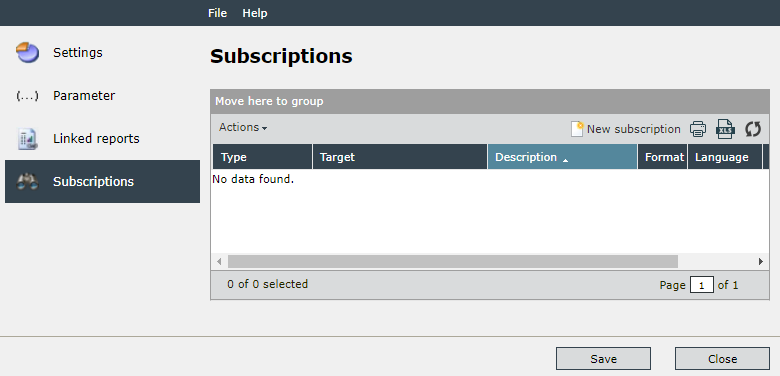
The Subscriptions tab lists all subscriptions. It is possible to add new subscriptions and remove existing ones.
Clicking the New subscription button opens the subscription dialog. In the Subscriptions tab, the settings for the existing rules can be made:
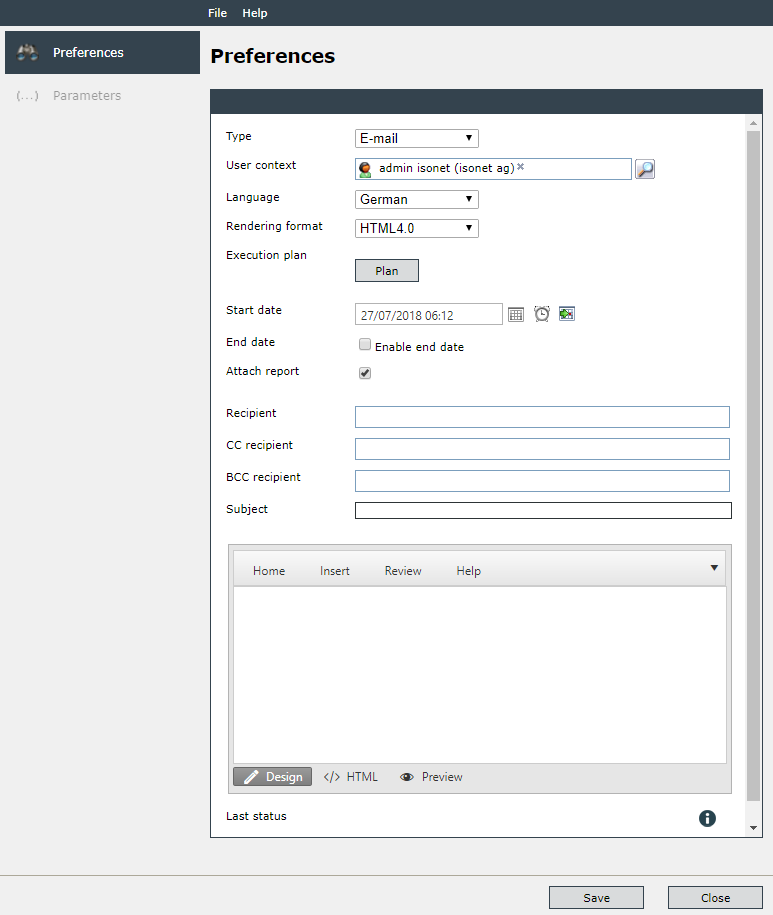
The following settings are possible here:
Type: You can choose between E-mail and File sharing.
User context: Enter a user with the required permissions to all of the ticket statuses or ticket schemas, for example, in order to enable the report to be generated with all of the necessary data using this user’s permissions. For example, if a user that does not have the permission to display all expense types is used for a report, in which an overview of all expense types is to be created, the report will only be generated incompletely and important details may be missing.
It is advisable to create a user with all necessary permissions for the report generation, but to disable his login (see User Management).
Language: Select the language, in which the report is to be displayed.
Rendering format: The report can be rendered in the following export formats:
- HTML4.0
- MHTML
- IMAGE
- EXCEL
- CSV
- XML
Adaptation of the XML export using XSLTThe report module can be configured via the file ..\ReportServer\rsreportserver.config so that only selected export options are available (see also SYSTEM > Software installation > Configurations).
For instance: Only display the PDF format controlled by the <Visible="false"> parameter in the <Render> section.
Copy<Render>
<Extension Name="WORDOPENXML"
Type="Microsoft.ReportingServices.Rendering.WordRenderer.WordOpenXmlRenderer.
WordOpenXmlDocumentRenderer, Microsoft.ReportingServices.WordRendering" Visible="false" />
<Extension Name="WORD"
Type="Microsoft.ReportingServices.Rendering.WordRenderer.WordDocumentRenderer,
Microsoft.ReportingServices.WordRendering" Visible="false" />
<Extension Name="EXCELOPENXML"
Type="Microsoft.ReportingServices.Rendering.ExcelOpenXmlRenderer.ExcelOpenXmlRenderer,
Microsoft.ReportingServices.ExcelRendering" Visible="false" />
<Extension Name="EXCEL"
Type="Microsoft.ReportingServices.Rendering.ExcelRenderer.ExcelRenderer,
Microsoft.ReportingServices.ExcelRendering" Visible="false" />
<Extension Name="PPTX"
Type="Microsoft.ReportingServices.Rendering.PowerPointRendering.PptxRenderingExtension,
Microsoft.ReportingServices.PowerPointRendering" Visible="false" />
<Extension Name="PDF"
Type="Microsoft.ReportingServices.Rendering.ImageRenderer.PDFRenderer,
Microsoft.ReportingServices.ImageRendering" />
<Extension Name="IMAGE"
Type="Microsoft.ReportingServices.Rendering.ImageRenderer.ImageRenderer,
Microsoft.ReportingServices.ImageRendering" Visible="false" />
<Extension Name="MHTML"
Type="Microsoft.ReportingServices.Rendering.HtmlRenderer.MHtmlRenderingExtension,
Microsoft.ReportingServices.HtmlRendering" Visible="false" >
<Configuration>
<DeviceInfo>
<DataVisualizationFitSizing>Approximate</DataVisualizationFitSizing>
</DeviceInfo>
</Configuration>
</Extension>
...
</Render>
Execution plan: Enter the desired period, in which the report is to be executed.
Start date: Enter the start date here. The current date and time will be filled in by default.
End date: If the report is only to be executed for a certain amount of time, enter the end date here.
Attach report: The report can optionally be added.
Recipient:/CC recipient:/BCC recipient: It is possible to specify the corresponding recipients here.
Subject: Enter the subject of the e-mail.
A formatted HTML text can be inserted in the field below. An editor is available for the various formats, which can be switched from design mode to HTML mode.
With a click on Save and Close the subscription is visible in the configuration menu under Subscriptions.


 Copyright (c) 2000-2026 Isonet AG