Installations
Chapters:
- Windows Services
- Databases
- Expanding the Knowledge Base Search to PDF Attachments
- Installation of the Web Sites
- Creating Sub-Applications
- Creating Virtual Directories
- Configuring Single Sign On (SSO)
- Activating HTTPS for the 446 Plattform® Web Site
The folder C:\Program Files\Isonet\ contains the file serviceinstall.bat. This file is opened with a text editor to adjust the paths. The file can then be executed with a right click on Run as administrator.
Note:
It is better to run the file from the command line as administrator (e.g.: Start > Run > cmd), otherwise any error messages that may occur will not be displayed.
After the installation of the services has been completed, you can check in the computer administration whether this has been carried out successfully. This can be opened, for example, by right-clicking on the start button. The Services and Applications node is selected on the left in the hierarchy tree and the Services submenu is clicked. The list of all services installed on the system (including all Isonet services starting with Isonet) appears on the right. The following image should now be visible:

The number of the Isonet services here can vary depending on system and licensing. The following services are installed:
- Isonet Agent
- Isonet Logging Manager
- Isonet Mail2Ticket Manager
- Isonet Messaging Manager
- Isonet Security Manager
- Isonet Service Level Manager
- Isonet Workflow Manager
These services should be configured to start automatically when the system is booted (default). This can be checked in the computer management. To do this, right-click on one of the Isonet services (e.g. the Logging Manager) and select Properties from the context menu.
The Startup type should be set to Automatic for the Logging Manager, Security Manager and Workflow Manager and to Automatic (Delayed Start) for the others. If this is not the case, the type should be changed and confirmed with OK.

The installation of the databases is performed using Microsoft SQL Server 2016 (English) and described on one of the 446 Plattform® databases. All other required databases can be installed analogously.
The following databases are available for the 446 Plattform®:
- Xpert-Master
- SecurityManager (Full-text)
- Xpert (Full-text)
- WorkflowManager
- KnowledgeBase (Full-text)
- LVER (Expenses)
- CMDB (Configuration Management Database, Full-text)
- TM (Full-text)
- Archive
For the databases with the addition Full-text, the activation and setup of a full-text catalog is necessary.
Database names
In general, it is possible to designate the databases arbitrarily. Almost all special characters can be used in MS SQL Server. However, it is not recommended to use these special characters, since this can lead to misbehaviour in certain applications or in different environments.
A naming convention is recommended, which contains the company name, the 446 Plattform® installation and the actual database name. For example
isonet_<database name>
This makes it possible to distinguish between the databases even if new clients are added with new databases or if completely separate customer systems have to share a database server.
Installation of the master database based on a backup
If the backup is available in the form of a *.BAK file, proceed as follows to install the database in the SQL server.
Importing a backup
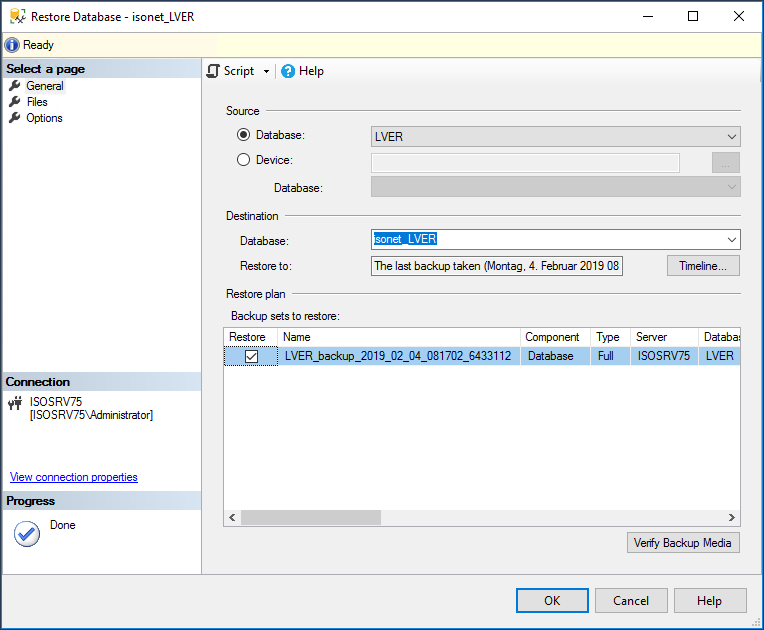
The backups of the databases must be imported. To do this, right-click on the database to be imported (e.g. isonet_LVER) and choose Tasks > Restore > Database.
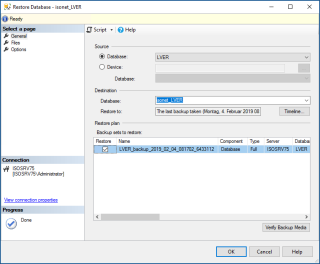
Here you can select an existing database or enter a name for a new database.
If an existing database is overwritten, it can happen that the full-text catalogs get identical file names. These must then be adjusted manually before the import. If a new database is created, Restore DB adjusts this automatically.
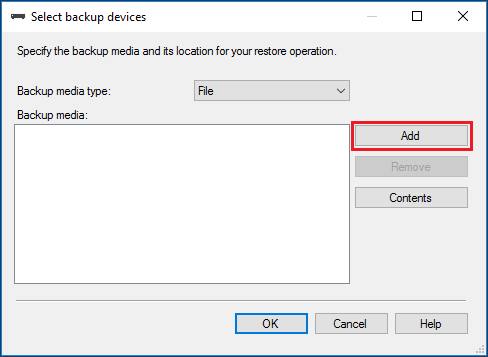
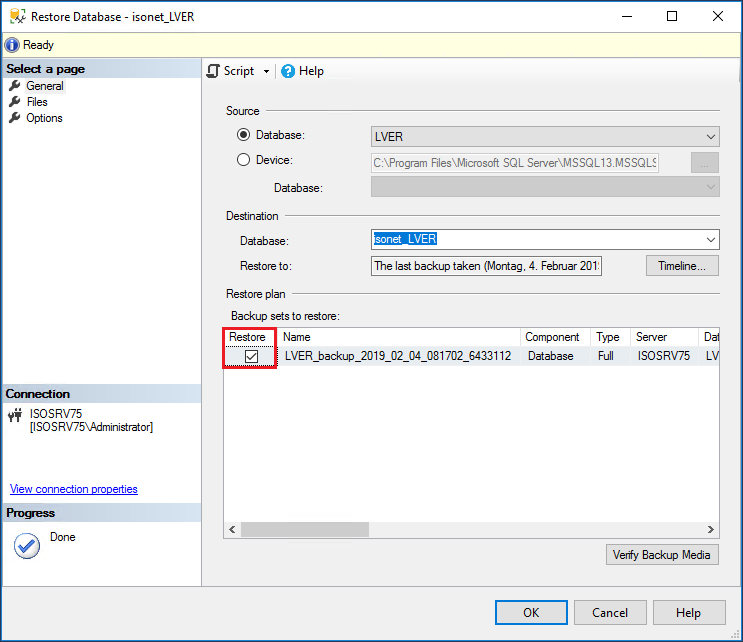
In the dialog that opens, select Device and then click on the button with the three dots on the right.
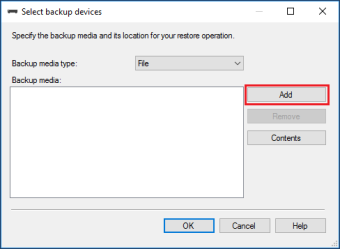
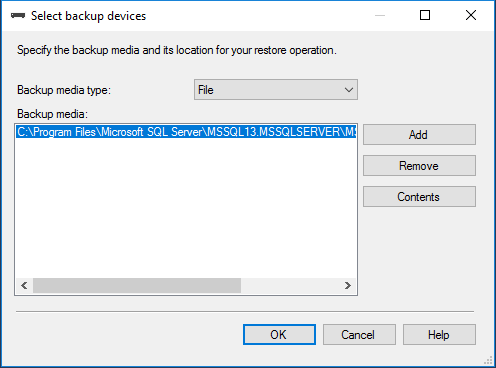
Then click the Add button. In the following dialog select the file you want to import. Make sure that you select the appropriate file for the selected database. Then confirm with OK.
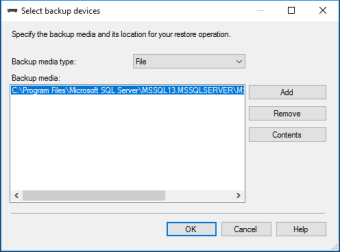
The dialog is also closed with OK.
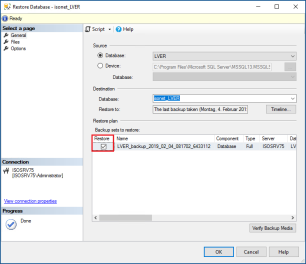
Make sure that a check mark is set in the red field, otherwise you will receive an error message. Now change to Files on the left.
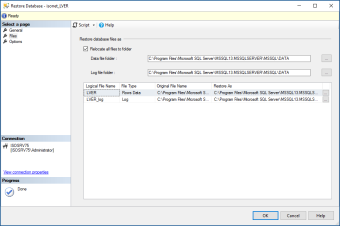
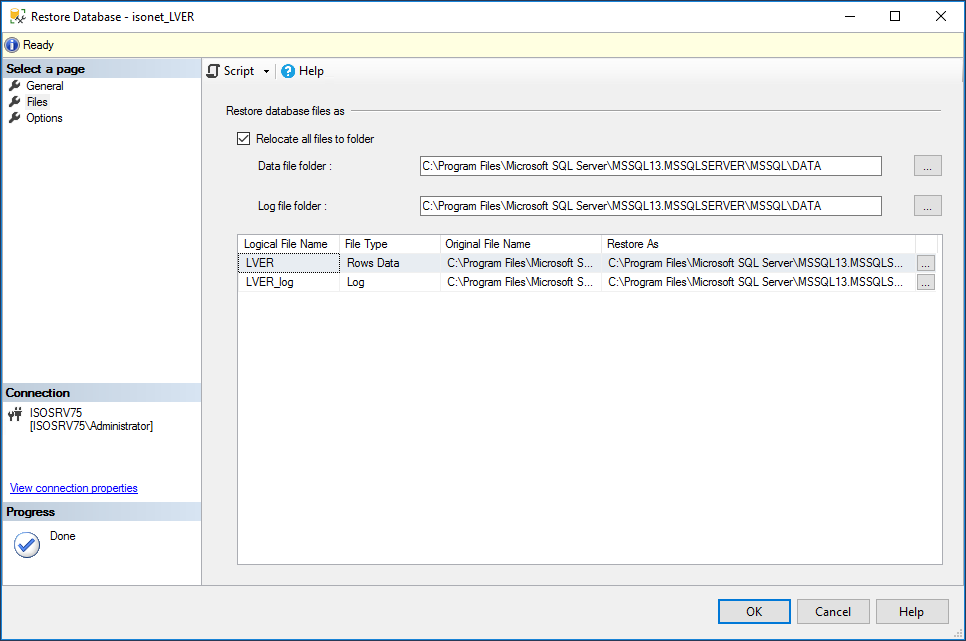
Because you get the backups from Isonet, the paths you find in the box in the middle of the dialog may not be correct. To change the paths, click on the button with the three points and select the required file in the following dialog and confirm with OK.
Each database has at least two data files, one MDF file and one LDF file. For the data file (this can be found in the Original File Name column) select the MDF file in your SQL data directory and for the log file select the LDF file in the directory.
Warning:
The configuration must be done very carefully. If you have problems with the configuration, please contact the Isonet service.
Then switch to Options.
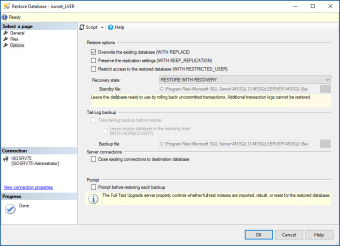
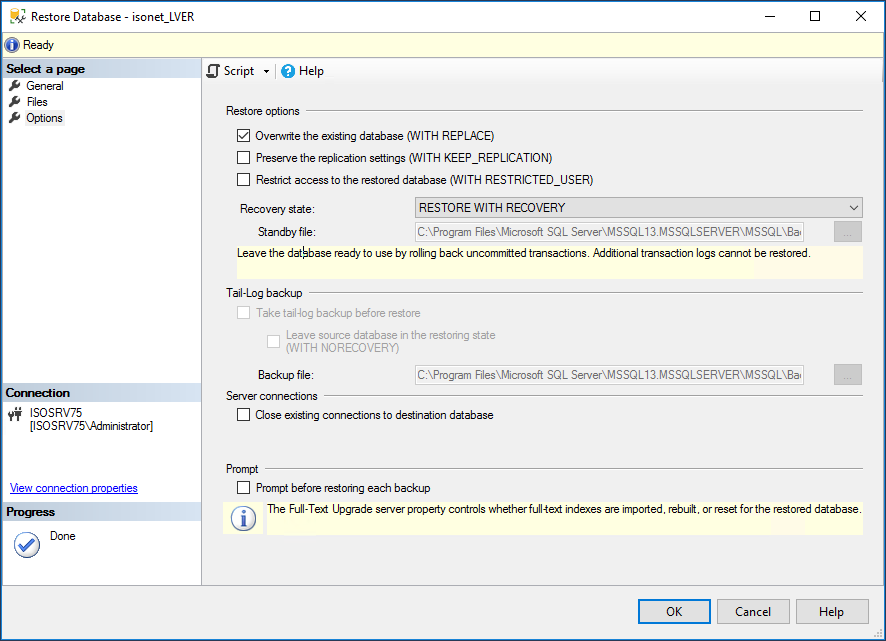
Activate the checkmark for Overwrite the existing database, as this has already been created.
Once all settings have been completed, the dialog can be closed with OK. The database is now imported. At the bottom left of the dialog you can see the progress of the import process. As soon as this has been completed, a message about the result of the import appears. If the process was successful, this message can be confirmed with OK.
The database is now imported. Proceed in the same way with the other databases.
Tip:
Always make sure that the correct BAK file has been selected for the selected database and that the correct paths are entered in the Restore Database dialog under Files.
Creating a Database User
Open Microsoft SQL Server Management Studio and, in Object Explorer, expand the Security node and then the Logins node.
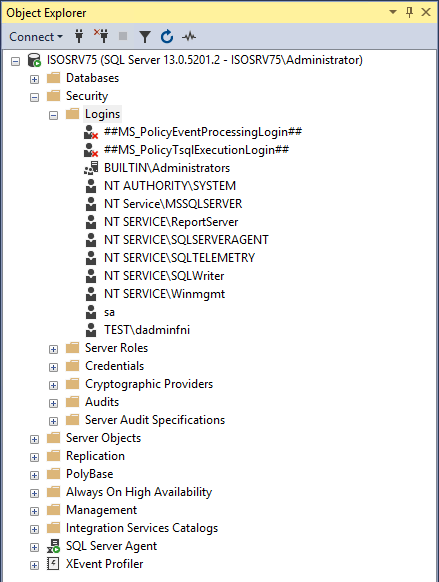
Right-click Logins and select New > New Login from the context menu.
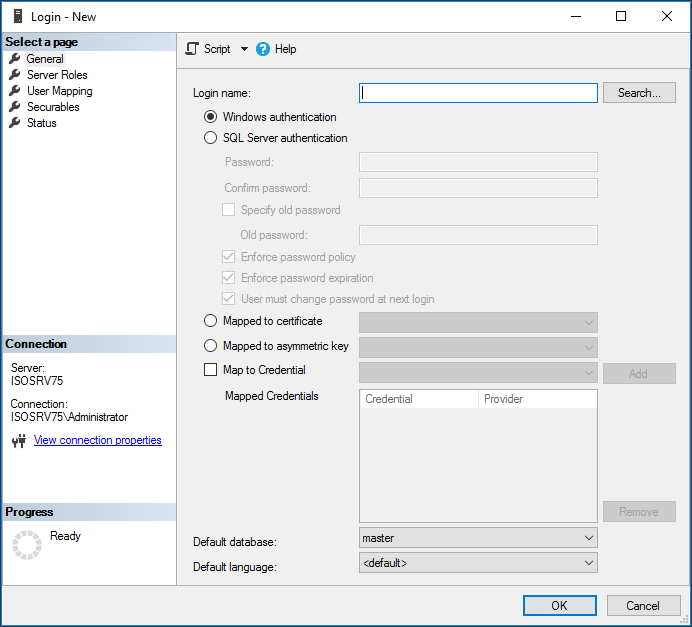
Enter a name for the user in the Login name field and select the SQL Server authentication option. Deactivate at least the two options Enforce password expiration and User must change password at next login.
Now switch to User Mapping on the left.
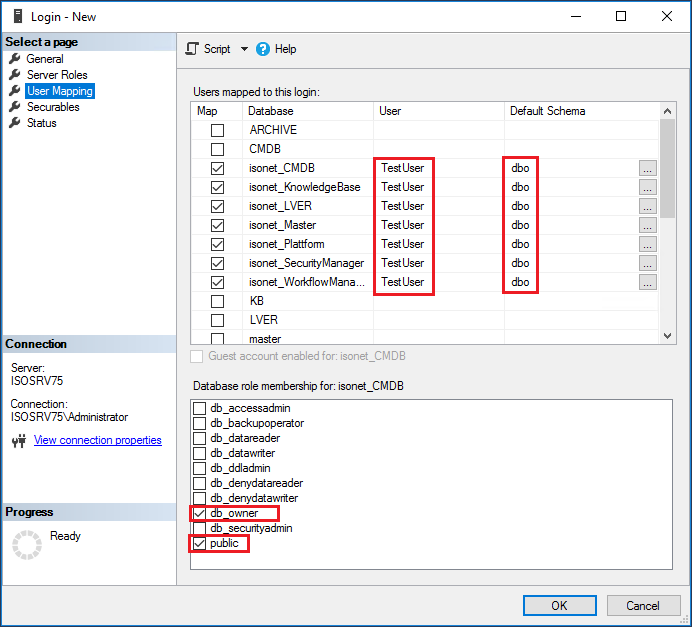
Now select the created databases one after the other and activate the check box in the Map column. The user name you entered in the first step is automatically entered in the User column. Then click in the Default Schema column and enter dbo in the text field that appears. For each database, you must also activate the option db_owner in the lower field (Database role membership).
Before confirming the dialog with OK, check again whether all options have been set correctly for the databases (it happens that a check mark is not accepted correctly).
After closing the dialog with OK, the user is created and linked to the selected databases.
Testing the configuration
Now you can login to SQL Management Studio with this new user and check the configuration. This new user should be able to select all isonet databases (but not another). Below the databases all tables must be visible and openable. If this is not possible or only partially possible, check the configuration of the user again. To do this, login to the Management Studio again using Windows authentication or as user sa (predefined user - system administrator). Select the Security > Logins node, right-click on the user to be corrected, and choose Properties from the context menu. The configuration can now be checked and adjusted if necessary.
If you want to index PDF documents, you must install the Adobe PDF IFilter extension (http://www.adobe.com/support/
This requires the execution of the following SQL statements on the Knowledge Base database:
sp_fulltext_service ’load_os_resources’, 1
sp_fulltext_service ’verify_signature’, 0
Restart the SQL Server service and the full-text service. A rebuild of the full-text catalog of the Knowledge Base database is then initialized by right-clicking the Storage element in the database and selecting Rebuild.
The folder C:\Program Files\Isonet contains the following folder structure (depending on the licensed modules):
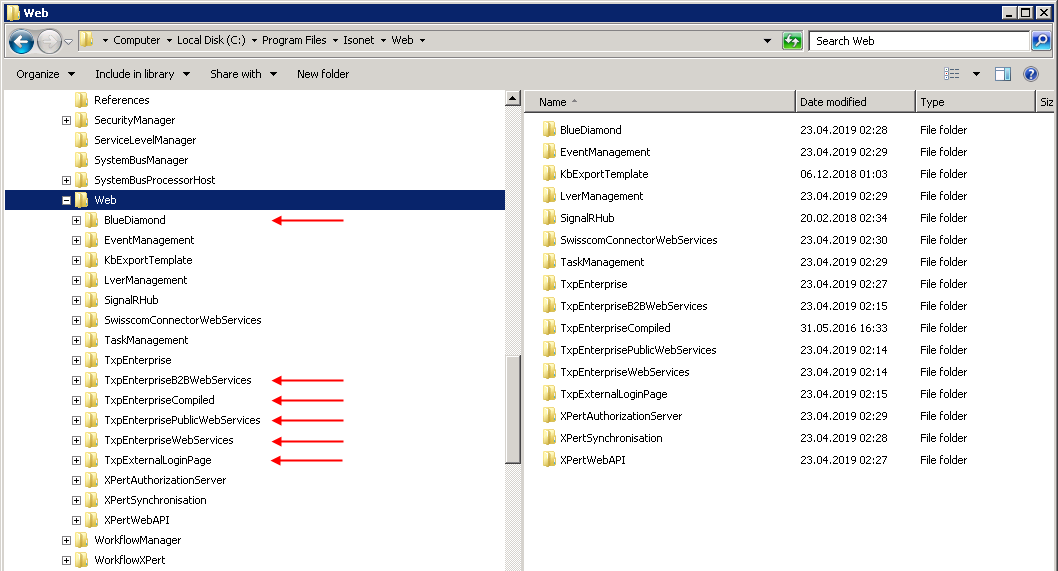
The directories marked with red arrows contain files that must be registered in the IIS (Internet Information Services). The Web directory should be visible in any case.
The following websites are to be registered:
-
Web\TxpEnterpriseCompiled
-
Web\TxpEnterpriseWebServices
-
Web\TxpEnterpriseB2BWebServices
-
Web\TxpEnterprisePublicWebServices
-
Web\TxpExternalLoginPage (optional)
-
Web\BlueDiamond (optional)
The optional web pages only need to be installed when necessary.
Installation example: Website Xpert (from Server 2008)
- Application Pool
The Application pool does not have to be created by the user, since it is generated when the website is created. It is important to specify the executor of the application pool. This is always relevant if no SQL user but the integrated authentication with the Windows user against the SQL server is used.
- Register the website for Xpert
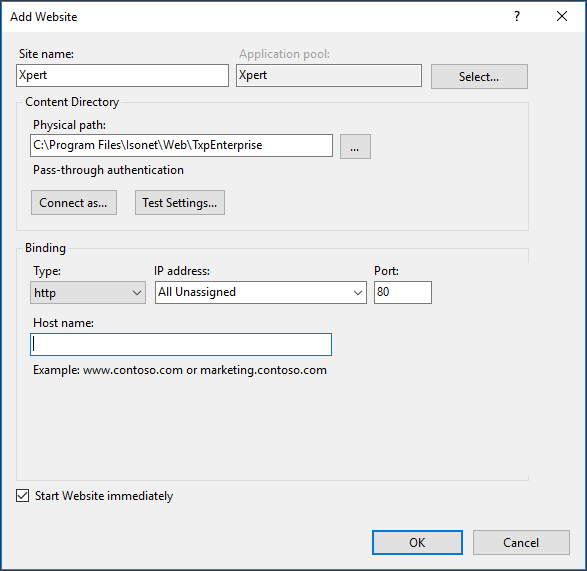
Select the Sites node and right-click on Add Website... in the context menu.
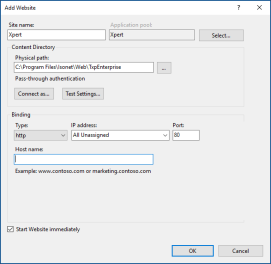
Site name: Type a friendly name for your site. The friendly name appears in the tree of IIS Manager and can be changed later if you want to rename the site.
Application pool: Displays the selected application pool for the site. When you type a website name, a new application pool is created with the same name as the site (up to 64 characters maximum). You can edit the settings for this application pool later or select a different application pool for your site.
Select: Opens the Select Application Pool dialog box from which you can select the application pool in which the site will run.
Physical path: Type the physical path where the site content is stored (e.g. C:\Program Files\Isonet\Web\TxpEnterpriseCompiled).
Connect as: Opens the Connect As dialog box from which you can select how to connect to the path that you typed in the Physical path box. By default, Application user (pass-through authentication) is selected.
Test Settings: Opens the Test Settings dialog box from which you can view a list of test results to assess whether the path settings are valid.
Type: Select HTTP if you want the website to have an HTTP binding, or select HTTPS if you want the website to have a Secure Sockets Layer (SSL) binding.
IP address: Select an IP address from the IP address list or type an IP address that users can use to access this site. If you select All Unassigned, this site will respond to requests for all IP addresses on the port and optional host name that you specify for this site, unless another site on the server has a binding on the same port but with a specific IP address.
Port: Enter the port on which you want to wait for requests to this Web site. If you select HTTP from the Type drop-down list, the default port is 80; if you select HTTPS from the drop-down list, the default port is 443. If you specify a port different from the default ports, clients must specify the port number in requests to the server or they will not connect to the website.
Host name: Type a host name if you want to assign one or more host names, also known as domain names, to one computer that uses a single IP address. If you specify a host name, clients must use the host name instead of the IP address to access the website. If this website is available on the Internet, type the domain name of the website as users type it in a browser, for example, www.contoso.com. If your website has more than one domain name, such as www.contoso.com and contoso.com, create a separate binding for each host name.
Start Web site immediately:Select this option to start the website immediately after it is created. When the website is started, it listens for requests. You might want to delay starting the website if you must make other configuration changes, such as changes to authentication or authorization, after the site is created.
After entering all the information you need to save, click OK.
The website is now registered in IIS. The procedure for the other web pages is the same (Important: always pay attention to the naming).
Then right-click on the node of the page that has just been created and select Add Application... from the context menu.
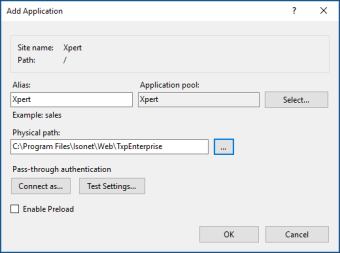
All the necessary information is entered here (including the name of the directory used to register the website - see point 5). In this example Xpert. Confirm the entries with OK.
The same applies to the other applications. Please note that each web service is its own page (URL).
Each created page of a web service should then be entered into the HOSTS file on the server.
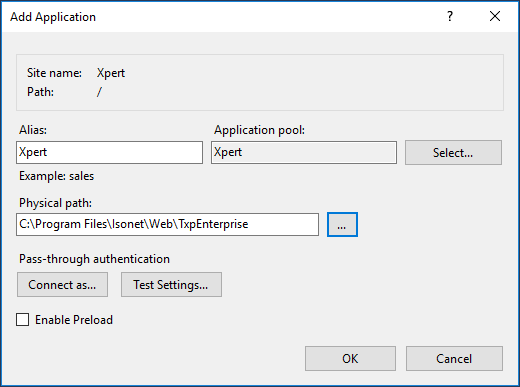
The following applications must be created below the Xpert website:
- Xpert\WebAPI (as an application)
- Xpert\WebAPI\XPertAuthorizationServer (as an application)
Right-click Xpert under the Sites node and select the Add Application... option.
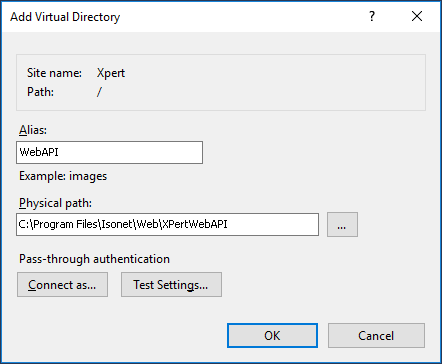
Site name: Displays the name of the site that contains the virtual directory.
Path: Displays the application that contains the virtual directory. If you create a virtual directory at the site level, this box will display /. If you create a virtual directory at the application level, this box displaya the name of the application, such as /myApp.
Alias: Displays the application that contains the virtual directory. If you create a virtual directory at the site level, this box will display /. If you create a virtual directory at the application level, this box displaya the name of the application, such as /myApp.
Input: WebAPI
Physical path: Type or navigate to the physical path where the virtual directory content is stored. The content can reside on the local computer or come from a remote share. If your content is stored on the local computer, enter the physical path, such as C:\Content. If your content is stored in a remote share, enter the UNC path, such as \\Server\Share. The path that you specify must exist, or you might receive a configuration error. Optionally, click Connect as to provide credentials for an account that is authorized to access content in the physical path.
Input: ...\Isonet\Web\XPertWebAPI
Connect as: Opens the Connect As dialog box from which you can select how to connect to the path that you typed in the Physical path box. By default, Application user (pass-through authentication) is selected.
Test Settings: Opens the Test Settings dialog box from which you can view a list of test results to assess whether the path settings are valid.
An identical MachineKey configuration must exist for the WebAPI and the XPertAuthorizationServer. It is best to set the key for one of the web pages and then copy the corresponding line from web.config to the other web.config.
The following virtual directories must be created below the Xpert website:
-
Event Management (EM)
-
Expense Management (Lver)
Right-click Xpert under the Sites node and select the Add Virtual Directory... option.
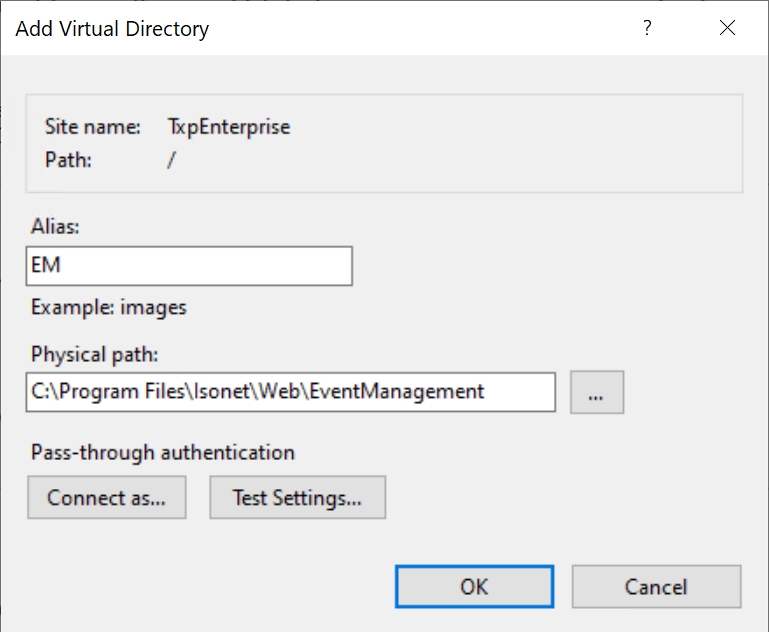
Site name: Displays the name of the site that contains the virtual directory.
Path: Displays the application that contains the virtual directory. If you create a virtual directory at the site level, this box will display /. If you create a virtual directory at the application level, this box displaya the name of the application, such as /myApp.
Alias: Displays the application that contains the virtual directory. If you create a virtual directory at the site level, this box will display /. If you create a virtual directory at the application level, this box displaya the name of the application, such as /myApp.
Input: EM
Physical path: Type or navigate to the physical path where the virtual directory content is stored. The content can reside on the local computer or come from a remote share. If your content is stored on the local computer, enter the physical path, such as C:\Content. If your content is stored in a remote share, enter the UNC path, such as \\Server\Share. The path that you specify must exist, or you might receive a configuration error. Optionally, click Connect as to provide credentials for an account that is authorized to access content in the physical path.
Input: ...\Isonet\Web\EventManagement
Connect as: Opens the Connect As dialog box from which you can select how to connect to the path that you typed in the Physical path box. By default, Application user (pass-through authentication) is selected.
Test Settings: Opens the Test Settings dialog box from which you can view a list of test results to assess whether the path settings are valid.
Repeat the configuration step for the Expense Management. The entries here are as follows:
-
Alias: Lver
-
Physical path: ...\Isonet\Web\LverManagement
Before Single Sign-on can be used (from IIS 7), some preparatory steps have to be carried out. For example, the authentication sections must first be activated so that they can be used in web.config:
- %windir%\system32\inetsrv\appcmd unlock config /section:anonymousAuthentication
- %windir%\system32\inetsrv\appcmd unlock config /section:windowsAuthentication
These commands enable anonymous authentication and Windows authentication in the web.config file.
For SSO, the corresponding configuration file from the ConfigFile reference must also be used as a basis.
The web.config file from the _ConfigFileReference folder can be used for further configuration.
In the Internet Information Service Administrative Console, navigate to the Xpert.NET site and right-click it to select "Edit Bindings...".
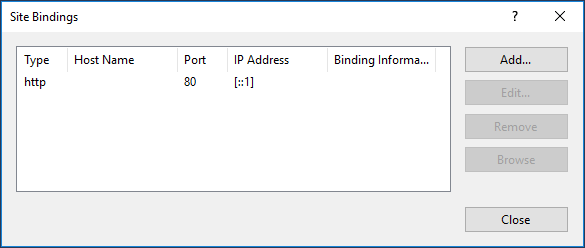
A page binding can be added via Add on the right side of the dialog.
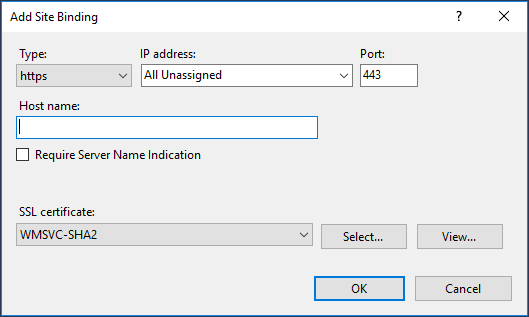
Type: Select HTTP if you want the website to have an HTTP binding, or select HTTPS if you want the website to have a Secure Sockets Layer (SSL) binding.
Input: HTTPS
IP address: Select an IP address from the IP address list or type an IP address that users can use to access this site. If you select All Unassigned, this site will respond to requests for all IP addresses on the port and optional host name that you specify for this site, unless another site on the server has a binding on the same port but with a specific IP address.
Port: Type the port on which HTTP.sys must listen for requests made to this website. If you select HTTP from the Type drop-down list, the default port is 80; if you select HTTPS from the drop-down list, the default port is 443. If you specify a port different from the default ports, clients must specify the port number in requests to the server or they will not connect to the website.
Host name: Type a host name if you want to assign one or more host names, also known as domain names, to one computer that uses a single IP address. If you specify a host name, clients must use the host name instead of the IP address to access the website. If this website is available on the Internet, type the domain name of the website as users type it in a browser, for example, www.contoso.com. If your website has more than one domain name, such as www.contoso.com and contoso.com, create a separate binding for each host name.
Require Server Name Indication: Determines whether the website requires Server Name Indication (SNI). SNI extends the SSL and TLS protocols to indicate what hostname the client is attempting to connect to. It allows multiple secure websites with different certificates to use the same IP address. This check box is displayed when the binding type is HTTPS.
SSL certificate: Select the certificate that you want the website to use for SSL. The SSL certificate list appears only when you select HTTPS from the Type list.
Input: Available certificate
View: Opens the Certificate dialog box from which you can view information about the selected certificate in the SSL certificate list. The View button appears only when you select HTTPS from the Type list and select a certificate from the SSL certificate list.
Press OK to save the entries.
[Source: docs.microsoft.com]


 Copyright (c) 2000-2026 Isonet AG
Master Database and Security Manager Database
The master database contains the basic settings for the system as well as the references to the other databases. This database is not client-dependent, that is, it only exists once on multiclient systems.
The same applies to the Security Manager database. All users are stored in one database - even in multiclient systems. This makes it possible to create and configure users that can be active in multiple clients. This is not possible with separate databases because the security settings for one user may not be found.