System integration
| Icon | Description |
|---|---|
|
Address to coordinates 
Old icon: |
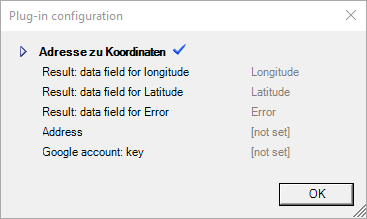
Transforms an address to coordinates (for geographical location) and stores them in the specified data fields. These can be used, for example, for the plug-in Set geo location. Configuration
Google Account: key: Needed to use the Google API and can be requested separately from Google (possibly associated with costs from June 2018). |
|
Apply XPath 
Old icon: |
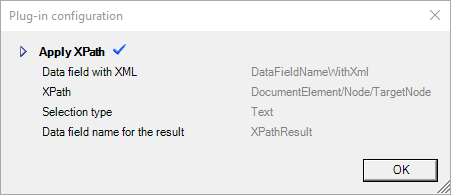
Applies an XPath query on an XML document and saves the result (InnerText). Configuration
The following parameters can be set:
|
|
Create Lead Dynamics 365 
Old icon: |
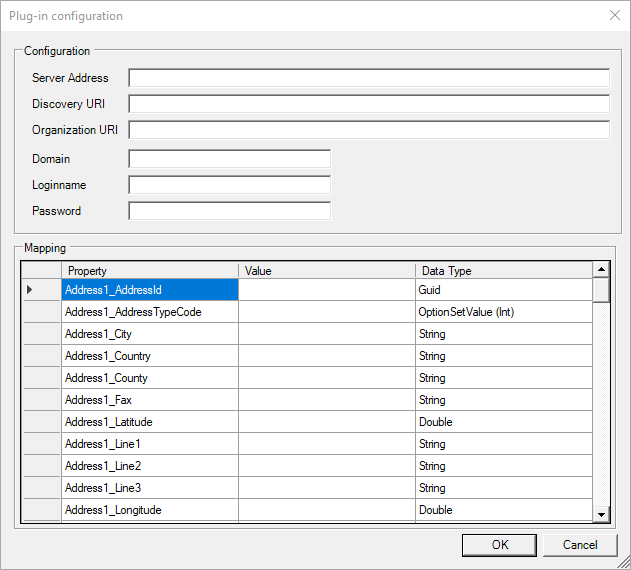
The data for a potential new customer are created using a customer relationship management system. It is based on the Microsoft Dynamics Customer Relationship Management (CRM) from version 2011 onwards. This plug-in can be enabled and disabled (red cross). Configuration
The special input parameters are available from the administrator. Server Address: Address to the CRM server. Discovery URI: Enter the Discovery URI (Uniform Resource Identifier). Organization URI: Enter the Organization URI. Domain: Enter the Domain. Loginname: Enter the login name. Password: Enter the password. Mapping: Available fields from the CRM system for specifying the customer are displayed. |
|
Execute advanced WebService 
Old icon: |
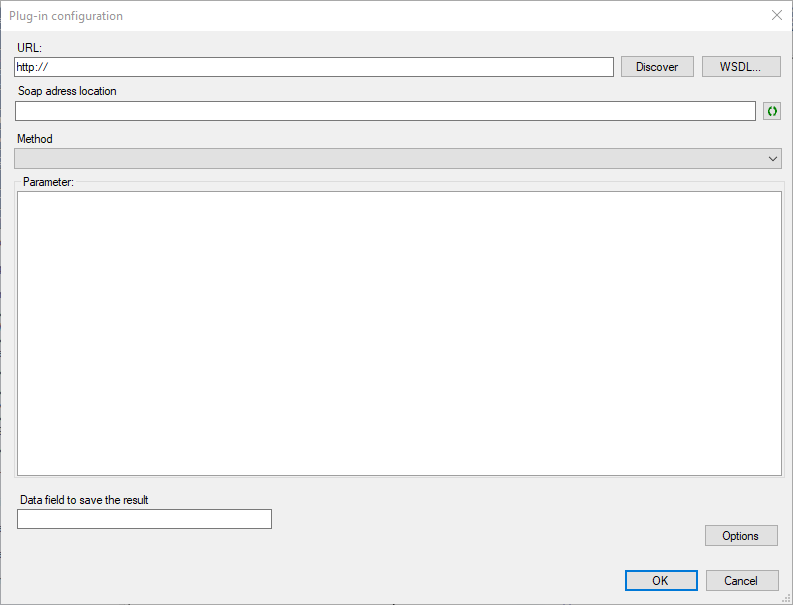
This plug-in is used for accessing a SOAP compliant web service and then saving the result. The plug-in has an additional error output. The workflow item leaves the plug-in through this output whenever a timeout, a SOAP exception, or a similar error occurs. The plug-in offers array support. Data with the type Number, String or Boolean can be saved in arrays. Configuration
URL: The URL to the web service can be entered here (address of the end point with protocol). The Discover button only works for .NET SOAP WebServices (*.asmx). The web service definition file (WSDL) is loaded automatically by the web service using WS-Discovery. If this service is not available, the button can be ignored (the URL box remains empty) and the button WSDL ... used instead. It opens a text box into which the contents of the web service definition file can be copied. The plug-in only supports WSDL version 1.0. Soap address location: The technical address of the web service must be entered. It contains the URL (with protocol) that is to be used to call the web service at runtime. Methods: If the WSDL has been successfully read, the public web methods appear in the Methods drop-down list. The desired web method can be selected and the parameter list appears in the text box below. Parameters: Contains the available parameters for this method. After a click on the respective parameter, the corresponding value can be entered under Parameter value. Parameter value: Here, either a value can be entered or the corresponding parameter set to NULL (via the checkbox NULL). Expressions can be used for the parameter values. This process has to be repeated for every parameter needed. Data field to save the result: The name of the data field the result of the request is to be saved in is to be specified here. The data field can be used in the further process of the workflow, e.g. for writing the value into a ticket field. Options: Access data and proxy configurations can be stored here. Warning: For this plug-in, a proxy DLL is generated for the requested web service and stored in the database. The DLL is necessary in order to execute the web service via this plug-in later on. It may happen that this DLL cannot be found in the database any more. In order to solve this problem, the web service has to be reloaded in the plug-in. Thus, the DLL will be generated again using the available methods. After saving the workflow, it can be used again. |
|
Execute Python Script 
Old icon: |
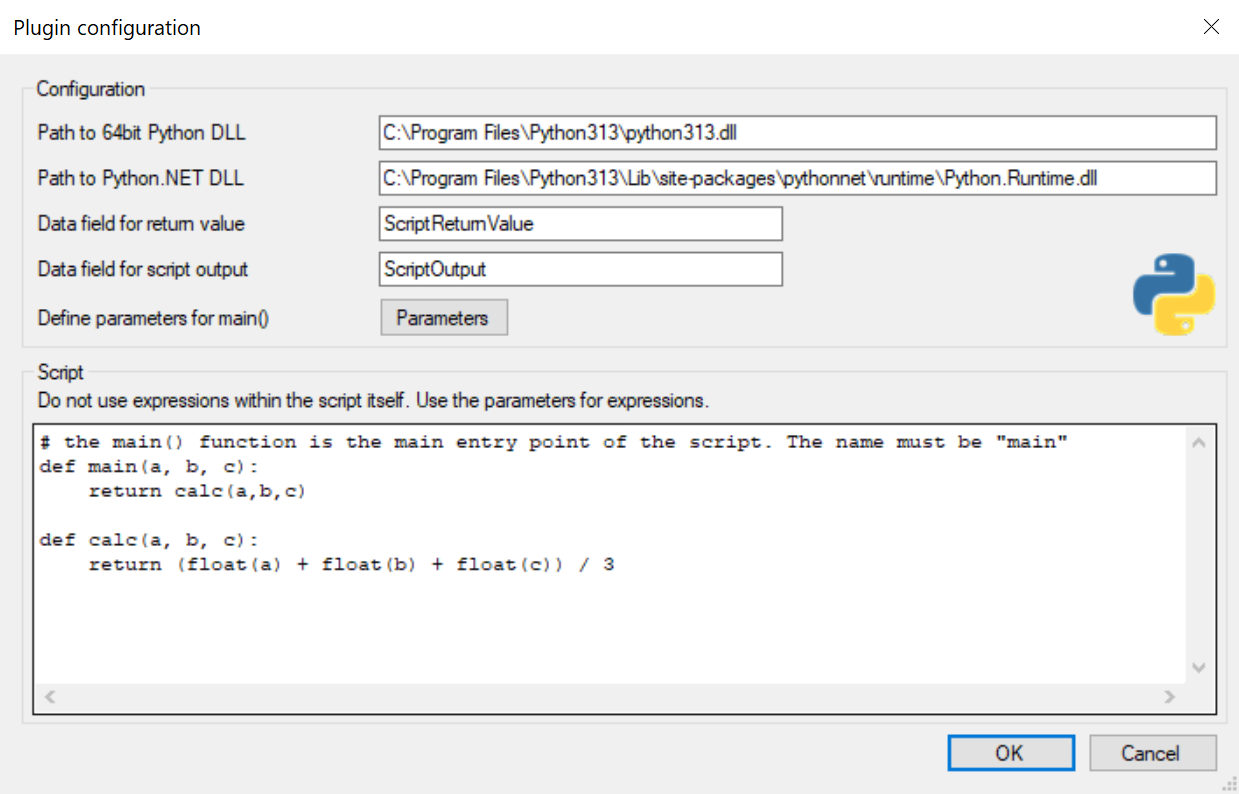
This plugin allows scripts written in Python to be executed. It works in the same way as the Script plugin (see Execute script). The plugin is available when the EnablePythonWorkflowPlugIn license key is activated. Configuration
Path to 64bit Python DLL: The path to the server-local 64bit Python DLL has to be specified. The plugin was built against Python 3.13, so the default location to this DLL is predefined here. The plugin basically supports all Python versions, but the Python.NET library has to match the Python version. If a future version of the Python.NET wrapper is incompatible with the plugin, then the plugin has to be rebuilt against the new version. Recommended is to store the path in the MasterData and use expressions here. Path to Python.NET DLL: The path to the Python.NET DLL. The default path for Python 3.13 is preset. It can be found here as soon as Python.NET has been installed. Recommended is to store the path in the MasterData and use expressions here. Important: you can not use multiple Python.NET DLL versionssimultanously. You can use only one and the same Python.NET assembly, inall your plugins. If you try to load a different version, after thefirst DLL is already loaded, it will fail and not be used, until arestart of the WorkflowManager service. Data field for return value: Data field name for the script return value. The return value of the main() function of the script will be written into this data field, as string. Data field for script output: Data field name for the script output. Output means, all "print()" commands, and any error output. So, in case of an error, check this datafield. Define parameters for main(): The Parameter button opens a dialog box where you can define the necessary parameters for executing the script. Enter a parameter value on each line. All parameters must be of the String (text) data type. Additionally, the number of parameters defined in the main() method must match the number of parameter values; otherwise, an error will occur, and the script will not execute successfully. Expressions are supported.
Requirements for using the plugin
The plugin requires that the Python runtime is installed on the application server (every server where the WorkflowManager service is installed). Download Python from https://www.python.org/downloads/windows/ or use the pre-downloaded .exe (for 64bit windows) located under \Isonet\_Tools\AdditionalTools\Python\ Example filename: python-3.13.7-amd64.exe
Install the Python executable. In addition to that, Python.NET (the .NET wrapper for Python) must be installed. The easiest way is with pip (after Python is installed). Open a windows command prompt, and enter (better use a command window with administrative privileges): > pip install pythonnet
If "pip" is not recognized, it means that the Python directories are not in the environment path. In that case, navigate to the Python install directory, and there to the subdirectory Scripts. For example: C:\Program Files\Python313\Scripts\. There you find "pip.exe". From there, run the following command in the windows command prompt (better use a command window with administrative privileges): > pip install pythonnet
If there's no internet access, you can also install Python.NET offline: - download the package with another computer, from https://pypi.org/project/pythonnet/#files, or use the local package found under \Isonet\_Tools\AdditionalTools\Python\ - example filename: pythonnet-3.0.5.tar.gz - if you downloaded the file, store the file on the application server, and install it with the comment > pip install "C:\Program Files\Isonet\_Tools\AdditionalTools\Python\pythonnet-3.0.5.tar.gz"
After installation, confirm the setup by opening Python and running: > import clr
|
|
Execute REST webservice 
Old icon: |
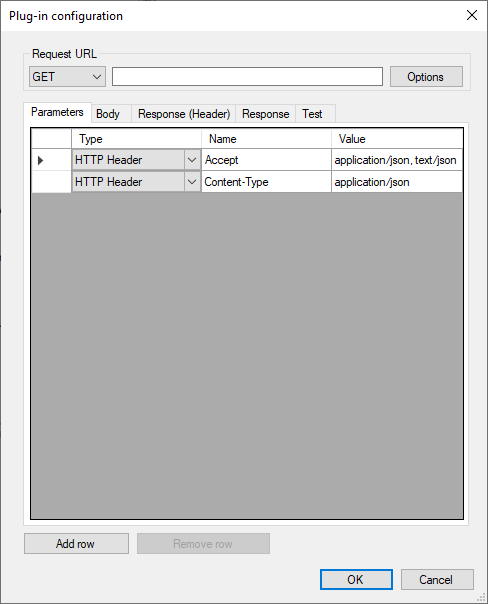
REST calls can be issued and related responses processed. JSON expressions can be used. The plug-in has three outputs:
Configuration
In the Request URL section, three settings can be made:
The parameters of the request can be defined in the Parameters tab:
Example: Parameter name: id Parameter value: SP-123 Required URL: http://host/object/{id} Generated URL: http://host/object/
Example: Parameter name: id Parameter value: SP-123 Required URL: http://host/object Generated URL: http://host/object?id=
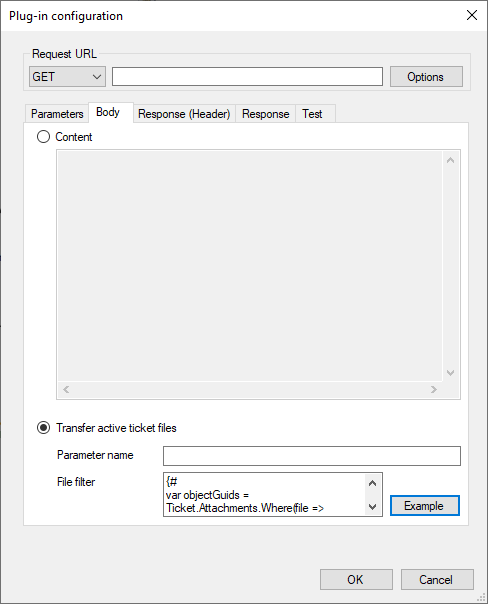
In the Body tab you can define the data to be transferred to the request body.
In the Content text box, e.g. a JSON object can be defined for passing to the web service method. The use of expressions is permitted here. If you want to transfer file extensions, the plug-in provides for the transfer of all active ticket attachments. To do this, the checkbox Transfer active ticket files must be activated. You then need to enter a parameter name that is expected by the REST WebService method. Note: It is possible to specify an expression to filter the file attachments to send. The expression must return a comma separated list of ObjectGUIDs. The Example button can be used to fill the text field with an expression that filters for the files that have been added within the last minute. Copy
Example
The Response section defines which return data is to be stored in data fields of the workflow item. Only JSON is supported as a data structure. In the grid, any data fields can now be defined and JSON expressions can be defined to determine the specific data. |

Old icon: |
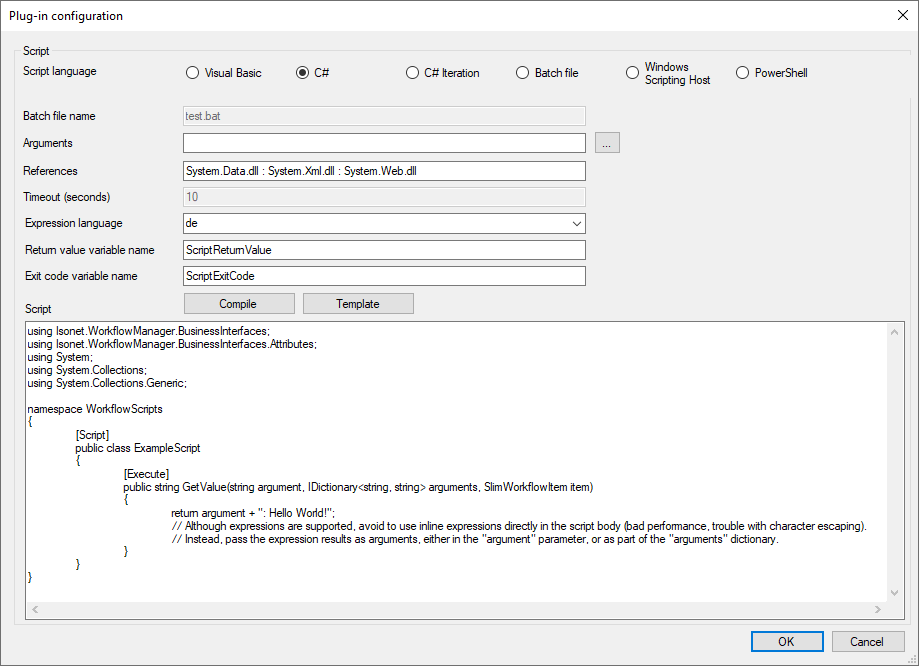
Via the plug-in Execute script, scripts can be defined, which can then be executed at workflow runtime. For this purpose, various scripting and programming languages can be used. Example: This plug-in can be used whenever certain system tasks are to be executed as soon as the ticket reaches this position in the workflow. Configuration
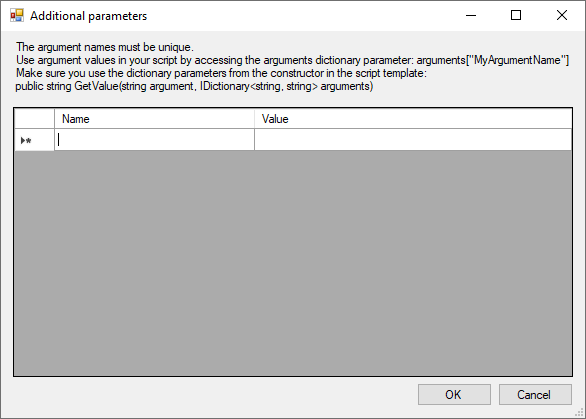
Script language: Contains the script or programming language to be used. Batch file name: If Batch file is to be used as a language, a file name to be used for intermediate storage has to be entered here. No path is allowed here. Arguments: If arguments are to be attached to the command line, they have to be specified here. Multiple parameters will be submitted to the script as one parameter. For performance reasons, the arguments for Sharp-Expressions should be added using the ellipsis button ("...", to the right of the input field).
References: Contains references to other assemblies for the languages Visual Basic and C#. Multiple languages have to be separated by a colon. Timeout (seconds): Specifies the time in seconds, after which the processing is to be aborted, if no result has been delivered or the exit code has not been returned until then. Expression language: Defines the language to be used for replacing expressions. Return value variable name: A variable name for saving the return value after executing the script. Exit code variable name: Contains a variable name for the exit code after executing the script. An exit code is always set after executing the program and specifies whether the execution has been successful or not:
Script: The script to be executed is specified in the respective language here. If the Script language option is changed, an example will be written into the script array. The Template button writes an example script into the script array. The Compile button is used for testing the script. For this purpose, it will be compiled (translated into executable code). The occurring errors will be returned or a note on the successful compiling process will be displayed, if no errors have occurred. It can then be assumed that the script is executable at runtime. |
|
Execute SQL statement (NonQuery) 
Old icon: |
This plug-in is used for writing data into a database or for changing existing data. It does not deliver any return value. This plug-in can be used whenever data has to be written into a database.
Configuration Data source: You have the choice between the "Odbc", "OleDb", "OracleClient" and "SqlClient Data Provider". The configuration is performed analogously to the Data source configuration. Connection string: Contains the connection string to a database system. Information on connection strings can be found under: http://www.connection Warning:
Query: Contains the actual SQL statement. Expressions can be used additionally here. Please note that the expressions are not listed directly in the query, but are declared as parameters beforehand. Example: Incorrect: UPDATE [DB01].[dbo].[Customers] SET Typ='{$Ticket. Nummer='{$Ticket. Gruppe='{$Ticket. Name='{$Ticket. Strasse='{$Ticket. PLZ='{$Ticket. Ort='{$Ticket. WHERE ID={$Ticket. Richtig: DECLARE @typ nvarchar(MAX) = {$Ticket.Fields! DECLARE @nummer nvarchar(MAX) = {$Ticket.Fields! DECLARE @gruppe nvarchar(MAX) = {$Ticket.Fields! DECLARE @name nvarchar(MAX) = {$Ticket.Fields! DECLARE @strasse nvarchar(MAX) = {$Ticket.Fields! DECLARE @plz nvarchar(MAX) = {$Ticket.Fields! DECLARE @ort nvarchar(MAX) = {$Ticket.Fields! INSERT INTO [DB01].[dbo].[Customers] (Typ, Nummer, Gruppe, Name, Strasse, PLZ, Ort) VALUES (@typ, CAST(@nummer AS INT), CAST(@gruppe AS INT), @name,@strasse,@plz, Parameter placeholder character: Expressions contained in SQL are passed as SQL parameters. Depending on the selected data source, however, the appropriate transfer format must be selected. OleDb, for example, requires a question mark (QuestionMark), while the native SqlClient identifies the parameters by Names (e.g. "@Parm1"). The wildcard character is set to QuestionMark by default. |
|
Execute SQL statement (Select) 
Old icon: |
This plug-in is used in order to query data from a database. It is important to note that a string data type or at least a data type that can be converted into a string has to be returned. This means that no entire tables but only individual values can be querried here. Whenever additional data (including data from external data sources) is necessary, this plug-in can be used. After the execution of the query, the return value can be used in the workflow.
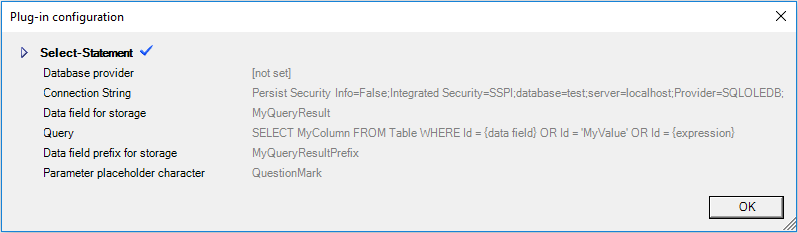
Configuration Data source: You have the choice between the "Odbc", "OleDb", "OracleClient" and "SqlClient Data Provider". The configuration is performed analogously to the Data source configuration Connection string: Contains the connection string to a database system. Information on connection strings can be found under: http://www.connection Warning:
Data field for storage: Contains the name of the variable for storing the return value in a data field. Leave this field empty to retrieve more than one result set. An example of this is listed below. Query: The SQL statement is specified here. Expressions can be used as well. Data field prefix for storage: Specifies a prefix for the data field name, if more than one field is to be returned and used in the workflow (see example above). An example of this can be found below. Note: Multiple fields can only be queried if the 'Data field for storage' has no value (is not being set) at the same time! Parameter placeholder character: Expressions contained in SQL are passed as SQL parameters. Depending on the selected data source, however, the appropriate transfer format must be selected. OleDb, for example, requires a question mark (QuestionMark), while the native SqlClient identifies the parameters by Names (e.g. "@Parm1"). The wildcard character is set to QuestionMark by default.
Example: If only one field is queried from the database, the option Data field for storage can be used: Data field for storage: Result Query: SELECT FieldA FROM Table WHERE Id = 100 The result (content of the field FieldA) will be saved in a data field called Result. Example: In order to be able to query and use multiple fields from an external database, the following configuration can be used: Data field for storage: [not set] Data field prefix for storage: Json_ Query: DECLARE @data NVARCHAR(max) = {#WorkflowItem.Fields["MyJsonField"].Text#} SELECT JSON_VALUE(@data, '$.QMCId') AS 'QMCId', JSON_VALUE(@data, '$.SAPBusinessPartner') AS 'SAPBusinessPartner', JSON_VALUE(@data, '$.CustomerName') AS 'CustomerName', JSON_VALUE(@data, '$.Street') AS 'Street', JSON_VALUE(@data, '$.HouseNumber') AS 'HouseNumber', JSON_VALUE(@data, '$.Zip') AS 'Zip', JSON_VALUE(@data, '$.City') AS 'City', JSON_VALUE(@data, '$.Technology') AS 'Technology' In order to save the result, separate data fields with the prefix Json_will be created automatically. The column name from the result will then be added to this prefix. In this example, each property of the JSON object is listed separately and directly written into the Workflow item. These data fields can then be used in the workflow. The more fields are queried from the data source, the more data fields will be created. |
|
Execute WebService 
Old icon: |
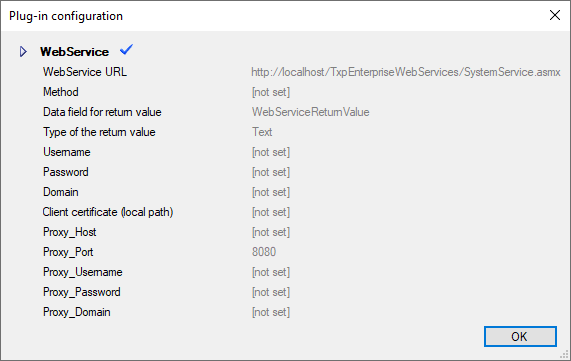
This plug-in allows for calling a web service and storing its return value in a data field. It is furthermore possible to fill the parameter values that are expected by a web service from data fields originating from user actions. Example: Whenever external web services are to be called in order to gather information from them, this plug-in has to be selected. There is an internal web service, which is to be queried due to a ticket field; the ticket field is read out first and then the read out value is submitted as a parameter to the web service. The result will be saved in a data field and can then be used in the continuing workflow. Configuration
The configuration of the plug-in varies due to the number of parameters required by the selected web service method. These parameters will be displayed dynamically after the selection of the method and the specification of the web service URL. WebService URL: The URL to the web service is to be specified here. Method: The name of the method to be used in the web service can be selected here. Data field for return value: Contains a name for the data field the return value of the web service method is stored in. Type of the return value: The data type of the return value is specified here. There are two settings available: Text or binary data. Further options: Access data and proxy configurations can be stored here.
|
|
HTTP Post 
Old icon: |
With this plug-in, data can be sent to a service via the HTTP POST method and return values recieved. The plug-in can be used for retrieving data from a web server. Configuration
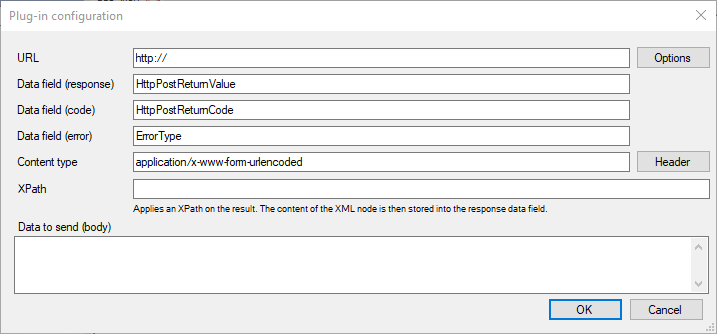
URL: The URL the query is to be sent to. Data field (response ): A unique name for a data field (attachment) the response is to be stored in has to be specified here. Data field (code): A unique name must be specified for a data field in which the code is to be stored. Data field (error): The error type is saved under the name specified here. Content type: The content type can be specified in this field. XPath: An XML path used for selecting and reading the desired data from the returned XML can be specified here. Data to send (body): This text box contains data that are to be sent to the web server during the query. This field can remain empty. |
|
Ping 
Old icon: |
This plug-in allows for sending a Ping to each computer or network device registered as a CI in order to check its general availability. The plug-in has two outputs: Reachable and Unreachable. If the CI is not reachable, the reason (e.g. timeout) is written into the specified data field. Configuration Address: An expression for determining the required IP address is necessary here. Alternatively, a static IP or host name can be entered here as well. Data field name for the status: The returned status (reachable or unreachable) is written into this data field. |
|
Set geo location 
Old icon: |
Sets the geographical location of a ticket using the specified coordinates or expressions that would return coordinates. This plug-in can be enabled and disabled (red cross). Configuration
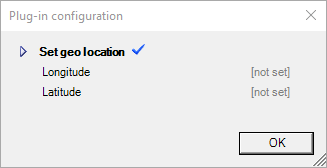
Longitude: Entering the geographic length. Latitude: Enter the geographical width. The coordinates are displayed in the ticket under Details.
|
|
Set pin color 
Old icon: |
Sets the pin color of a ticket for the map using the specified colors or expressions that would return color. This plug-in can be enabled and disabled (red cross). Configuration Pin color: Enter the desired color. |
|
Toggle synchronization
Old icon: |
Enables or disables synchronization of the ticket to another instance of the 446 Plattform®. |
|
Transform Xml 
Old icon: |
This plug-in transforms a specified XML in a way that allows for storing the individual values in data fields. Example: This plug-in is often necessary when web services are queried via HTTP POST data. They are mostly returned as an XML structure, from which only one value is needed. This plug-in helps to filter values from the XML via XSL and then store them in a data field, which can be further used in the workflow. Configuration: XML: Contains the XML to be transformed. Expressions and data fields can be used here. XSLT: The XSLT to be used for the transformation. Expressions and data fields can be used here. Data field for the result: A name of the data field for the storage of the transformation result. Language for expressions: Contains the language to be used for parsing expressions. |





















 Copyright (c) 2000-2026 Isonet AG