Master Data
The Master Data is accessible through Settings > Administration > Master Data.
Via the Master Data management, information that is needed regularly during the daily work can be saved and categorized on the system, for example. In doing so, they can be used analogously to system variables of an operating system.
The values stored in the Master Data Management can be used via expressions at any location, at which the use of expressions is generally possible, e.g. in workflow plug-ins, ticket actions, and messaging templates.
Additionally, to the categories, validity periods can be defined for master data entries as well. Thus, multiple values can be stored for a master data entry, which then will alternate in their validity automatically.
Master Data Categories
The categories of the master data are designed for a simple subdivision of the various information.
They a comprised of the name and a short description.

Note:
Please do not use umlauts or special characters in the category names, as they will be used as part of the expressions later on.
Creating and Deleting Categories
Categories can be created via the New category button top right in the category overview. In doing so, entering an unique name is mandatory. The description of a category is not mandatory, but allows for an additional definition of the category beyond its name.
For deleting categories, the Actions menu can be used. After selecting a category, it can be deleted from the system via the entry Delete.
Note:
Only categories not containing master data entries can be deleted. These have to be deleted separately beforehand.
Managing Master Data
After all categories have been drawn up, the actual master data can be created.

New master data can be created via the button New entry top right in the master data overview.
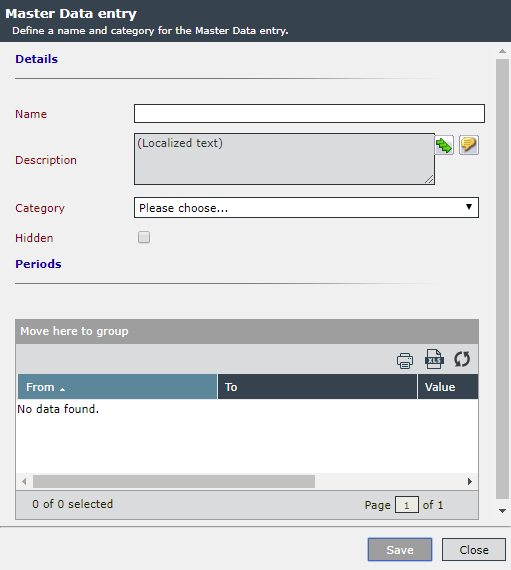
In the next dialog, the following settings can be made:
Name: The name of the master data entry is mandatory. No umlauts or special characters should be used here, as the name will become part of an expression later.
Description: A description of the master data entry. The description is not mandatory, but allows for an additional definition of the entry beyond its name.
Category: All categories created previously can be selected for the master data entry here.
Hidden: This option allows you to hide the value of the time periods. If this option is activated, the display in the master data list is masked by asterisks.
Periods: The time periods can be used to store values for a master data entry. From- and to-values can be defined. These allow these values to be valid for a limited period of time. At this point, you can define as many time periods as you like, but they must not have any gaps or overlaps. By defining time periods, different values can be used at separate times.
After entering all data, the values must be saved.
Using Master Data
The completed master data can now be used anywhere the use of expressions is possible, e.g. in
- workflow plug-ins,
- message templates,
- ticket actions.
The master data entries can be accessed using Sharp-Expressions:
{#General.MasterData("myCategory", "myKey")#}
Note:
Whenever a wrong expression is entered (e.g. due to a spelling error or a non-existent category or master data field) an empty string is returned.
Warning:
The option for accessing a SharePoint presented in the following example is extremely insecure, as the user name and password will be transmitted as plaintext. Passwords should generally not be transmitted as plaintext! This example is only designed to illustrate the use of the Master Data Management.
Example:
- A category Sharepoint has been created.
-
For this category, the following master data with an unlimited validity has been created:
- Password with the value 123
- User with the value user
- Host with the value sharepoint
If now a SharePoint page is to be opened via a ticket, using the user configured in the master data, the ticket action External link could be used, for example.
Instead of a fixed URL, the following text is to be entered into the ticket action for this purpose:
http://www.{$General.MasterData["Sharepoint"]["Domain"]$}%5c
{$General.MasterData["Sharepoint"]["User"]$}:
{$General.MasterData["Sharepoint"]["Password"]$}@mydomain.com
This would result in
http://www.sharepoint%5cBenutzer:
123@mydomain.com
when executing the action, without the executing user having to enter or know a user name or password for the login.
At the turn of the year in particular, it may be desirable to carry out a process changeover automatically on a certain date (for example, from 01 January 00:00). There are two ways to do this:
- With master data flag
A flag can be stored using the master data configuration, e.g. DispatchToNewFirstLevelGroup. The date-based values assign the flag the value no until the end of the year and the value yes on January 1. Now the following expression can be used in the workflow to set up the switches:
{$General.MasterData["Flags"]["DispatchTo
NewFirstLevelGroup"] = "yes"$} You can also use the expression in a dispatching rule. The expression is created as a dispatching condition:
{$General.MasterData["Flags"]["EnableDispatchingToTele"]$}
Comparison type: equal
Comparison value: yes
This means that only the dispatching plug-ins can be used in the workflow instead of expressions.
- Without master data flag
With the Sharp-Expressions it is possible to perform date comparisons directly in an expression:
{#DateTime.Now >= new DateTime(2019, 1, 1)#}
Parameters: year, month, day.
Note:
Text-based date comparisons are not advisable. The terms 10.2.2019 and 2019-2-10 can mean either 10 February or 2 October, depending on the server localization.
If the above expression is used in a dispatching switch, the comparison value must be True. A boolean expression can be used directly in the workflow.


 Copyright (c) 2000-2026 Isonet AG